MTD Yardman Pulley Removal.

hs5424

Member
Joined
May 30, 2018
Threads
2
Messages
34
I own the machine from new. Took it out of the box myself about 1996.
I guess yardman fitted the engine to their mower and fitted the manual choke and put the small screw in place to stop the auto choke facility that came already fitted to the engine. Easier to put the stopper screw in place than remove the auto choke linkage. I am going to take a look for some carburetor repair kits as I think it's leaking some fuel into the block while its sitting idle.
 

hs5424

Member
Joined
May 30, 2018
Threads
2
Messages
34
UPDATE,
Fitted new float and float needle but still flooding when not running. Everything looks clean inside carb.
 

Fish

Lawn Pro
Joined
Aug 2, 2013
Threads
11
Messages
5,130
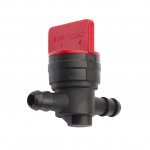
Get one of these, and shut it off when the mower sits.
shutoff.jpg
 

hs5424

Member
Joined
May 30, 2018
Threads
2
Messages
34
Thanks guys,
I am pretty sure that I cleaned all jets etc recently, however I will remove the carb later today and use my inspection scope to take a close up inspection. If all looks ok I will put a shut off tap on it as suggested by Fish. I was thinking about doing this but wondering how do I remember to shut it off when the mower is not in use. Maybe a 12v solenoid shut off would be an option.
I will post the outcome.
 

bertsmobile1

Lawn Royalty
Joined
Nov 29, 2014
Threads
64
Messages
24,702
Flip the carb upside down
the weight of the float should hold the needle down hard enough so you can not blow through the intake .
 

hs5424

Member
Joined
May 30, 2018
Threads
2
Messages
34
Would have tried that earlier. I polished the seat where the needle rests and inspected it under the microscope and all looks good, however one thing on the carb is not original and that it the O ring on the bowl. I was thinking that if the non original O ring was a thicker gauge ( which I am almost certain it is ) then this could have an effect on the volume of gas in the bowl etc. I was expecting the correct one to arrive with the needle and float last week but it is on back order. I am going to do nothing until I receive and fit it. It will be interesting to see if it has any effect on the problem.
Watch this space.
 

wolfey01

Member
Joined
Aug 9, 2017
Threads
6
Messages
33
UPDATE.,
I had to make an attachment to fit tight to the crankshaft and put pressure against the pulley shoulder using an hydraulic pullers. Severe pressure was required to remove the pulley. I now have the piston and rings removed and I am going to order a new set of rings, wheather the originals are worn or not. Everything looks very clean inside the crank case and the piston appears to have no side movement when in the barrel. Theres no sign of scoring or wear in the cylinder barrel . Does anyone know if I insert one of the rings into the cylinder what gap should I expect between the ring ends. I know I would probably need a new ring to insert first and make comparsons. Also, when putting all back together again what type of gasket do you suggest for the crank case.
See pulley removal setup.
Congratulations .
Buy the gasket rebuild kit most will have multiple sump gaskets which are used to set the end float on the crank .
Measure the depth that the sump oil seal is set to and write it down as too deep will cause oil flow problems
When you replace the pulley use liberal amounts of nickel anti sieze on the shaft ,'
Fill the key way, push the pulley back up then push some more up the key way and next time it will drop off into your hands.
All bar one of these I have done had the belt keepers bent back because the owners could not pull the pulley down far enough to replace the drive belt.
To give you ring gaps we will need the full engine numbers that are stamped into the rocker cover
If you can get something between the sump and the pulley that bears against the boss and not the edge of the pulley like some tyre irons or wrecking bars.
Flip the engine upside down and put a cap screw into the end of the crankshaft to protect it.
Then with an air hammer lay into the end of the cap screw.
With the weight of the engine plus the 1,000 little whacks a minute it will usually shock the pulley off. very slowly .
A bit of heat will not hurs as will some of your favourite penetrant poured down the key slot.
Some I have done here have taken the best part of a full day to do but they all come off in the end.
The important thing is to only press on the boss part of the pulley and of the flange part of the pulley.
I just went through the same problem. Pry bar above the pulley while using impact hammer on side of pulley boss. Do yourself a favor and use anti seize on crank where pulley mounts. Will make it much easier next time.
 

hs5424

Member
Joined
May 30, 2018
Threads
2
Messages
34
I gave the shaft a good clean with very fine paper and applied plenty of grease when re-installing the pulleys. Hope you can see what I had to make up to get the pulley removed. I would guess that a few tons of pressure was applied in order to get it to let go. Copy and paste this link to see my pulley removal tool https://www.dropbox.com/s/24j4aru0s0fx0x2/20200328_113756.jpg?dl=0
By the way, my carb is still allowing fuel to get into the block when not in use. I fitted the new O ring on the carb bowl today and still the problem is there. To recap I fitted new float, needle, bowl O ring and polished seat. I think I will follow the advise posted by fish and fit a tap on the gas line and maybe order a cheap Chinese carb after the cutting season. I see from the packaging of the spares I received that they are ''genuine Briggs and Stratton'' spare parts made in China.
 

hs5424

Member
Joined
May 30, 2018
Threads
2
Messages
34
Success at last.
Cured carb flooding. Now before I explain what I did, I realize that the needle seat was the only component that I did not change to fix the flooding because (a), I would need to order one which would take a few weeks to receive and (b), there is a very slight possibility that after the wait the problem could still exist. I wanted to prove the seat was the problem before I ordered one. When I used the microscope to examine the seat I noticed that although it was spotless from the polishing I had carried out on it previously its orifice looked rounded at its edges. Maybe this is how it should be but I thought it should be the same shape as the rubber on the top of the needle in order for both seat and needle to have max surface area contact and provide a good seal. Here is what I did.
I got a 1.5mm drill bit and under the microscope I placed it along side the carb needle and compared the shape of the needle rubber with the drill bit cutting edge. The needle rubber is much more pointed than the drill bit so I gave the drill bit a quick dressing on the grinding stone so that its cutting face matched the angle of the rubber on the needle. I then used my dremel tool at slow speed and ran it in the seat orifice for about 1 second with very little pressure. Now the seat has a'' beveled'' edge to its orifice. I tested the carb outside the engine with a clear fuel line, marked the fuel level in the line and after 1 hour it remained at the same level. Before my mod I observed the fuel level dropping about 1'' in 15 mins or so until fuel would appear out the front of the carb. My description may seem long winded but in fact it took me less that 5 minutes to complete. Worth considering if you don't have a spare seat and you need to get up and running quickly. Probably quicker than replacing the seat.
N.B.
My microscope isn't a microscope at all . I use a lens in reverse from an old video projector.
Hope this helps others.
 
Top