New to me Tiger Cat

Mad Mackie

Lawn Addict
Joined
Jul 11, 2011
Threads
50
Messages
1,851
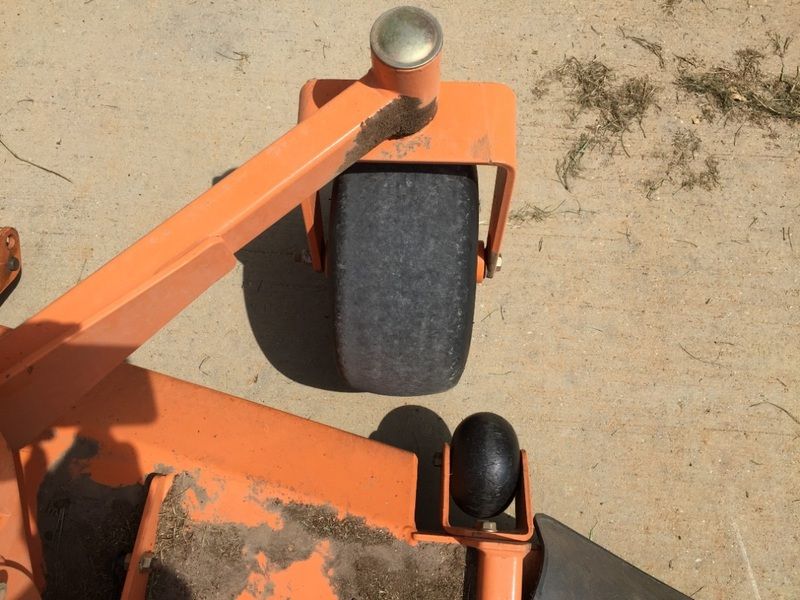
Due to the design of the deck, the right front caster wheel is set farther forward than the left to allow clearance.
 

Sonders

Well-Known Member
Joined
Aug 26, 2013
Threads
26
Messages
184
Thats kinda what I figured that the right wheel is supposed to be slightly forward of the left wheel. Didn't get a chance to stop by dealer saturday so going to try to run over on lunch break one day this week and get a better look. The right arm has got to be bent slightly back on mine, about the only possibility I can come up with.

In other news I got my replacement decals put on to freshen it up. Going to sand the bad spots on the deck this weekend and get them painted.
 

kwak

Member
Joined
Jul 18, 2012
Threads
0
Messages
36
Sorry it took so long but here is the picture of mine, again it is a 2013 Tiger Cat.
Scag TC 2.jpg
Scag%20TC%202.jpg
 

Sonders

Well-Known Member
Joined
Aug 26, 2013
Threads
26
Messages
184
Thanks for posting up kwak. I went to dealer today and measured the width from top of caster left to right. Mine is exactly an inch further apart. I'll try to pull the front caster mount bar off sometime and maybe put it in vise and try to rig up a way to use porta-power on it or something.
 

Steve0853

Active Member
Joined
Jul 12, 2011
Threads
4
Messages
73
Steve0853,
Here are the basics of correct Scag deck leveling.
Flat and level area to place the machine on.
Correct tire pressure.
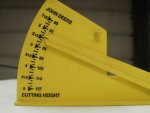
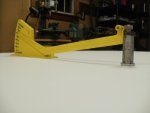
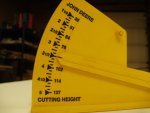
Position the deck height adjuster in 3 1/2" position, unlock the deck.
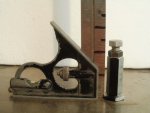
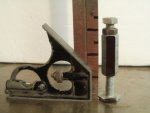
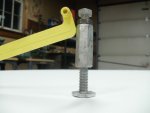
I measure the actual blade height with a small tool that I made up. I will take a pic of it and post it, I'm not sure where it is at the moment, tool boxes are in my trailer.
Clean or new blades installed.
The front deck hanger levers are a fixed unit. Basically one piece as far as we are concerned, no adjustment other than the fine adjustment on the left front chain.
The rear hanger levers are independent from each other, and are held inposition by the rods that connect them to the front hanger levers.
The rear of the deck are the only leveling adjustments. Moving the nuts on the rods will change the adjustment.
Position the outboard blades forward and check the height at the blade tip forward and aft.
The forward facing blade tip should be 1/8 to 3/16 of an inch lower than the rear facing blade tip.
When you have performed these adjustments to both sides of the deck, and know the blade height, then you adjust the height to match the adjustable stop by turning the short rod. Raise up the deck to lock it and make sure that the deck up stops are not stopping the deck from locking in the up position.
You may need to reposition the deck height position pin to more closely match the actual blade height and readjust the short rod so the deck will lock in the up position.


Thanks Mackie. I'm going to level my deck this weekend.
 

Mad Mackie

Lawn Addict
Joined
Jul 11, 2011
Threads
50
Messages
1,851
I found my blade height measuring tool and I will take a pic of it and post it.
 

Sonders

Well-Known Member
Joined
Aug 26, 2013
Threads
26
Messages
184
Would definitely be interested in seeing your blade height measuring tool Mad Mackie.
Finally got some better pictures of front of my mower to show the wheel arm issue.


Mad Mackie

Lawn Addict
Joined
Jul 11, 2011
Threads
50
Messages
1,851
Here are pics and a description of my blade height measuring tool.
The long nut is for connecting threaded rods together. This nut is threaded to 3/8-16.
The top bolt and nut are at a fixed setting.
The bottom bolt is from an appliance and originally had a plastic shoe on it. As it has a large flat head, it works fine for this application.
As this is threaded to 16 threads per inch, one full turn is 1/16" for easy measurement.
I have marked both the bolt and long nut so I can count the turns.
It is setup at a low height of 2 1/2" and extends up to 3 1/2" in 1/16" increments.
Click on the links to the jpegs.
The yellow John Deere gauge is a pain to work with, but available at a JD dealer.
Have fun!!!
 

Attachments

  • P8210001.JPG
    P8210001.JPG
    79.3 KB · Views: 8
  • P8210002.JPG
    P8210002.JPG
    78.4 KB · Views: 6
  • P8210003.JPG
    P8210003.JPG
    75.5 KB · Views: 8
  • P9040001.JPG
    P9040001.JPG
    70.2 KB · Views: 10
  • P9040002.JPG
    P9040002.JPG
    70.2 KB · Views: 11
  • P9040003.JPG
    P9040003.JPG
    69.6 KB · Views: 10
  • P9040004.JPG
    P9040004.JPG
    72.8 KB · Views: 7
  • P9040005.JPG
    P9040005.JPG
    58.6 KB · Views: 10

Mad Mackie

Lawn Addict
Joined
Jul 11, 2011
Threads
50
Messages
1,851
Hi Sonders,
There is no doubt that the front weldment is bent back at the right caster. This part is available from Scag but no doubt pricey!!!
You can remove this piece and take it to a frame straightening shop, you will need to get the measurements from another 61" Tiger Cat.
I have the same suspension seat on my machine that I put on. As it is much heavier than the stock seat and doesn't have a switch in it, I'm going to add two more seat springs. I have the pieces from Scag and will weld in the two seat springs after I makeup the mounts for them.
I only have a small area to put the new sear springs.
As you machine was originally equipped with the suspension sear with a switch, the seat support doesn't have these installed in it.
Fortunately this support is easily removed from the machine making this job fairly easy. P8200009.JPG
 

Sonders

Well-Known Member
Joined
Aug 26, 2013
Threads
26
Messages
184
Would be nice if they made these with individual bolt on arms that can be replaced cheaper like on the Turf Tiger. Definitely going the bending route vs buying a new one.
I was wondering what those springs looked like. I had thought of adding them to mine just so the seat base plate wouldn't rub on that bottom piece. But like you mentioned the suspension seat is to heavy for those springs, I won't waste my money on them.
 
Top