You are using an out of date browser. It may not display this or other websites correctly.
You should upgrade or use an alternative browser.
You should upgrade or use an alternative browser.
Export thread
Kohler CH740 power issues.
#1

F150Fan80

F150Fan80
Well my first real post on the forum, here goes.
I have a Kohler Command Pro 27 (according to the carb cover anyway) that has a loss of power at speed. I know, not a another one. Lol. This is a CH740-0037 Morridge engine with serial number 3631007811 and a build date of 11/6/2006. This is in a 2007 Grasshopper 727K2 with a manual height (want Powerfold) adjust 3461 deck. The engine wants to die when the deck is engaged. Sometimes it does die. Also it is a little hard starting. Now usually I can throw whatever I want at this machine to mow and it takes it all with no issues. The last couple of mows this year was a little rough since it would bog down and really struggle is spots where it would just chew the grass up and spit it out.
Here's the list of things that I have looked through or changed out trying to chase this issue down. I have already changed out the head gaskets about 400 hours or so ago. The engine has about 880 or so on it now. I have changed out the fuel filter with a Kohler one. I have changed the fuel pump, rebuilt and cleaned the carb, replaced the coils. I even checked everything on the deck and it moves with relative ease. I have replaced all the drive pulley bearings for the hydros. I have even changed the PTO clutch thinking it was wearing out. That turned out to be true but not the issue.
I haven't checked compression or fuel solenoid yet. I plan on doing that this afternoon. I'm starting to run out of ideas here. If there is anything else that I could check or send me in the right direction it would be greatly appreciated. This machine may become my snow removal machine so I want this running great. That is a discussion for another thread to be started soon. :laughing:
Thanks for any advice in this!!
Edit: Can we add this forum to Tapatalk? Maybe a different app? Thanks!!
Attachments
#2

tom3
tom3
I suspect the compression test will lead to the problem. Valve adjustment or loose rocker (hydraulic lifters?) , push rod(s) bent, maybe a head leaking even though they were replaced at one time.
#3

F150Fan80
I was unable to get to the compression test yesterday so today will hopefully lead to some answers, or more questions. LOL I do believe this has hydraulic lifters so there shouldn't be any valve adjustment. I do think that I have read that the lifters can fail in these leading to compression issues. Knowing my luck it will be something more expensive though.
F150Fan80
I suspect the compression test will lead to the problem. Valve adjustment or loose rocker (hydraulic lifters?) , push rod(s) bent, maybe a head leaking even though they were replaced at one time.
I was unable to get to the compression test yesterday so today will hopefully lead to some answers, or more questions. LOL I do believe this has hydraulic lifters so there shouldn't be any valve adjustment. I do think that I have read that the lifters can fail in these leading to compression issues. Knowing my luck it will be something more expensive though.
#4

F150Fan80
Well I was able to do the compression test. I ran the mower at about half throttle outside for about ten minutes or so and then brought it back inside the warm shop. Here is what I found. One side was 125-135 psig and the other side was 90-100 psig. Needless to say this wasn't the outcome I was looking for. The side with the higher compression had some oil on the plug. Not sure what I am going to find with this yet. Now it is time to clean the benches off to pull the motor and go from there. I should be able to pull the heads with the engine still in the frame which I might do but I feel that it will be easier to just do it on the bench.
F150Fan80
I suspect the compression test will lead to the problem. Valve adjustment or loose rocker (hydraulic lifters?) , push rod(s) bent, maybe a head leaking even though they were replaced at one time.
Well I was able to do the compression test. I ran the mower at about half throttle outside for about ten minutes or so and then brought it back inside the warm shop. Here is what I found. One side was 125-135 psig and the other side was 90-100 psig. Needless to say this wasn't the outcome I was looking for. The side with the higher compression had some oil on the plug. Not sure what I am going to find with this yet. Now it is time to clean the benches off to pull the motor and go from there. I should be able to pull the heads with the engine still in the frame which I might do but I feel that it will be easier to just do it on the bench.
#5
B
bertsmobile1
B
bertsmobile1
Before you go ripping the engine out test the governor
Start by resetting it then go for a test mow
If it is no better then put a length of string / wire on the governor arm so you can manually over ride it to give the engine more throttle when it is under load.
Did this just happen over time or did it happen after you had done something
Do a double check that the choke is fully open when the mower is in run mode.
Also check that the throttle cable has not slipped so the throttle is not putting enough stretch on the governor spring.
#6

F150Fan80
I more I think about I believe that it has been more gradual but seems to have gotten much worse the last couple times I have mowed. Unfortunately we have snow on the ground now and I'm not able to test mow currently. I have reset the governor a few times due to surging when unloaded. I don't see a way however to not pull the heads since this engine needs at least 160 psig in each cylinder. The choke appears to be moving freely and completely in both directions. I guess I could just engage the deck and move the governor arm by hand and see what happens. The low compression numbers do point to head removal though.
F150Fan80
Before you go ripping the engine out test the governor
Start by resetting it then go for a test mow
If it is no better then put a length of string / wire on the governor arm so you can manually over ride it to give the engine more throttle when it is under load.
Did this just happen over time or did it happen after you had done something
Do a double check that the choke is fully open when the mower is in run mode.
Also check that the throttle cable has not slipped so the throttle is not putting enough stretch on the governor spring.
I more I think about I believe that it has been more gradual but seems to have gotten much worse the last couple times I have mowed. Unfortunately we have snow on the ground now and I'm not able to test mow currently. I have reset the governor a few times due to surging when unloaded. I don't see a way however to not pull the heads since this engine needs at least 160 psig in each cylinder. The choke appears to be moving freely and completely in both directions. I guess I could just engage the deck and move the governor arm by hand and see what happens. The low compression numbers do point to head removal though.
#7

ILENGINE
According to Kohler those compression readings are low for both cylinders. Kohler says 160+ for the Command twin engines since they don't use compression release.
Was typing up my response when you posted about tearing the engine down on the bench.
ILENGINE
Well I was able to do the compression test. I ran the mower at about half throttle outside for about ten minutes or so and then brought it back inside the warm shop. Here is what I found. One side was 125-135 psig and the other side was 90-100 psig. Needless to say this wasn't the outcome I was looking for. The side with the higher compression had some oil on the plug. Not sure what I am going to find with this yet. Now it is time to clean the benches off to pull the motor and go from there. I should be able to pull the heads with the engine still in the frame which I might do but I feel that it will be easier to just do it on the bench.
According to Kohler those compression readings are low for both cylinders. Kohler says 160+ for the Command twin engines since they don't use compression release.
Was typing up my response when you posted about tearing the engine down on the bench.
#8

Fish
Fish
Unplug one plug wire and try to start. Then plug it back in and remove the other one and try.
Tell us what you find.
Tell us what you find.
#9

F150Fan80
That is where I found those numbers myself, although I almost missed it. Thoughts on pulling the heads and inspecting?
F150Fan80
According to Kohler those compression readings are low for both cylinders. Kohler says 160+ for the Command twin engines since they don't use compression release.
That is where I found those numbers myself, although I almost missed it. Thoughts on pulling the heads and inspecting?
#10

F150Fan80
I assume you're wanting me to see if it is running on one cylinder or not and to try and figure out which one could it be? I could do this. I will say though when I start the engine cold it seems to fire on one cylinder and then will run on two after 10 seconds or so. After it starts running on two it seems to stay that way.
F150Fan80
Unplug one plug wire and try to start. Then plug it back in and remove the other one and try.
Tell us what you find.
I assume you're wanting me to see if it is running on one cylinder or not and to try and figure out which one could it be? I could do this. I will say though when I start the engine cold it seems to fire on one cylinder and then will run on two after 10 seconds or so. After it starts running on two it seems to stay that way.
#11

ILENGINE
I would start with a leakdown test to see where you are loosing compression.
ILENGINE
That is where I found those numbers myself, although I almost missed it. Thoughts on pulling the heads and inspecting?
I would start with a leakdown test to see where you are loosing compression.
#12

F150Fan80
This would be my first time doing a leak down test. I read through the service manual and it seems very straight forward. Any tips for performing the test? Easiest way to determine a leak? Soapy water maybe?
F150Fan80
I would start with a leakdown test to see where you are loosing compression.
This would be my first time doing a leak down test. I read through the service manual and it seems very straight forward. Any tips for performing the test? Easiest way to determine a leak? Soapy water maybe?
#13

ILENGINE
ILENGINE
You use your ears. If the air from the cylinder is coming out of the air filter housing then you have a leaking intake valve, not to be confused with air that could be coming out of the breather tube connected to the air filter housing from the engine block, but this can be prevented by removing the dipstick. . If air coming out of muffler then exhaust valve leaking. If air is rushing out of the dipstick tube then that would be worn/damaged rings or blown head gasket. Some air coming out of the dipstick tube is normal since there will be air bypassing the rings to some extent. Also air leaking past the valve can mask worn rings or head gaskets issues.
You will need to pull the head in the end but it will give you some direction to what to look for.
You will need to pull the head in the end but it will give you some direction to what to look for.
#14

F150Fan80
Sounds great. Thank you for the insight. My thoughts on the soapy water was mainly due to a really badly blown head gasket but the way you explained it makes perfect sense. I should be getting the tester tomorrow and should be able to test it tomorrow night. I will update once I perform the test. Thank you everyone for the help so far!
F150Fan80
You use your ears. If the air from the cylinder is coming out of the air filter housing then you have a leaking intake valve, not to be confused with air that could be coming out of the breather tube connected to the air filter housing from the engine block, but this can be prevented by removing the dipstick. . If air coming out of muffler then exhaust valve leaking. If air is rushing out of the dipstick tube then that would be worn/damaged rings or blown head gasket. Some air coming out of the dipstick tube is normal since there will be air bypassing the rings to some extent. Also air leaking past the valve can mask worn rings or head gaskets issues.
You will need to pull the head in the end but it will give you some direction to what to look for.
Sounds great. Thank you for the insight. My thoughts on the soapy water was mainly due to a really badly blown head gasket but the way you explained it makes perfect sense. I should be getting the tester tomorrow and should be able to test it tomorrow night. I will update once I perform the test. Thank you everyone for the help so far!
#15

Fish
Fish
Have you tried the plug wire pulling test??
It doesn't cost anything, and could tell you a lot.
It doesn't cost anything, and could tell you a lot.
#16

F150Fan80
Out of curiosity what would it tell me? I must be missing something. I know I have low compression in both cylinders. With it possibly running on one cylinder what else will it tell me?
F150Fan80
Have you tried the plug wire pulling test??
It doesn't cost anything, and could tell you a lot.
Out of curiosity what would it tell me? I must be missing something. I know I have low compression in both cylinders. With it possibly running on one cylinder what else will it tell me?
#17

Fish
Fish
Knowing which side is causing the problem would be nice, then you know which side to look at.
Could be a pushrod loose, ignition problem, who can know. But a simple test that takes less than 2 minutes, and will help you isolate the problem, plus it would cost you absolutely nothing.
Could be a pushrod loose, ignition problem, who can know. But a simple test that takes less than 2 minutes, and will help you isolate the problem, plus it would cost you absolutely nothing.
#18

Fish
Fish
Hell, it could just be a bad/fouled plug.
I once knew a guy that started to pull the engine on his truck, because the engine was "locked up". Turns out to be just a locked up alternator. Check the simple chit first.
I once knew a guy that started to pull the engine on his truck, because the engine was "locked up". Turns out to be just a locked up alternator. Check the simple chit first.
#19

F150Fan80
That makes sense. I will do that tomorrow morning. I will be getting at it first thing. I will follow up with the leak down test. This may point to other things being wrong however with compression that low in both cylinders I am not sure that I will yield any decent results by pulling the plug wires. Who knows, maybe I'll be surprised.
F150Fan80
Hell, it could just be a bad/fouled plug.
I once knew a guy that started to pull the engine on his truck, because the engine was "locked up". Turns out to be just a locked up alternator. Check the simple chit first.
That makes sense. I will do that tomorrow morning. I will be getting at it first thing. I will follow up with the leak down test. This may point to other things being wrong however with compression that low in both cylinders I am not sure that I will yield any decent results by pulling the plug wires. Who knows, maybe I'll be surprised.
#20

F150Fan80
I tried the pull test. It seems like one side is trying to start more than the other side. The side that had the higher of the compression readings was trying to start easier. I will be doing the leak down test next and seeing where that leads.
F150Fan80
Have you tried the plug wire pulling test??
It doesn't cost anything, and could tell you a lot.
I tried the pull test. It seems like one side is trying to start more than the other side. The side that had the higher of the compression readings was trying to start easier. I will be doing the leak down test next and seeing where that leads.
#21

F150Fan80
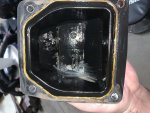
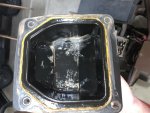


So I got to the leak down test. Warmed up the engine for about ten minutes. I ended up taking the valve covers off to help find TDC on compression. Good news is that it seems like the valves are sealing decently. Bad news is it appears that the rings are worn. Looking at a complete rebuild at this point from what I gathered. Also noticed some white stuff under the valve covers. The plugs looked weird to me. The oily one came from the side with the better compression. The other plug came from the side with the lest compression.
F150Fan80


You use your ears. If the air from the cylinder is coming out of the air filter housing then you have a leaking intake valve, not to be confused with air that could be coming out of the breather tube connected to the air filter housing from the engine block, but this can be prevented by removing the dipstick. . If air coming out of muffler then exhaust valve leaking. If air is rushing out of the dipstick tube then that would be worn/damaged rings or blown head gasket. Some air coming out of the dipstick tube is normal since there will be air bypassing the rings to some extent. Also air leaking past the valve can mask worn rings or head gaskets issues.
You will need to pull the head in the end but it will give you some direction to what to look for.
So I got to the leak down test. Warmed up the engine for about ten minutes. I ended up taking the valve covers off to help find TDC on compression. Good news is that it seems like the valves are sealing decently. Bad news is it appears that the rings are worn. Looking at a complete rebuild at this point from what I gathered. Also noticed some white stuff under the valve covers. The plugs looked weird to me. The oily one came from the side with the better compression. The other plug came from the side with the lest compression.
#24
B
bertsmobile1
B
bertsmobile1
As fish mentioned the milky colour is water and common to find it in rocker boxes where water can condense overnight depending upon the local weather conditions, nothing much to worry about unless all of the oil is milky.
If you do not run the mower for long enough to boil it off it can persist for a very long time.
The plugs both look lean
The left photo just looks too lean and probably the wrong grade of plug.
The right is hard to tell weather the plug is damaged or it is just a bad photo
If I am seeing little chunks taken out of the plug that usually means there is something rattleing around inside the head.
It is what a plug looks like when one of the butterfly screws falls out and gets sucked into a cylinder
#25

F150Fan80
It tried to start on both but I didn't let it go for too long. One side seemed stronger though while trying.
F150Fan80
So neither side will start it?
It tried to start on both but I didn't let it go for too long. One side seemed stronger though while trying.
#26

F150Fan80

No screws have fallen off the carburetor. I have had it off a couple of times in the last two weeks and they are all there. As far as the lean condition I would have to agree. I have never adjusted this on the carburetor since owning the machine. The adjustment is behind an aluminum plug that just recently came off when I installed a rebuild kit. The needle was placed back in the exact same spot where it was. Both plugs are Champion RC12YC, which is what it called for in this. Here is another picture of that other plug. This should be a better view.
F150Fan80

As fish mentioned the milky colour is water and common to find it in rocker boxes where water can condense overnight depending upon the local weather conditions, nothing much to worry about unless all of the oil is milky.
If you do not run the mower for long enough to boil it off it can persist for a very long time.
The plugs both look lean
The left photo just looks too lean and probably the wrong grade of plug.
The right is hard to tell weather the plug is damaged or it is just a bad photo
If I am seeing little chunks taken out of the plug that usually means there is something rattleing around inside the head.
It is what a plug looks like when one of the butterfly screws falls out and gets sucked into a cylinder
No screws have fallen off the carburetor. I have had it off a couple of times in the last two weeks and they are all there. As far as the lean condition I would have to agree. I have never adjusted this on the carburetor since owning the machine. The adjustment is behind an aluminum plug that just recently came off when I installed a rebuild kit. The needle was placed back in the exact same spot where it was. Both plugs are Champion RC12YC, which is what it called for in this. Here is another picture of that other plug. This should be a better view.
#27

ILENGINE
ILENGINE
Looks like possible gas additive deposits on the electrode. Threads on plug look like plug not properly tightened down allowing compression to seep past the threads.
#28

F150Fan80
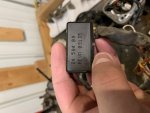
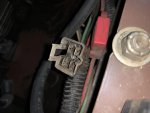
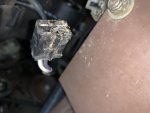
Never thought of that. It was snug in the hole but not as tight as I would have thought. Maybe it wasn't sealing. That side had the best compression during the test. I have the oil draining currently. Once it's done draining the engine is ready to be lifted out and on to the bench. I did happen to notice the wiring harness connector has seen better days. Here are some pictures of that.
F150Fan80
Looks like possible gas additive deposits on the electrode. Threads on plug look like plug not properly tightened down allowing compression to seep past the threads.
Never thought of that. It was snug in the hole but not as tight as I would have thought. Maybe it wasn't sealing. That side had the best compression during the test. I have the oil draining currently. Once it's done draining the engine is ready to be lifted out and on to the bench. I did happen to notice the wiring harness connector has seen better days. Here are some pictures of that.


#29

F150Fan80
F150Fan80
So I recently started working midnights and haven't had much time with the engine. I did get lift it out of the mower (by hand :frown and set it up on the bench. I started tearing it down by removing all the shrouding, plates, muffler, throttle control, etc. It's finally ready for me to pull the heads hopefully this afternoon after I wake up before work. I had started to look around for possible rebuild kits. I have found one site that offers them but not sure if other places do. There were quite a few different options. Not sure what the best one would be but then again I haven't gotten into the engine to see how things look. I will leave the link for the website I found and see what you all think. Should I lap the valves while in there? I'm assuming yes but wanted to what the consensus is. Here are a couple pics of the progress. Also, what do you think about the wiring harness connector here? Looks rough. One terminal looks as though it got pretty hot. Not sure what happened to the plastic. Should it be replaced? Can it be replaced?
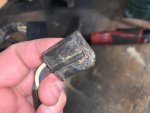
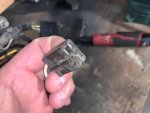
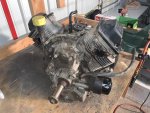
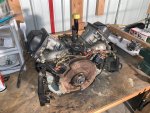
http://www.psep.biz/store/kohler_rebuild_kits.htm


http://www.psep.biz/store/kohler_rebuild_kits.htm
#30

Fish
Fish
Looks like your engine has smartspark, I looked up your engine and it said that you did not, so I didn't suggest it.
That is very likely your problem
That is very likely your problem
#32

F150Fan80
Didn't realize that I had Smart Spark either. This is the one that causes all the issues right? Isn't there a kit that replaces all that? I just replaced the coils too. Lol. Thanks Fish for the page number. Made it really easy to see. I'm guessing that I should just replace that since I'm already in it doing a tear-down. I was able to get the heads removed tonight. It appears that the head gaskets were intact and not leaking, guess I did do that repair correctly. :laughing:
I did take some pictures of the worst head and the inside each of the cylinder to show you all. The cylinders look like there isn't any scoring at all. I may have caught it before it got too bad. Lucky me I guess. Anywho, I'm hoping to get the case apart tomorrow afternoon and I would like to order the rebuild kit soon. Any suggestions on where to get that? I posted the link to the one place I found but not sure if you all have a better option.


F150Fan80
Looks like your engine has smartspark, I looked up your engine and it said that you did not, so I didn't suggest it.
That is very likely your problem
Didn't realize that I had Smart Spark either. This is the one that causes all the issues right? Isn't there a kit that replaces all that? I just replaced the coils too. Lol. Thanks Fish for the page number. Made it really easy to see. I'm guessing that I should just replace that since I'm already in it doing a tear-down. I was able to get the heads removed tonight. It appears that the head gaskets were intact and not leaking, guess I did do that repair correctly. :laughing:
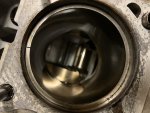
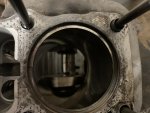
I did take some pictures of the worst head and the inside each of the cylinder to show you all. The cylinders look like there isn't any scoring at all. I may have caught it before it got too bad. Lucky me I guess. Anywho, I'm hoping to get the case apart tomorrow afternoon and I would like to order the rebuild kit soon. Any suggestions on where to get that? I posted the link to the one place I found but not sure if you all have a better option.
Attachments
#33

Fish
Fish
I would just try to repair the burnt connections with a splice. Doing away with the Smartspark involves a new flywheel too.
#34

Fish
Fish
I don't believe that your mower had any other problems, I would clean up the valves, and put it back together and run it. Have the valve heads redone, as that was likely the only spot that you were losing any compression, but even that was minor.
#35

F150Fan80
You think that’s where I was losing compression? During the leak down test it appeared that most of it was going past the rings. I don’t recall hearing anything past the valves. I could be wrong though. I figured since I’m this far I’ll install new rings and such while I’m in it. I had the cover off today to check the insides and there doesn’t look like there is much wear in anything. The governor looks good, as well as the oil pump and camshaft.
F150Fan80
I don't believe that your mower had any other problems, I would clean up the valves, and put it back together and run it. Have the valve heads redone, as that was likely the only spot that you were losing any compression, but even that was minor.
You think that’s where I was losing compression? During the leak down test it appeared that most of it was going past the rings. I don’t recall hearing anything past the valves. I could be wrong though. I figured since I’m this far I’ll install new rings and such while I’m in it. I had the cover off today to check the insides and there doesn’t look like there is much wear in anything. The governor looks good, as well as the oil pump and camshaft.
#36

ILENGINE
ILENGINE
From the cylinder pictures you can tell there is cylinder wear, and the pistons look like they would be able to tilt back and forth. Is there a ridge at the top of the cylinders that you can catch a fingernail on. The newer style thin rings tend to loose their sealing ability after very little wear. After you get the pistons out take one of the rings and slide it back down the cylinder and see how much gap there is.
#37

F150Fan80
I’ll check that out tomorrow afternoon. Thank you. I’ll get off work tomorrow about 630 am and sleep a little when I get home. The afternoon will be spent cleaning everything up on the engine so it’ll be ready to go back together once parts arrive. I’ll either be ordering each part individually or find a kit.
F150Fan80
From the cylinder pictures you can tell there is cylinder wear, and the pistons look like they would be able to tilt back and forth. Is there a ridge at the top of the cylinders that you can catch a fingernail on. The newer style thin rings tend to loose their sealing ability after very little wear. After you get the pistons out take one of the rings and slide it back down the cylinder and see how much gap there is.
I’ll check that out tomorrow afternoon. Thank you. I’ll get off work tomorrow about 630 am and sleep a little when I get home. The afternoon will be spent cleaning everything up on the engine so it’ll be ready to go back together once parts arrive. I’ll either be ordering each part individually or find a kit.
#38

F150Fan80
What problem is there with Smart Spark? I don't really know anything about it.
F150Fan80
Looks like your engine has smartspark, I looked up your engine and it said that you did not, so I didn't suggest it.
That is very likely your problem
What problem is there with Smart Spark? I don't really know anything about it.
#39

Fish
Fish
A wide variety of symptoms, extremely squirrelly and hard to diagnose, start and dies, sometimes on one side.
>You name it...
Usually due to a bad connection somewhere, usually a burned or corroded connection interrupts the power supply to the SmartSpark module, often just a bunch of corrosion at the back of a keyswitch or plug.
>You name it...
Usually due to a bad connection somewhere, usually a burned or corroded connection interrupts the power supply to the SmartSpark module, often just a bunch of corrosion at the back of a keyswitch or plug.
#40

F150Fan80
F150Fan80
Love what I am learning here. So do you think that my harness plug on the engine side could have been an issue Fish? Could it have messed with the control module at all? I'll look through the wiring diagram at some point today and see where that terminal that looks like it's seen some bad stuff runs to. I'll have to check out my ignition switch as well. Couldn't hurt to at least. Do those control modules go out at all? If they do, what are my options to repair that? I don't remember seeing that being available for my engine.
#41

ILENGINE
Kohler is not very forthcoming with what system was used on this engine. Most parts diagrams don't show the SAM unit, but the DSAM is shown on the Dealer parts site, but not the ASAM It shows the ASAM compatible ignition modules with a serial break of below 36339000001, but not the Analog speed advance module It also shows the Speed advance module for after serial number 3633900001 but not the 3 prong ignition modules themselves. They supercede directly to the MDI modules.
It looks like the OP has the ASAM Which uses the two terminal ignition modules. The ignition modules for the ASAM system are available but cannot get the ASAM advance module itself. Problems with the advance module are required to convert it to MDI for this engine which requires the replacement of the flywheel. Conversion kit 24 755 308-s which includes both new modules, and a new flywheel.
ILENGINE
Looks like your engine has smartspark, I looked up your engine and it said that you did not, so I didn't suggest it.
That is very likely your problem
Kohler is not very forthcoming with what system was used on this engine. Most parts diagrams don't show the SAM unit, but the DSAM is shown on the Dealer parts site, but not the ASAM It shows the ASAM compatible ignition modules with a serial break of below 36339000001, but not the Analog speed advance module It also shows the Speed advance module for after serial number 3633900001 but not the 3 prong ignition modules themselves. They supercede directly to the MDI modules.
It looks like the OP has the ASAM Which uses the two terminal ignition modules. The ignition modules for the ASAM system are available but cannot get the ASAM advance module itself. Problems with the advance module are required to convert it to MDI for this engine which requires the replacement of the flywheel. Conversion kit 24 755 308-s which includes both new modules, and a new flywheel.
#42

F150Fan80
Would it be worth it for me to convert it while everything is apart? If it is a better and more reliable setup it seems that it would be in my best interest to do that conversion while everything is apart.
F150Fan80
Kohler is not very forthcoming with what system was used on this engine. Most parts diagrams don't show the SAM unit, but the DSAM is shown on the Dealer parts site, but not the ASAM It shows the ASAM compatible ignition modules with a serial break of below 36339000001, but not the Analog speed advance module It also shows the Speed advance module for after serial number 3633900001 but not the 3 prong ignition modules themselves. They supercede directly to the MDI modules.
It looks like the OP has the ASAM Which uses the two terminal ignition modules. The ignition modules for the ASAM system are available but cannot get the ASAM advance module itself. Problems with the advance module are required to convert it to MDI for this engine which requires the replacement of the flywheel. Conversion kit 24 755 308-s which includes both new modules, and a new flywheel.
Would it be worth it for me to convert it while everything is apart? If it is a better and more reliable setup it seems that it would be in my best interest to do that conversion while everything is apart.
#43

ILENGINE
ILENGINE
It would be easier to convert now with it on the bench than to wait and find out you will have to pull the engine a second time to convert it. If possible could you get the numbers that are printed on the Spark Advance Module to comfirm which module you have. Your engine puts you in the ASAM range but the conversion kit doesn't list your model in the parts bulletin.
#44

F150Fan80
Hopefully this picture helps. I just put these on and they have only been used for roughly ten minutes. Basically brand new.
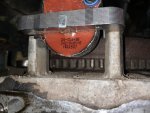
Here are some pictures of each piston and the jug they came out of. I haven't tried to put a ring back in each as of yet. I hope to try that later tonight if I don't get really tired first from getting off midnights.
Side one:
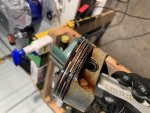
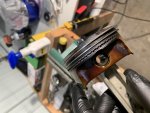
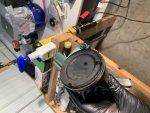
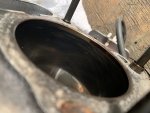
Side two:
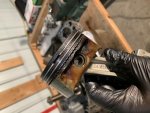
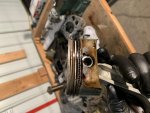
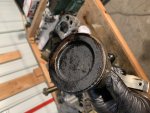
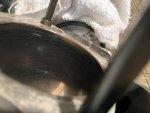
F150Fan80
It would be easier to convert now with it on the bench than to wait and find out you will have to pull the engine a second time to convert it. If possible could you get the numbers that are printed on the Spark Advance Module to comfirm which module you have. Your engine puts you in the ASAM range but the conversion kit doesn't list your model in the parts bulletin.
Hopefully this picture helps. I just put these on and they have only been used for roughly ten minutes. Basically brand new.

Here are some pictures of each piston and the jug they came out of. I haven't tried to put a ring back in each as of yet. I hope to try that later tonight if I don't get really tired first from getting off midnights.
Side one:


Side two:


#46

ILENGINE
ILENGINE
cylinders look good with very little since crosshatch still present. Was looking for the numbers on the spark advance box not the ignition module number, Rings look worn, would like to see picture of ring in cylinder to see end gap.
#47

F150Fan80
F150Fan80
#48

F150Fan80
This was exactly my thoughts. A little honing and good to go after that.
F150Fan80
Bores ought to be good since factory crosshatching is still visible.
This was exactly my thoughts. A little honing and good to go after that.
#49

Scrubcadet10
Scrubcadet10
https://www.youtube.com/watch?v=4IOYxsFS8yw
I think a General rule of thumb is a gap between .010-.020 is good, 020 being the worn end.
I tried to find the ring gap spec, but couldn't.
I think a General rule of thumb is a gap between .010-.020 is good, 020 being the worn end.
I tried to find the ring gap spec, but couldn't.
#50

ILENGINE
New bore end gap is .010-0224 used bore max wear limit is .037 for top and middle rings, they don't give a spec for the oil control ring.
To the OP. that SAM is the Analog Spark Advance Module which requires the kit that I listed. The ring end gaps in the pictures don't look too bad.
ILENGINE
https://www.youtube.com/watch?v=4IOYxsFS8yw
I think a General rule of thumb is a gap between .010-.020 is good, 020 being the worn end.
I tried to find the ring gap spec, but couldn't.
New bore end gap is .010-0224 used bore max wear limit is .037 for top and middle rings, they don't give a spec for the oil control ring.
To the OP. that SAM is the Analog Spark Advance Module which requires the kit that I listed. The ring end gaps in the pictures don't look too bad.
#51

Fish
Fish
I would put it back together, and repair the electrical connections with a splice repair first,
and see how well it runs.
and see how well it runs.
#52

F150Fan80
Thanks for the info and the video. It really solidified what I was already thinking I need to check.
F150Fan80
https://www.youtube.com/watch?v=4IOYxsFS8yw
I think a General rule of thumb is a gap between .010-.020 is good, 020 being the worn end.
I tried to find the ring gap spec, but couldn't.
Thanks for the info and the video. It really solidified what I was already thinking I need to check.
#53

F150Fan80
Sounds great. I'll look into that kit today and see what I can find. Does Kohler have OEM rebuild kits available or should I just piece everything together? I believe I have found an outfit that does offer kits that they put together themselves but wasn't sure if Kohler actually had anything they do as well. These were OEM Kohler parts as well. Those rings were the top compression rings of each piston back in the same bore. I'll get out the feeler gauge today and see where those stand but they looked decent to my untrained eye. LOL
F150Fan80
New bore end gap is .010-0224 used bore max wear limit is .037 for top and middle rings, they don't give a spec for the oil control ring.
To the OP. that SAM is the Analog Spark Advance Module which requires the kit that I listed. The ring end gaps in the pictures don't look too bad.
Sounds great. I'll look into that kit today and see what I can find. Does Kohler have OEM rebuild kits available or should I just piece everything together? I believe I have found an outfit that does offer kits that they put together themselves but wasn't sure if Kohler actually had anything they do as well. These were OEM Kohler parts as well. Those rings were the top compression rings of each piston back in the same bore. I'll get out the feeler gauge today and see where those stand but they looked decent to my untrained eye. LOL
#54

F150Fan80
I think I'll continue with the rebuild since I am already at this stage. I was losing compression somewhere. Maybe I missed it when performing the leak down test but I believed it was coming from the rings and not the valves. I am hoping to get to the heads today and remove the valves to see what their extent of condition is. Between transitioning off of midnights back to the world of the living and on kid control I am not sure how much time I'll actually have working on it.
F150Fan80
I would put it back together, and repair the electrical connections with a splice repair first,
and see how well it runs.
I think I'll continue with the rebuild since I am already at this stage. I was losing compression somewhere. Maybe I missed it when performing the leak down test but I believed it was coming from the rings and not the valves. I am hoping to get to the heads today and remove the valves to see what their extent of condition is. Between transitioning off of midnights back to the world of the living and on kid control I am not sure how much time I'll actually have working on it.
#55

ILENGINE
Kohler doesn't offer everything in one box rebuilt kits. Just too many variables to do that. Kohler does offer complete gasket kits both with and without seals for some of their engines. But other than rings, gasket set is about all you would need. And the retrofit ignition kit if you decide to go that route.
ILENGINE
Sounds great. I'll look into that kit today and see what I can find. Does Kohler have OEM rebuild kits available or should I just piece everything together? I believe I have found an outfit that does offer kits that they put together themselves but wasn't sure if Kohler actually had anything they do as well. These were OEM Kohler parts as well. Those rings were the top compression rings of each piston back in the same bore. I'll get out the feeler gauge today and see where those stand but they looked decent to my untrained eye. LOL
Kohler doesn't offer everything in one box rebuilt kits. Just too many variables to do that. Kohler does offer complete gasket kits both with and without seals for some of their engines. But other than rings, gasket set is about all you would need. And the retrofit ignition kit if you decide to go that route.
#56

Scrubcadet10
Scrubcadet10
Probably replace the PTO/sump cover oil seal, since you'll have to remove the cover to access the rods and piston, I wouldn't risk damaging that seal and reusing it.
:2cents:
:2cents:
#57

F150Fan80
Agreed. Already removed the cover to access those. That seal is a must at this point. Should I replace the opposite seal as well? I plan on removing the flywheel and installing the new magneto kit and was thinking about replacing it as well.
F150Fan80
Probably replace the PTO/sump cover oil seal, since you'll have to remove the cover to access the rods and piston, I wouldn't risk damaging that seal and reusing it.
:2cents:
Agreed. Already removed the cover to access those. That seal is a must at this point. Should I replace the opposite seal as well? I plan on removing the flywheel and installing the new magneto kit and was thinking about replacing it as well.
#59

F150Fan80
Exactly.
Thank you all for helping with this. Rebuilding an engine isn't too tough but with all the things I'm learning along the way with this about the more technical aspects that I didn't know and really enjoy learning about its been an absolute great time. I have learned quite a bit from you all about these things and couldn't be more grateful. Thank you all again as I continue to get this Kohler back up to where it should be!!
:drink: :thumbsup:
F150Fan80
As long as you're that far, it's cheap insurance
Exactly.
Thank you all for helping with this. Rebuilding an engine isn't too tough but with all the things I'm learning along the way with this about the more technical aspects that I didn't know and really enjoy learning about its been an absolute great time. I have learned quite a bit from you all about these things and couldn't be more grateful. Thank you all again as I continue to get this Kohler back up to where it should be!!
:drink: :thumbsup:
#60
B
bertsmobile1
Kohler parts are what I would call a reasonable price ( Briggs parts are under priced & Kawakasi parts tend towards over priced ) .
Some will say Kohler parts are expensive so pull the parts out , measure & check everything before you start to order parts.
If you are not feeling confident the post the full list of what you intend to replace.
I am sure there will be enough contradicing opinions to totally confuse you.:laughing:
B
bertsmobile1
Exactly.
Thank you all for helping with this. Rebuilding an engine isn't too tough but with all the things I'm learning along the way with this about the more technical aspects that I didn't know and really enjoy learning about its been an absolute great time. I have learned quite a bit from you all about these things and couldn't be more grateful. Thank you all again as I continue to get this Kohler back up to where it should be!!
:drink: :thumbsup:
Kohler parts are what I would call a reasonable price ( Briggs parts are under priced & Kawakasi parts tend towards over priced ) .
Some will say Kohler parts are expensive so pull the parts out , measure & check everything before you start to order parts.
If you are not feeling confident the post the full list of what you intend to replace.
I am sure there will be enough contradicing opinions to totally confuse you.:laughing:
#61

Scrubcadet10
If it ain't WORE don't Replace it.
Let the contradictions begin!.......:licking:
Scrubcadet10
I have all my opinions ready,Kohler parts are what I would call a reasonable price ( Briggs parts are under priced & Kawakasi parts tend towards over priced ) .
Some will say Kohler parts are expensive so pull the parts out , measure & check everything before you start to order parts.
If you are not feeling confident the post the full list of what you intend to replace.
I am sure there will be enough contradicing opinions to totally confuse you.:laughing:
If it ain't WORE don't Replace it.
Let the contradictions begin!.......:licking:
#62

F150Fan80
ILENGINE, can you tell me which style pistons I have? I think that via the parts diagram I'm looking at now they look like both. Lol
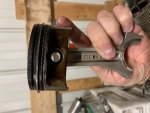
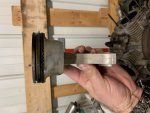


F150Fan80
Hopefully this picture helps. I just put these on and they have only been used for roughly ten minutes. Basically brand new.
View attachment 46227
Here are some pictures of each piston and the jug they came out of. I haven't tried to put a ring back in each as of yet. I hope to try that later tonight if I don't get really tired first from getting off midnights.
Side one:
View attachment 46220View attachment 46219View attachment 46221View attachment 46222
Side two:
View attachment 46223View attachment 46224View attachment 46225View attachment 46226
ILENGINE, can you tell me which style pistons I have? I think that via the parts diagram I'm looking at now they look like both. Lol


#63

Scrubcadet10
Scrubcadet10
Looked up images with the part numbers, to me it looks like you have style B, I noticed style A the area around the wrist pin was more rounded, style B
Was square -ish like yours...
:2cents:
But wait and see what others say.
Was square -ish like yours...
:2cents:
But wait and see what others say.
#64

ILENGINE
ILENGINE
The Kohler dealer parts lookup site only shows the Style B rings and pistons. Doesn't appear that Style A was used on your spec number. Something to check is the thickness of the top piston ring. 1.2 mm is the style B and 1.5 mm is the style A,
#65

Scrubcadet10
Scrubcadet10
https://www.partstree.com/models/ch...p-725cc/crankcase-group-2-24-296-ch18-750-12/
Look at the piston Diagram in the schematic, #32 top left,
Look at the piston Diagram in the schematic, #32 top left,
#66

F150Fan80
F150Fan80
Top ring is 1.5mm according to my caliper. Looks like I have style A. What was the reasoning for the new style piston? Should I change them out or just re-ring what I have? The pistons look pretty good. They just need a bit of a sprucing up is all.
#67

ILENGINE
ILENGINE
Piston manufacturer may of changed. From what I found the standard size Style A rings are NLA. So may have to convert to style B piston ring assemblies.
#68

F150Fan80
What numbers are you coming up with? So it's looking like I'll need new pistons w/ rings then right? Is the rod the same? I just want to make sure that I can reuse the original rods since there is no need to replace those.
EDIT: Just found these on eBay. https://www.ebay.com/itm/KOH-24-108-14-S-Kohler-Piston-Ring-Set-STD-83mm-25HP-2410814S/173663221847?hash=item286f227857:g:vAoAAOSwcOZb~YzK#shpCntId
F150Fan80
Piston manufacturer may of changed. From what I found the standard size Style A rings are NLA. So may have to convert to style B piston ring assemblies.
What numbers are you coming up with? So it's looking like I'll need new pistons w/ rings then right? Is the rod the same? I just want to make sure that I can reuse the original rods since there is no need to replace those.
EDIT: Just found these on eBay. https://www.ebay.com/itm/KOH-24-108-14-S-Kohler-Piston-Ring-Set-STD-83mm-25HP-2410814S/173663221847?hash=item286f227857:g:vAoAAOSwcOZb~YzK#shpCntId
#69

Scrubcadet10
Scrubcadet10
Look at the parts tree link I posted, everything is available and/or got superceded to a new part number
#70

F150Fan80
I did go to that link. The standard replacement rings for my style piston are no longer available from there either. It wants to supercede to the new style piston and ring assembly. I found someone with NOS OEM standard rings for my pistons on eBay. Those are way cheaper than a new piston and rings. The new pistons use a thinner ring at 1.2 mm instead of what mine uses, a 1.5 mm thick ring.
F150Fan80
Look at the parts tree link I posted, everything is available and/or got superceded to a new part number
I did go to that link. The standard replacement rings for my style piston are no longer available from there either. It wants to supercede to the new style piston and ring assembly. I found someone with NOS OEM standard rings for my pistons on eBay. Those are way cheaper than a new piston and rings. The new pistons use a thinner ring at 1.2 mm instead of what mine uses, a 1.5 mm thick ring.
#71

F150Fan80
Parts have been ordered. Now it’s time to get everything ready to put back together once parts arrive.
F150Fan80
I did go to that link. The standard replacement rings for my style piston are no longer available from there either. It wants to supercede to the new style piston and ring assembly. I found someone with NOS OEM standard rings for my pistons on eBay. Those are way cheaper than a new piston and rings. The new pistons use a thinner ring at 1.2 mm instead of what mine uses, a 1.5 mm thick ring.
Parts have been ordered. Now it’s time to get everything ready to put back together once parts arrive.
#72

Scrubcadet10
Scrubcadet10
:thumbsup:
Be sure to pre lube everything, during reassembly , with at least oil.
I usually use assembly lube on bearing surfaces/wrist pin, and coat the cylinders walls rings with engine oil.
And I guess your going to hone too
Be sure to pre lube everything, during reassembly , with at least oil.
I usually use assembly lube on bearing surfaces/wrist pin, and coat the cylinders walls rings with engine oil.
And I guess your going to hone too
#73

F150Fan80
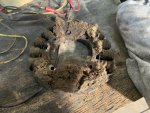
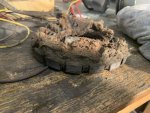
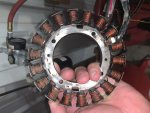
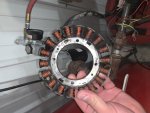
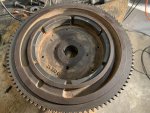
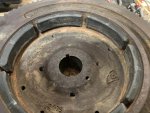
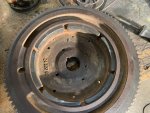
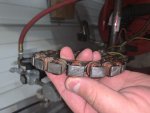
Yup!! The hone will definitely be coming out! I did manage to get some time to go out tonight for a little while and what I found actually surprised me. Here are some pictures of what I found after I removed the flywheel. Needless to say I wasn't very happy. It appears as though the shaft seal behind it has been weeping at the least for some time now. It was so packed in there around the stator and the magnets on the flywheel, oil/dirt/grease/grass. I have a new flywheel coming for the conversion so I am not too worried about that. However, the stator I could be. I will be checking resistance on it tomorrow to at least see what I get however I still wonder about it. I did manage to clean both the stator and the old flywheel (just in case) up quite a bit. I was wondering what you all thought about this. Even if the stator checks out resistance wise, should it be replaced? I also wonder if this is why I was probably having spark or power issues well after the engine warmed up.
Before the cleaning:
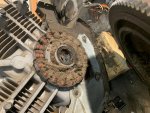
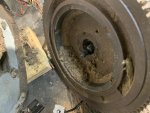
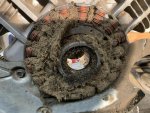
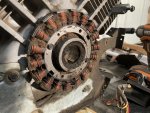
After cleaning:
F150Fan80
:thumbsup:
Be sure to pre lube everything, during reassembly , with at least oil.
I usually use assembly lube on bearing surfaces/wrist pin, and coat the cylinders walls rings with engine oil.
And I guess your going to hone too
Yup!! The hone will definitely be coming out! I did manage to get some time to go out tonight for a little while and what I found actually surprised me. Here are some pictures of what I found after I removed the flywheel. Needless to say I wasn't very happy. It appears as though the shaft seal behind it has been weeping at the least for some time now. It was so packed in there around the stator and the magnets on the flywheel, oil/dirt/grease/grass. I have a new flywheel coming for the conversion so I am not too worried about that. However, the stator I could be. I will be checking resistance on it tomorrow to at least see what I get however I still wonder about it. I did manage to clean both the stator and the old flywheel (just in case) up quite a bit. I was wondering what you all thought about this. Even if the stator checks out resistance wise, should it be replaced? I also wonder if this is why I was probably having spark or power issues well after the engine warmed up.
Before the cleaning:


After cleaning:


#75

Scrubcadet10
Scrubcadet10
Stator looks good to me, usually if a wire isn't burnt/charred or broke it ought to be good.
It's probably not the season you were having power issues, all they stator does is charge the battery.
It's probably not the season you were having power issues, all they stator does is charge the battery.
#76

F150Fan80
The magneto and flywheel kit was just over $100 if I remember correctly. I am a little worried about heat. The grass/oil/dirt/grease mash was so tight in around the coils that they wouldn't be able to breathe properly. Excessive heat is the number one killer of stators from what I've seen.
F150Fan80
Why would you replace the alternator?
How much are the new flywheel and coils?
The magneto and flywheel kit was just over $100 if I remember correctly. I am a little worried about heat. The grass/oil/dirt/grease mash was so tight in around the coils that they wouldn't be able to breathe properly. Excessive heat is the number one killer of stators from what I've seen.
#77

F150Fan80
I hope so. Who knows how much heat was being kept in there with all that crap around the magnets and coils. I just hope it didn't do any real damage. If there was any real damage I couldn't see it. That seal must have been leaking for a long time. If I hadn't pulled the flywheel who knows if I would have ever caught that seal leaking.
F150Fan80
Stator looks good to me, usually if a wire isn't burnt/charred or broke it ought to be good.
It's probably not the season you were having power issues, all they stator does is charge the battery.
I hope so. Who knows how much heat was being kept in there with all that crap around the magnets and coils. I just hope it didn't do any real damage. If there was any real damage I couldn't see it. That seal must have been leaking for a long time. If I hadn't pulled the flywheel who knows if I would have ever caught that seal leaking.
#79

F150Fan80
F150Fan80
I know that it's been a while since I have posted but I wanted to give an update. I haven't had much time to spend on the engine lately due to work, the Thanksgiving holiday, kid stuff, etc. I was able to get the heads back together. I lapped the valves before reassembling those. There was one head that the intake valve took quite a bit longer to do than the others. I suspect I missed that one leaking during the leak down test. Damn newbies. Anyway, those are all oiled and ready to go back on. I have the case all cleaned up, honed, crank seal replaced, and the crankshaft and new flywheel installed. It's ready for the piston and rod assemblies (redone) to be installed. While cleaning the case cover, or sump cover, my dumb self put way to much pressure on the cover at one point snapping the oil pump pickup in the process. That part should be here today or tomorrow. My goal is to have the engine back together this weekend at some point. I will update this as more progress, hopefully, is made. Thanks for hanging in there with me!!
#81

F150Fan80
F150Fan80
So, if you all remember I was going to replace or repair that electrical connector from the engine to the tractor. I am looking for a replacement connector and cannot find something that is very suitable for it. I would like something that is snug and weather-tight as well. Does anyone have a recommendation for a replacement? I am at work currently and cannot look at the wire sizing either. I want to make sure that I have something that will take what current is being transferred. Thanks!!
#82

F150Fan80


F150Fan80
Well I finally have the engine all back together. Finding time to get back to it has been hard. I ended up using a 6 prong trailer connector to redo the engine to tractor wiring harness connector. Since there are only four wires used now I just eliminated two of them. I chose this style of plug due to the larger gauge wire that was used with it versus a normal 4 prong trailer connector. All the wire splices are sealed. I then just found a rhythm and basically only have a couple things left to install but they have to wait until I get the engine back on the tractor. I'm hoping tomorrow will be the day to see if this thing will roar to life again. Here are some pictures. I still have to clean the tractor off as you can see in the pictures but I am still hopeful to start it tomorrow with any luck.
Attachments
#84

F150Fan80


F150Fan80
I wasn't able to fire it up yesterday, that will be today. Fingers crossed!!! I did however get everything mounted back up and wired. It's sitting in the shop right now waiting for me to try and start it.
Attachments
#86

F150Fan80

On a more serious note I almost forgot to. But I followed the manual for torque specs!! ?
F150Fan80
On a more serious note I almost forgot to. But I followed the manual for torque specs!! ?
#87

F150Fan80
F150Fan80
Well, I know that it has been a long time since I updated anyone on the progress made. Between work, sick kids, sick adults, Christmas, getting ready to go snowmobiling, etc, I haven't had much time to dedicate to getting this thing running. Let me rephrase this, running well. It does in fact start and run. However, there is still a lack of power issue. I do not think it is spark related since that is all new. It appears to have either a fuel problem or a breathing problem. The engine is acting rather "taxed" when the PTO is engaged for the deck. Again, I can turn the drive shaft for the deck by hand and it turns very easily. I've replaced the idler pulley bearings for the pump drive side and that is all in good working order. I did try an experiment of sorts. Without spending more money without having a good understanding of what could be doing this, I decided to remove the muffler and run the engine and see what happens. The engine actually seemed to run much better like a restriction was removed from it breathing properly. I also adjusted the governor according to the manual as well when all was hooked back up. Could this actually be the issue? Should I do another compression test and see if the valves are sealing right? Just wanted to poll the group on things to look at once we get back from our trip.
#88

F150Fan80
F150Fan80
Well I am finally back from sledding in northern Wisconsin. Love it up there. Anyway, anyone have any thoughts on this? I am looking into getting back out to look it over within the next couple of nights. Hopefully someone has some insight for me. I feel like I am missing something here. I just don't know what.
#89

ILENGINE
ILENGINE
Doing a compression check could confirm if you still have a low compression issue. I am wondering about the remove muffler and it ran better. You could have a restriction in the muffler that would cause power related problems. I have seen the baffles come loose in mufflers and restrict the outflow,
#90

AVB
AVB
Leak down test would be better valve sealing problem.
I do have question since it seem taxed with the PTO on. Are you sure it is running on both cylinders?
I do have question since it seem taxed with the PTO on. Are you sure it is running on both cylinders?
#91

F150Fan80
I can try doing another compression test and seeing what it shows. If it shows low then a leak down test would be next. If I was losing compression again I would bet the valves aren't sealing properly since it's been honed and new pistons and rings. I'll know more later this week. It seemed to engage much easier and bog down what I would consider to be normal during the initial PTO engagement at a lower RPM. The muffler doesn't rattle or anything so I am not sure if something did move or not. I'll try to get to a compression check tomorrow night after work.
F150Fan80
Doing a compression check could confirm if you still have a low compression issue. I am wondering about the remove muffler and it ran better. You could have a restriction in the muffler that would cause power related problems. I have seen the baffles come loose in mufflers and restrict the outflow,
I can try doing another compression test and seeing what it shows. If it shows low then a leak down test would be next. If I was losing compression again I would bet the valves aren't sealing properly since it's been honed and new pistons and rings. I'll know more later this week. It seemed to engage much easier and bog down what I would consider to be normal during the initial PTO engagement at a lower RPM. The muffler doesn't rattle or anything so I am not sure if something did move or not. I'll try to get to a compression check tomorrow night after work.
#92

F150Fan80
I'll start with the compression check and go from there. I have a leak down kit as well if the test shows low. My bet would be a leaking valve, possibly not seating correctly. I'll hopefully be able to run a compression check tomorrow after work. It does seem to be running on both cylinders.
F150Fan80
Leak down test would be better valve sealing problem.
I do have question since it seem taxed with the PTO on. Are you sure it is running on both cylinders?
I'll start with the compression check and go from there. I have a leak down kit as well if the test shows low. My bet would be a leaking valve, possibly not seating correctly. I'll hopefully be able to run a compression check tomorrow after work. It does seem to be running on both cylinders.
#93

F150Fan80
F150Fan80
So it appears that I still have low compression although not near as low as it was. One cylinder was at 130 and the other is at 140. Note that this is found on a cold engine. I have yet to perform a leak down test but I am relatively sure that it is leaking through the valves since I have brand new rings and pistons, along with honing the cylinders. I could be wrong though. I'm guessing that the lap job I did on the valves was insufficient. I may just look for someone local to go over the heads and make sure everything is seating and sealing properly. Anyone else have any ideas? It's almost discouraging after going through all that work and here is where I ended up. ?
#94

AVB
AVB
Without going back and reading the whole thread it possible that honing isn't complete. Even if you just break the glaze you should use a rigid hone in the cylinder(s) are oval or tapered. All a flex hone does is to break glaze or hone in the shape as it was before you try honing. Just a thought...though.
#95

F150Fan80
F150Fan80
I used a three-legged hone with the spring action on the arms to hone them out. It's done well for me in the past but maybe not in this case.Without going back and reading the whole thread it possible that honing isn't complete. Even if you just break the glaze you should use a rigid hone in the cylinder(s) are oval or tapered. All a flex hone does is to break glaze or hone in the shape as it was before you try honing. Just a thought...though.
#97

F150Fan80
F150Fan80
Not a whole lot at all. Basically I've ran it for about 20 minutes give or take. Probably a little more. I figured It would be a little better now. It seems like the issue I was having in the beginning is still present, even with the low compression that was originally found. Perplexing issue and annoying to say the least after all this.How much run time On The rebuild? Rings may not be sealed well yet.
#98

F150Fan80
F150Fan80
So I was finally able to test the muffler of sorts by stuffing a rag in one inlet and then inserting a rag and compressed air nozzle into the other to see how much air was actually leaving the muffler. I also reversed the inlets and tried again. It really didn't seem like there was much of a restriction. The air the came out was not traveling as fast compared to what was coming in, due to the large pressure drop, but seemed adequate. There was really no difference in the sound or amount of air leaving the muffler from either inlet. There was no rattling either. If the muffler is indeed "clogging" could it be cleaned with solvent or should I just buy another? ILENGINE, I would love to hear from you on this to see what you think. Obviously I am open to all thoughts as well. This is turning into a nightmare trying to get it to run well again.
#99

ILENGINE
ILENGINE
I kind of wish I could hear this thing run with and without the deck engaged. It could be a fuel issue related to the high speed jet side of the carb, either slight restriction in the jet causing slight lean condition. Even though the compression is slightly low I don't think it would be real noticeable unless you were really lugging the engine in tall grass.
I will keep thinking maybe I will come up with something else.
I will keep thinking maybe I will come up with something else.
#100

F150Fan80
I am ok with going through the carb again. I did a rebuild kit on it as well. This was before I found the compression issue. It still persisted. I am always game for trying to clean it again.
F150Fan80
I kind of wish I could hear this thing run with and without the deck engaged. It could be a fuel issue related to the high speed jet side of the carb, either slight restriction in the jet causing slight lean condition. Even though the compression is slightly low I don't think it would be real noticeable unless you were really lugging the engine in tall grass.
I will keep thinking maybe I will come up with something else.
I am ok with going through the carb again. I did a rebuild kit on it as well. This was before I found the compression issue. It still persisted. I am always game for trying to clean it again.
#101
C
clipper elite 6020
C
clipper elite 6020
The difference in the compression is not too bad. Suggest you back off both rockers on each head. Make spark plug threads to compressed air fitting. Put compressed air to a cylinder, valves will be shut since you backed off the rockers. You can hear where the air is going. Intake?exhaust? crankcase?.

