ZT2348XL drum brake removal - castle nut won't loosen?

deckeda

Well-Known Member
Joined
Jun 12, 2017
Threads
15
Messages
124
  • / ZT2348XL drum brake removal - castle nut won't loosen?
Ariens/Gravely doesn't publish a service manual for this model. Our ultimate goal is to replace seals in a wheel motor. I've never seen a how-to for that but have the service manual from Hydro-Gear.

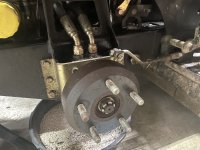
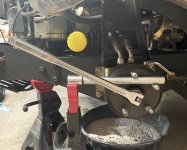
So I'll ask how to remove the castle nut that presumably secures the brake drum and/or hub. Yes the cotter pin is out, but the castle nut appears to be on there with death. I tried a breaker bar (how to hold the hub/drum from turning?) I tried a many-hundreds-of-ft pounds impact and it won't budge. So I'm clearly doing this wrong.

This obviously isn't the same type of scenario as on a typical trailer or car, because if a castle nut was this tight on one of those the bearings would be cinched so tight the hub would not turn. What's the secret here? Thanks.
 

Attachments

  • zt drum brake outer.JPG
    zt drum brake outer.JPG
    888.8 KB · Views: 8

bertsmobile1

Lawn Royalty
Joined
Nov 29, 2014
Threads
64
Messages
24,705
  • / ZT2348XL drum brake removal - castle nut won't loosen?
Have a close look at the exposed threads to check it is not left hand
After that it is heat-penetrating fluid - heat- penetrating fluid - heat .
If necessary heat to dull red and hit it with an impact while still red
 

ILENGINE

Lawn Pro
Joined
May 6, 2010
Threads
39
Messages
9,977
  • / ZT2348XL drum brake removal - castle nut won't loosen?
I wouldn't be surprised if it was torqued to 350 ft/lb and has red heat released lock tight on it,
 

Hammermechanicman

Lawn Addict
Joined
Jan 10, 2020
Threads
56
Messages
3,528
  • / ZT2348XL drum brake removal - castle nut won't loosen?
Place a long ctowbar between 3 of the studs snd use a breaker bar on the nut with a torque amplifier (pipe). Position them close together so you can squeeze them together like bolt cutter handles. Be careful hitting it with an impact without the hub being locked down. The innards may not like it.
 

deckeda

Well-Known Member
Joined
Jun 12, 2017
Threads
15
Messages
124
  • / ZT2348XL drum brake removal - castle nut won't loosen?
Place a long ctowbar between 3 of the studs snd use a breaker bar on the nut with a torque amplifier (pipe). Position them close together so you can squeeze them together like bolt cutter handles. Be careful hitting it with an impact without the hub being locked down. The innards may not like it.
For some dumb reason I think I got rid of my 4' black pipe a few years ago. I'd hate to think what they cost now. I employed a small pipe in the cradle of another jack stand to prevent the hub from rotating backwards.

From there I tapped the breaker bar with a ~ 3lb plastic sledge (Estwing CCD45 dead blow hammer, one of my favorite tools) twice and it broke free. I'm blaming my impact's shameful performance yesterday on a weak battery that died twice while attempting to use it.

Aaaand now I'm off yet again to find a larger jaw puller. The only 3-jaw style I have is a 4" and won't fit around the drum to pull it off.
The brake is disengaged, so I don't expect anything's keeping the drum on except that it's likely pressed on there. I do see a woodruff key on the shaft that's part of the mix.
 

Attachments

  • zt drum brake outer setup.JPG
    zt drum brake outer setup.JPG
    880.5 KB · Views: 6

deckeda

Well-Known Member
Joined
Jun 12, 2017
Threads
15
Messages
124
  • / ZT2348XL drum brake removal - castle nut won't loosen?
I rented a $100 7-inch 3-jaw gear puller from the auto parts store and initially had no luck. I was hammering it pretty good with the impact up to the point I thought something would break and more than once I removed it and double-checked the gear puller jaws to make sure they weren't caught on the backing plate. The backing plate is secured to the wheel motor, and the backing plate is what the brake shoes attach to. So you gotta remove the drum alone, first.

In effect, because the rim of the brake drum has little more than 1/8" thickness you're using the jaws as wedges or chisels (which, is a technique I'd read elsewhere.)

The internet is rife with people asking the same question for how to remove drums like this. They are indeed pressed on somehow (I guess I'll find out ...?) and need some "help" coming off. So I went back to it, reinstalled the jaw pullers thinking I'd get them crazy tight once more, stop, and smack the end of the rod to hopefully crack it free.

Instead, I'd stayed on the impact about 2 seconds longer and it finally gave way. There was no way that turning the thing with a wrench or a breaker bar would have put enough torque on it.

Now that I know about the design I realize they put all of the rear mower weight NOT on any sort of wheel bearing, but entirely on the bearings inside the wheel motor. Structurally this is "OK" but at some point you'll replace the very expensive motor not because it broke or leaked but because the needle bearings inside wore out.
 

bertsmobile1

Lawn Royalty
Joined
Nov 29, 2014
Threads
64
Messages
24,705
  • / ZT2348XL drum brake removal - castle nut won't loosen?
Run the engine and rotate the wheel slowly while applying some light outward taps with you best hammer.
It will come off quite eadily.
 

deckeda

Well-Known Member
Joined
Jun 12, 2017
Threads
15
Messages
124
  • / ZT2348XL drum brake removal - castle nut won't loosen?
I took some more pictures in case someone else has a similar mower and wants a reference. Gravely's parts manual has a diagram but it's not the entire story.

backside of drum:

zt drum brake.JPG


The backing plate secures to the wheel motor with 6 socket head bolts. Gravely's parts manual claims M6. On this machine they are M5. Interestingly, the backing plate wasn't perfectly tight against the wheel motor even though the bolts were all tight. Do not remove the springs/brake shoes. There's nothing behind them you need to access.

zt drum off.JPG

zt drum brake backing plate bolts.JPG


You will see the 1/2" nut that secures the brake lever to the rod, however there is a clip that secures the bottom of the lever to the brake assembly. This clip isn't shown on Gavely's parts manual. Pry it a little, push it off etc. and the level slides off.
zt drum brake lever clip.JPG

It would have been great (and, smart) if the lever only fit on one way, however after removing you immediately realize it's toothed and you maybe sorta wished you'd known that ahead of time to mark it's relative location. This makes a total of THREE possible adjustments (the other two are on the brake rod) for just this one brake side -- stupid.

zt drum brake lever.JPG


Backside of brake assembly. This is why you can't just throw a 3-jaw gear puller onto the drum without checking to see if the jaws aren't also catching the back of this assembly ... which as you'll recall above, is bolted to the wheel motor. (A wheel hub remover would likely be easier to use instead if your wheel studs are in good shape.)

zt drum brake behind.JPG


Our bogey:

zt wheel motor.JPG
 

deckeda

Well-Known Member
Joined
Jun 12, 2017
Threads
15
Messages
124
  • / ZT2348XL drum brake removal - castle nut won't loosen?
Got seals replaced and all back together except I waited on adding the brake assembly. I wanted to check for obvious leaks first.

Replaced an O-ring on the back although I think the leak was on the output side. Replaced the axle shaft seal, dust seal, and O-ring for the output shaft side. We never removed the output shaft, and so we never had to deal with the needle bearings and associated bits. Still, the needle bearings turned like buttuh and there weren't any metal suprises inside the rear gearset.

One thing that seemed off (euphemism for "wrong") was that the small bolts that secure the front plate on the output shaft side were all, um loose. Loose as in, just putting the small Torx bit in there they could be turned by hand! All bolts have oil on the threads and there's an O-ring behind that plate (but, inboard of the wet bolts ... ), so there's gotta be some pressure even if it's not full line pressure. Each bolt had what looked like a little red Loctite on it, which did very little. I'm still not clear on why these bolts would be swimming in oil but not sealed against it. Perhaps I was just seeing oil that had come into them from the top side after getting past the O-ring yada yada yada.

Hydro-Gear says to torque these beauties to somewhere between 45-70 inch-pounds. Nothing like a 2/3 difference in spec to make it essentially meaningless? I went with 60 inch-pounds, tighter than they were when I first saw them. If the brake assembly weren't such a pain to pull off these bolts could be checked at a later date while still on the mower. Actually, knowing what I know now, the entire front end plate and associated seals could have been swapped while the rest was still on the mower and I could have been done with this repair DAYS ago.

No apparent (or, obvious) leaks but we'd skipped the timing of the rear gearset and naturally screwed up the timing; so the motor operates the reverse of how it should. At least we know now what to do. Or since the lines need to be opened up again anyway I might just try instead swapping the lines at either the motor or at the pump.

If the other side develops a leak on the output shaft I'll know not to remove the motor, and especially not take apart the rear of the motor ... I just wish the O-rings and seals could be bought separately. At $90+ per kit that's way too expensive.

You'll notice that what was missing throughout this party was troubleshooting information. I didn't have it, and so wasted time and effort doing things that weren't necessary.
 

deckeda

Well-Known Member
Joined
Jun 12, 2017
Threads
15
Messages
124
  • / ZT2348XL drum brake removal - castle nut won't loosen?
And now we appear to be basically done. Just a final leak check while under load is needed. Took the motor off again tonight and once more opened up the back end and gearset. The instructions for setting the timing are incredibly simplistic to the point of not making sense. You get about two sentences, while staring at a bunch of symmetrical parts. So why this matters I'm not really sure ... except that it does.

The directions are non-sensical "unless" the end cap bolt hole locations that the gearset rim must line up with are factored into whatever position the gearset might be in regardless of where it's located within its rim. Stay within that and the gearset will always turn in the expected direction based on which port is receive fluid pressure.

But that's a total guess. It now turns in the proper direction, because of luck if you ask me.
 
Top