Used tractor nightmare

bertsmobile1

Lawn Royalty
Joined
Nov 29, 2014
Threads
65
Messages
24,995
They are shown in the parts book
Two U pins with a long leg to go through the bracket & into the arm and a short one that when turned strait down holds the pin back so you can drop the arm in to position
A quick release mechanism .
Should be the same both sides of the deck but the left has the height adjustment on it for leveling the deck
 

Demonseed

Forum Newbie
Joined
Jun 1, 2022
Threads
1
Messages
9
I believe that's what is meant to be there, but I'll be damned if I can locate them in the parts manual, and a search of the entire document for Quick yields 0 return found so without part numbers I'm afraid cotter pins are the best I can do. Not sure where in the book you saw them but a page number would go a long way in helping me locate them.
 

StarTech

Lawn Royalty
Top Poster Of Month
Joined
Feb 19, 2020
Threads
91
Messages
11,467
Boy is this stupid as I don't see them on any of the MTD diagrams but they are available. Had go through CC to find the PNs.

Two each are require.

747-1116 Rod, Handle, Deck Rel .375 Dia

732-04652 Compression Spring, .535" X 1.75"

914-0470 Cotter Pin, 1/8 X 1.25 (of course you can use just cotter pin that is correct size beside MTD wants a ridiculous price for one.)


bertsmobile1

Lawn Royalty
Joined
Nov 29, 2014
Threads
65
Messages
24,995
Sorry
I saw they were shown in the diagram but did not check the parts list proper
As Star mentioned they are listed in the Cub Cadel perts lists
You also need a washer to go between the spring & split pin to take the spring force .
The left one has the height adjuster with it so the entire housing moves up & down rather than moving the lift arm
Sounds like your mower is missing that part as well
It is good system when set up properly and is probably the easiest hook up aside from what Toro use on the Timecutters
 

StarTech

Lawn Royalty
Top Poster Of Month
Joined
Feb 19, 2020
Threads
91
Messages
11,467
I do forget those items that I provide in house like the washer as those are common hardware items.
 

Demonseed

Forum Newbie
Joined
Jun 1, 2022
Threads
1
Messages
9
I appreciate all the help guys, but I think I'm done spending money on this thing, at least for the time being, well almost.

Now that I finally have it reassembled and basically fully functional, (oh yeah, right. Didn't tell you yet. Surprise! I fixed it!) All I want now is to just use it so I can feel like it was all justified.

Believe it or not that damn thing had one last zinger of a curve ball to throw at me, one last challenge if you will, in the form of the PTO engaging lever barely putting any tension on the deck belt. After I stripped it down of its fenders and seat so I could get a good look at it, I noticed the bracket the cable attached to didn't appear to be the same shape as the one I was seeing in the diagram. Pulled it off, went and looked up a proper image online and sure enough, someone had wrenched that poor handle so hard they twisted the tab on the end everything connects to about 45 degrees out of its original position. So I broke out the Oxy/Map torch and got her glowing nice and red then proceeded to easing it on back where it was meant to be, and somehow managed not to break it in the process.

Got it reinstalled, and while the finders were off did the two transmission belts before finally reassembling it, then gave it the long overdue test cut. And it did awesome, except the one spot it scalped the ground, but we'll just pretend that didn't happen and say it was ultimately a complete success!

The only real issue I saw while driving it for the first time was the breaks. They aren't awesome, and upon examination I've concluded I don't have the first clue how that thing stops. So it stands to reason I also don't know how difficult it will be to fix. Enter you guys to save my ass again. Someone please clue me in. Is it easy, hard, quick and easy or super involved? Once this bit is as it should be, this little machine has its work cut out for it to pay back it's recent debts. Only thin will I consider giving it the cosmedics it has been begging for, new headlight valence, tires, quick release deck, you know,the stuff it wants but doesn't really need. It has got to prove itself worthy first. Then the fun stuff can be considered.

But it's cutting grass, so finally something went my way. Yeay me, woohoo!
ok celebration over, back to work...
 

StarTech

Lawn Royalty
Top Poster Of Month
Joined
Feb 19, 2020
Threads
91
Messages
11,467
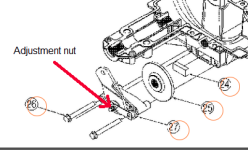
Most likely the brakes has never been adjusted. Try adjusting them. It done at the transaxle. You just tight enough to brake good when you brake but loose enough so the wheels spin freely when no braking needed. Otherwise 2 of the #24 will needed or the two caliper pins might be stuck.
1654516648623.png
 

bertsmobile1

Lawn Royalty
Joined
Nov 29, 2014
Threads
65
Messages
24,995
Not shown in the diagram Star posted is the pins
the lever is bent & pushes two small pins agains a shim behind a tiny brake block that pushes against the disc.
The disc is floating an a spline so it can move and bear against the second brake pad that sits in a recess in the housing ( part # 24 )
So the disc must be free to slide on the splined shaft or the brake becomes one sided & does not work.

The brake locks the layshaft inside the transmission which it turn locks the diff, exactly the same as the Park position on a car auto box.
This means that the wheels have to turn in opposite directions so you stop quick
As such the brake is not progressive it is all on or not on
The nut in the above diagram adjusts the brakes to accomodate wear on the pads
The rod that pulls the brake on will have an adjuster at the other end to balance the clutching & braking
Remember only 1 pedal for both so the adjustment has to be made such that the brake dissengages just before the clutch starts to spin the drive belts If it is over adjusted , the belt will burn because it will not be able to run on the drive pulley.
IT takes a bit of fiddleing to get it just right
If you take your foot off the clutch / brake pedal & the mower tosses a wheelie then the brakes are too late dissengaging.

I usually pop an old carton under the brake when I pull one apart because one of the parts always tries to run away & hide ( usually the shim ).
To remove & clean the brake, take the 2 long bolts out of the caliper & do one touch the center adjustment bolt till it is reassembled and you are setting it .
And no grease, it goes together dry
 

Demonseed

Forum Newbie
Joined
Jun 1, 2022
Threads
1
Messages
9
That seems doable. Nothing there sounds to hard, just fidgety. So you say parts run away when pulling it apart? So no clips or retainers on the pads for assembly? Sounds fun. I'll for sure be attempting the adjustment first in hopes that the pads still have some life left in them.

Topic change once more, the scalping I briefly mentioned, you guys wouldn't happen to have any recommendations for some aftermarket anti scalping wheels that include bracketry that I could get for this thing? Ideally ones that won't break the bank.

I found some on amazon but they're listed as MTD 2009 and newer for like 55 bucks and I swear the price jumped to 64 bucks while I was looking at them! But they were listed to be for 36 inch and 42 inch decks, and every other one I've found (not necessarily for MTD) all were for 42 inch. I'm not unwilling to get creative and do whatever is needed to add some, because damn this things blades hit the dirt FAR to much. My yard is all sorts of wavy and full of holes and ruts, to the point I'm not even sure just rear mounted wheels are going to be enough, I think I may need some or at least one centered in the front as well.

Just thought you guys having far more experience with these machines might just have some you have used or seen used that you could recommend and possibly save me from having to take this thing to my buddy's welding shop to fab up custom brackets.

The most affordable ones I've located so far were 35 dollars for a Husqvarna which seems more reasonable to me than that jacked up price of 64
 

bertsmobile1

Lawn Royalty
Joined
Nov 29, 2014
Threads
65
Messages
24,995
Wheels & axels are easy, Oregon, Prime Line , Stens , Rotary all do wheels & rollers
Brackets to fit onto the mower are another story as most OEM ones are welded to the deck and they need to be substantial
Some 3" wide flat strap at least 1/8" thick will be needed to fabricate them
 
Top