You are using an out of date browser. It may not display this or other websites correctly.
You should upgrade or use an alternative browser.
You should upgrade or use an alternative browser.
Walk behind Restoration HR215 SXA
- Thread starter wfsway
- Start date
More options
Export threadwfsway
Member
- Joined
- Jul 10, 2016
- Threads
- 1
- Messages
- 31
WOW and double WOW. What you did is masterful. Thank you for sharing that here at this forum along with the pictures and a good level of detail. That is a special post!
Thank you for the kind words, I am presently working on some other equipment and should post maybe in another thread ? The latest is a HRC215 SX Commercial.
wfsway
Member
- Joined
- Jul 10, 2016
- Threads
- 1
- Messages
- 31
Relating to the color choice, I had some Toyota Dark Gray Metallic on hand. What was important at the time was doing it right. The blast cleaned deck was primed with Chromate proper for aluminum and then top coated as you see. Also the Red engine cover and crown is Ford Candy Apple Red, then both were compounded and buffed. Originality is certainly important, although I wanted best quality workmanship and longevity all while working out of my simple garage and resources.
golfergordy
Active Member
- Joined
- Jun 28, 2014
- Threads
- 5
- Messages
- 55
Thank you for the kind words, I am presently working on some other equipment and should post maybe in another thread ? The latest is a HRC215 SX Commercial.
Very interesting, because I fixed up an HRC215 SXA last year. When I bought it, it appeared like it was never in commercial use, and it came with grass bag and mulching plug and the mulching blades were brand new. One side was nicked up a bit and I repainted one side only below the "COMMERCIAL" lettering from front wheel to rear wheel. The paint I used was Chrysler # DSCC331 (charcoal Grey), which is available in rattle can form at automotive stores. This color is extremely close to the original Honda color. Where I had to blend the paint in to the original paint I used rubbing compound and you can't tell where this is unless you look very closely. Normally a lawnmower is covered with some dust and grass clippings making telling the paint color difference impossible. I also spray painted the side protective deck guards and parts of the handlebar with a flat black spray paint where some paint damage was present and it now looks great. I also cleaned and power wire wheel cleaned the deck underside, and painted it with self priming Hammerite "Rust Cap". After a few mowings I noticed a few paint chips falling off the underside so this paint wasn't the perfect solution. The engine was fine (no smoke) so I didn't touch it. I Adjusted all the cables according to the owner's manual, cleaned out the carburetor, adjusted the valves, did all the typical maintenance tasks (oil, plug, air filter), and went thru the shop manual procedure to set the engine running speed. One interesting problem came up while trying to set the running speed - I couldn't get the engine to run quite fast enough. In setting engine speed, the manual says that you place the governor spring into the 2nd lowest hole in the control lever, and if the rpm isn't fast enough, to move the spring into the lowest (3rd) hole. Well, that still didn't get the rpm fast enough so I drilled a 4th hole and put the governor spring into this hole and only then was the rpm ok. One other unusual repair was in one rear wheel where a hairline crack was present in the wheel hub. To reinforce the wheel I epoxy glued onto both rear wheels a 1/4" piece of 1" (I think it was 1") schedule 40 plastic pipe which nicely fit onto the outside wheel hubs. I gave this mower to one of my sons earlier this year, who uses it as a trim mower for areas where his rider mower won't reach. Good luck restoring your new project HRC215.
Attachments
wfsway
Member
- Joined
- Jul 10, 2016
- Threads
- 1
- Messages
- 31
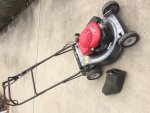
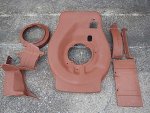
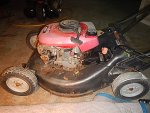
That is a very nice machine, you have kept it very well. I am curious about how you used the 1" PVC on the rear wheel. I have my original light grey and they have some cracking. My machine was literally pulled from the trash and in flood zone. I attached the photo of original where I started and have disassembled, blasted and primed.


golfergordy
Active Member
- Joined
- Jun 28, 2014
- Threads
- 5
- Messages
- 55
That is a very nice machine, you have kept it very well. I am curious about how you used the 1" PVC on the rear wheel. I have my original light grey and they have some cracking. My machine was literally pulled from the trash and in flood zone. I attached the photo of original where I started and have disassembled, blasted and primed.
View attachment 44819View attachment 44820
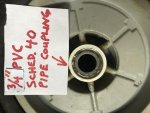
First of all, I checked and I used 3/4" pipe coupling and not 1" as I previously thought.
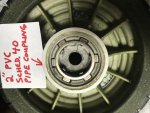
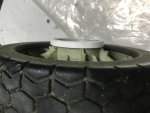
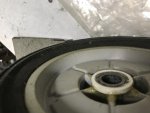
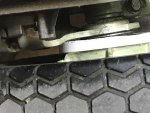
The following is a part of the text of a new thread I'm working on and hopefully will post soon. The plastic wheel cracking is an issue with all the HR & HRC series that have plastic wheels. The pics posted here are from an HR215K1 Masters, but the plastic wheels on the HRC215 are the same. I have seen a half dozen or so HR series lawnmowers (all were SX models) and most of them have had this issue, which is hairline cracking in the plastic rear wheel hubs. I've never seen this problem in the front wheels – probably because the front wheel hubs contain ball bearings. The interior of the rear wheel hubs ride directly on the axle shaft coming from the transmission and hairline cracks develop right on the interior surface that rides on the axle. These cracks can propagate thru the hub until they are visible from the outside of the hub. I have previously written about reinforcing the outside of the hub by epoxying on a thin piece sawed off of a 3/4” schedule 40 pvc pipe coupling which fits nicely onto the plastic wheel hub on the outside of the wheel. I have recently noticed that these cracks (in the HR215K1 Masters) also propagate to the inside face of the wheel facing the mower deck, so I did the same repair on the inside face of the wheel by glueing a thin piece of 2” schedule 40 pvc pipe coupling, but the inside surface of this coupling had to be ground down approx. 1/64” to snugly fit onto the wheel hub. I used my high speed rotary tool (Dremel or equal) to do this. Also, be careful not to saw off a piece of the 2” pipe coupling wider than about 3/16” so it is less likely to rub against the wheel adjuster arm. If it does rub, just grind off the outer top edge of the pvc until there's a small clearance to the arm. Also when I recently installed this reinforcement I used pvc cement to glue it on. I used the epoxy gluing method about 2-yrs ago on some other wheels and it still appears to be holding up just fine, but time will tell if either the epoxy or the pvc cement method eventually fails or not. Naturally, thorough cleaning and sanding should be done prior to applying any type of adhesive. See the pics showing the wheel reinforcement.
Attachments
wfsway
Member
- Joined
- Jul 10, 2016
- Threads
- 1
- Messages
- 31
Thank you so much for the detailed information, this tells and shows me exactly what to do. Your attention to detail and obvious love for these fine mowers is rare. I want to know more about your developing post so to follow you. I can also tell you have studied the service manuals and data, you are an asset to this forum. I appreciate.
The only up fit I have done is to the sloppy trailing arms that seize and will ruin the axle shaft by grooving. These sealed bearings are performing well in service.
![DSCN1105[1].JPG DSCN1105[1].JPG](https://www.lawnmowerforum.com/data/attachments/18/18878-eb68b8d3b9b0dfcc7d4fd4605fca6cf6.jpg)
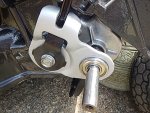
The only up fit I have done is to the sloppy trailing arms that seize and will ruin the axle shaft by grooving. These sealed bearings are performing well in service.
![DSCN1105[1].JPG DSCN1105[1].JPG](https://www.lawnmowerforum.com/data/attachments/18/18878-eb68b8d3b9b0dfcc7d4fd4605fca6cf6.jpg)

golfergordy
Active Member
- Joined
- Jun 28, 2014
- Threads
- 5
- Messages
- 55
Thank you so much for the detailed information, this tells and shows me exactly what to do. Your attention to detail and obvious love for these fine mowers is rare. I want to know more about your developing post so to follow you. I can also tell you have studied the service manuals and data, you are an asset to this forum. I appreciate.
The only up fit I have done is to the sloppy trailing arms that seize and will ruin the axle shaft by grooving. These sealed bearings are performing well in service.
View attachment 44850View attachment 44851
Thanks for the compliment.
I like the new sealed bearings on the wheel adjuster arm. A few years ago I picked up (for $5) 2-boxes of HR214SX parts from an owner who gave up on a project he never got to in 20-yrs and then sold me the parts - too bad the total HR214 was packed into 3-boxes and the owner lost the other box when he moved 15-yrs ago. Anyway, I just checked these parts and discovered that the bearings on these same arms were shot and the transmission shaft was showing some signs of grooving due to the bad bearings. I'll now have to check these bearings on 5 HR series mowers (I have 3 and 2 of my sons have one each) because when I fixed them up I never looked very closely at these bearings - if a transmission shaft gets ruined it's very expensive to replace.
That's exactly what I done for my HR214,HR215,HR216 .The correct size for rear wheel drive shaft bearing is flange bearing 15x31x11 in metric .You don't have to buy expensive bearing as these are low speed but need good seal .If the shaft worn out a little is OK .If it worn out too much you have to weld around that spot then file out to correct size .It may become too tight then you have to adjust both wheel at same time as these bearings much tighter tolerance than original one and sure last much longer .By the way its my new collection HR195 ,untouchedThanks for the compliment.
I like the new sealed bearings on the wheel adjuster arm. A few years ago I picked up (for $5) 2-boxes of HR214SX parts from an owner who gave up on a project he never got to in 20-yrs and then sold me the parts - too bad the total HR214 was packed into 3-boxes and the owner lost the other box when he moved 15-yrs ago. Anyway, I just checked these parts and discovered that the bearings on these same arms were shot and the transmission shaft was showing some signs of grooving due to the bad bearings. I'll now have to check these bearings on 5 HR series mowers (I have 3 and 2 of my sons have one each) because when I fixed them up I never looked very closely at these bearings - if a transmission shaft gets ruined it's very expensive to replace.
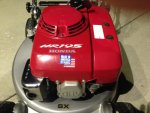
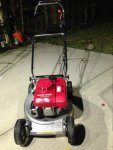
How did you get the plastic air filter cover so glossy. whole mower looks awesome I wouldn’t even wanna use it it’s too nice.View attachment 29171
Forum, I am new to this site and wanted to share my experience and efforts to restore the titled subject. I am Quality Engineer by trade and explains why I am so detailed and meticulous about this restoration, and was great experience to learn about this fine equipment piece by piece. Presently I will just list the actions done without explanation.
* Blasted aluminum mower deck to bare metal, repaired 2" hole in deck by aluminum welding and primed with Zinc Chromate.
* Single stage topcoat Toyota dark metallic gray.
* Rebuilt recoil assembly, blasted and painted Candy Apple Red.
* Reworked rusted out areas of grass bag frame assembly and repainted with POR 15. New cloth bag.
* Rebuilt rotor driven disk and brake assembly and surfaced contact faces, new driven disk.
* Top end rebuild engine GXV140 ported and polished intake/exhaust.
* Re-seated valves with lapping compound.
* Drilled oil ports (1mm) larger.
* Added inline fuel filter, new fuel lines.
* Zinc anodized small parts as dissembled.
* Dissembled SX Transmission refilled w/Honda gear fluid and restored.
* Wheels reworked with new bearings. Rubber switched front to rear.
* Restored handle mechanism, cabling and bearing points.
I am sure I have left something out but you folks get the picture, what an experience. I have not put the new stickers caution etc. for the paint to fully cure. Thanks to comment, question.
View attachment 29168View attachment 29169View attachment 29170

