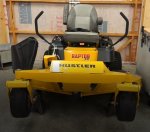
Raptor SD 54" Deck Discharge kit.

BoylermanCT

Well-Known Member
Joined
Jun 7, 2016
Threads
12
Messages
164
Has anyone installed the deck mod kit? Curious what exactly is included and how to do it - weld it, drill holes and use screws etc. Was mowing yesterday and this morning, and even though the weather was dry all day Thursday and Friday, it had rained Tuesday and Wednesday, the grass was not wet to the touch, but wet enough on the inside that it was clumping and partially clogged multiple times, burping out a football size mass of wet grass and completely clogged the chute two times so I had to stop and clean it out by hand. Grass is growing like crazy, mowed on Monday, and by this morning (Sat) it was tall enough and thick enough to really work the mower. Cutting out the bar across the chute seems like the answer for me, and I want to do it the right way according to Hustler and not simply attack the deck with my grinder.
 
Last edited:

Kremeneon

Well-Known Member
Joined
Apr 17, 2014
Threads
7
Messages
242
Has anyone installed the deck mod kit? Curious what exactly is included and how to do it - weld it, drill holes and use screws etc.
I don't know that anyone on here has. From what I can tell the kit comes with a cutting template for the bar, a drilling template for the reinforcing angle iron piece on the top of the deck, that reinforcing piece, and two sets of nuts and bolts to secure it.

Was mowing yesterday and this morning, and even though the weather was dry all day Thursday and Friday, it had rained Tuesday and Wednesday, the grass was not wet to the touch, but wet enough on the inside that it was clumping and partially clogged multiple times, burping out a football size mass of wet grass and completely clogged the chute two times so I had to stop and clean it out by hand. Grass is growing like crazy, mowed on Monday, and by this morning (Sat) it was tall enough and thick enough to really work the mower. Cutting out the bar across the chute seems like the answer for me, and I want to do it the right way according to Hustler and not simply attack the deck with my grinder.
I used a metal blade on a sawzall, just took a few minutes. A cutting wheel would work great for the top part of the rear opening but that beefy bar at the bottom may test your mettle with a grinder. And it may cook off a bit more paint that you need to.
 

DJ660

Active Member
Joined
May 22, 2013
Threads
1
Messages
58
I have on a 60" RSD. For the most part your cutting lower bar out from discharge area (Same as others have been doing on here) and installing the reinforcing plate across the top of the deck. I've priced it out both ways and the KIT is by far CHEAPER than buying just the reinforcing plate.
 

BoylermanCT

Well-Known Member
Joined
Jun 7, 2016
Threads
12
Messages
164
I ordered the kit and will tell everyone about it when it comes next week. I did jump the gun and used my sawzall and cut out the existing bar this morning.

I have thought about adding some plate metal to cover the opening at the top of the deck. Makes me nervous that the only thing preventing me from stepping into the spinning blades is the plastic discharge chute which I cut back to the minimum length to reduce clogs (and lets me mow close to trees, posts, fences etc on both sides ot the deck). The only down side is I could never buy the bagger, but I have no plans to do that.
 

mhavanti

Well-Known Member
Joined
Oct 12, 2014
Threads
12
Messages
924
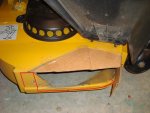
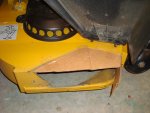
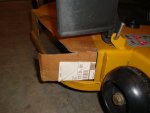
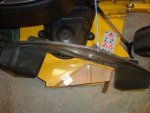
I was "made fun of" for showing the cardboard templates of the deck filler for the top and front (leading edge of the deck discharge chute). I know, I took it as it was meant, funnin'.

Anyhow, here are some photos of the templates taped into place to get an idea how it will look and I don't believe there is any reason to have the over the top angle iron in place if the filler plate is welded into place.

2 Possible enlargements.jpgDSC04895.JPGDSC04896.JPGDSC04897.JPG

The piece of cardboard sticking out of the front wasn't trimmed back when I had the brilliant idea of shooting those photos as you can see. Interesting side note: I forgot to remove those when I did the first mow this season and the stinking cardboard was still in place until I opened the chute to blow out the deck and put the mower away. It was barely hanging on, however, still there. That is some mighty fine packing tape.

Welder isn't in the new location as of yet. Soon as the rascal is in the shop. That large gap is GONE. However, leaving the rubber chute diverter. Hope the welding is nearly as good as the packing tape.

Go for it Boyler!

Max
 

BoylermanCT

Well-Known Member
Joined
Jun 7, 2016
Threads
12
Messages
164
Mhavanti, I think you have the right idea. That's exactly what I was thinking I would like to do. Thanks for the pics. How would you cut the plate steel in the correct shape?
 

mhavanti

Well-Known Member
Joined
Oct 12, 2014
Threads
12
Messages
924
You can cut 7 gauge to 10 gauge fairly easily with a 4 1/2" thin grinding wheel or even better, a 7" or 9" thin cutting wheel if you have a larger grinder. You can also cut it with a sawzall metal blade. You will just have to go slow and steady. Then grind it to a final fit. I've got so many things going on at this time I can't get to it right now. It is coming along with several other modifications.

I do intend to install the flex forks I just received though.

Have fun with it.
 

BoylermanCT

Well-Known Member
Joined
Jun 7, 2016
Threads
12
Messages
164
I have flex forks on my SD, and I just mowed my father-in-laws place with his Fastrak without flex forks. His ride was brutal. I am guessing his tire pressure is also much higher than mine, I run mine at 8 PSI, and the ride is much softer than the Fastrak.

My Hustler dealer called me today that the deck modification kit is in. I will pick it up on Saturday and report back.
 

Kremeneon

Well-Known Member
Joined
Apr 17, 2014
Threads
7
Messages
242
My Hustler dealer called me today that the deck modification kit is in. I will pick it up on Saturday and report back.

I'd be quite interested in a scan or good photos of the instructions.
 

mhavanti

Well-Known Member
Joined
Oct 12, 2014
Threads
12
Messages
924
Boyler,

Installed my flex forks today. Couldn't wait for the paint to dry and got out on it and ran it across curbs, sharp edged concrete, sprinkler valve indentions, etc.

Glad I put them on. Between the forks and the suspension seat kit from Seat Warehouse, now the stinking thing seems as though it is sitting still. Now I've got to put a set of 3400 hydros on it to make it feel like it is getting anyplace. lol

I had to paint them as the black on the flex forks makes me think of a Cub Cadet. Ummm, NAH!

Max

Flex Forks - Paint Match.jpg
 
Top