Kohler Courage 20 / SV600 Walbro 3 carburetor leaking from float valve

Scrubcadet10

Moderator
Staff member
Joined
Sep 24, 2017
Threads
250
Messages
6,441
  • / Kohler Courage 20 / SV600 Walbro 3 carburetor leaking from float valve
Make sure the Idle screw (not the mixture screw) is screwed out some, that screw makes physical contact with the throttle shaft where the linkage hooks to to set your idle rpm.
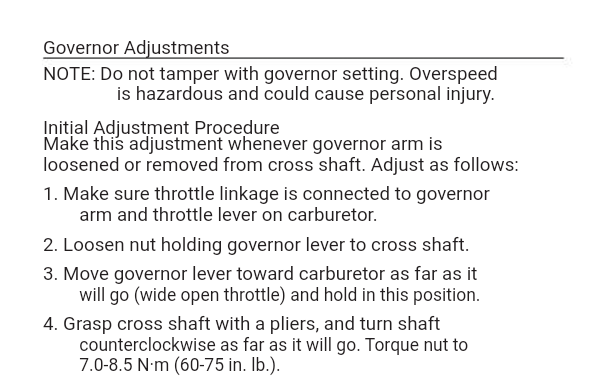
If that checks out, I'd do this, dont worry about torquing the nut. just get it tight.
Screenshot-2022-03-28-16-04-13-2.png
 

shrout1

Member
Joined
Mar 9, 2022
Threads
1
Messages
37
  • / Kohler Courage 20 / SV600 Walbro 3 carburetor leaking from float valve
Make sure the Idle screw (not the mixture screw) is screwed out some, that screw makes physical contact with the throttle shaft where the linkage hooks to to set your idle rpm.
If that checks out, I'd do this, dont worry about torquing the nut. just get it tight.
Screenshot-2022-03-28-16-04-13-2.png
Yeah sadly I have done all of that, including backing out the idle adjustment screw almost all the way.

I think the governor is shot. I need to monkey around with it a little more, but I really hate to run the engine in an overspeed condition for any period of time.

Man this thing is proving to be a real pain.
 

shrout1

Member
Joined
Mar 9, 2022
Threads
1
Messages
37
  • / Kohler Courage 20 / SV600 Walbro 3 carburetor leaking from float valve
So I tweaked the governor a whole bunch and had someone sitting on the mower who could turn it off quickly. The factory adjustment in the manual actually turns the governor *up* all the way, hence the crazy overspend. After turning it down the mower was actually idling a little lean - maybe because it couldnt pull off the main jet. I cranked the idle jet up a bunch and things smoothed out a bit. The mower seems to be running between 1900 rpms at the low end and 3000 at the top. It has headspace to make it up to 4900 (ask me how I know this) but it seems like it's running well enough for now.... So I will try mowing with it next weekend... we'll see if the blade deck gives me any trouble. Thanks again for all your help!
 

shrout1

Member
Joined
Mar 9, 2022
Threads
1
Messages
37
  • / Kohler Courage 20 / SV600 Walbro 3 carburetor leaking from float valve
It runs! It's still a little lean on the bottom of the throttle but it cuts the lawn so it's going to stay that way.

There are still a couple things wrong with it; it moves at about 2 mph... slower than a walk. I believe the accelerator bracket that connects the pedal to the transmission has been bent by years of a lead foot. This thread identified the issue and I can see that my bracket is bent when I look under the tractor (https://www.lawnmowerforum.com/threads/troubleshooting-slow-troy-bilt-bronco-2011-fixed.60636/).

Also, the steering is all kinds of messed up as the bushing for the "tie rod" (not 100% sure what the connecting rod to the wheels is called) to the steering gear is cracked and broken. The wheel has to be turned pretty far to one side before it starts to engage the tie rod.

I have all the replacement parts on the way from MTD, so hopefully I can get it back to 100% in the next couple weeks.

Also, this thing turns out to be a 2010 Troy Bilt Bronco, no surprise; the engine is a 2010 Kohler Courage so I figured the mower might be the same vintage.

This is actually the MTD Transmatic 780 mower. MTD rebadges them. I think my parents bought an earlier generation of this exact mower that I used to mow the lawn many moons ago. And now I know how to fix one... Will follow up when I get it running 100%!
 

shrout1

Member
Joined
Mar 9, 2022
Threads
1
Messages
37
  • / Kohler Courage 20 / SV600 Walbro 3 carburetor leaking from float valve
Just a follow up to finish discussing my fixes. I've fixed just about everything so far... there were a few more problems...

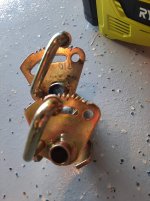
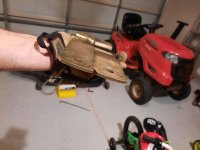
  • Accelerator bracket replacement
    • I replaced the old accelerator bracket with a new one, but this was while replacing all the internal belts
    • Accelerator_Brackets_Compared.jpg
    • In order to replace this I had to drop the blade deck and take off all the springs connected to the shaft this bracket is connected to.
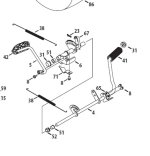
    • There is a strange circular retaining clip in front of this bracket that has to be forced off (see item #31 in the diagram below)
    • The kotter pin (part #23) has to be removed and then the strange wrench like brace has to be separated from the bracket.
    • Once part 71 is removed (the mounting bracket for the shaft) then the accelerator bracket can slide off.
    • Accelerator_Bracket.jpg
    • The new bracket did not have tapped screw holes for the pedal to mount in to - I had to tap it with a 5/16 18 thread count tap.
    • See the "Illustrated Parts Manual" for the transmatic 780 to get these same diagrams.
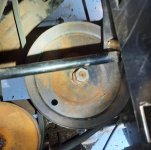
  • I had to replace the transmission pulley that sits underneath the driver's seat as it had become stripped:
    • Stripped_Pulley.jpg
    • The flange nut on the top was seized in place, making it impossible to remove the pulley without impact tools.
    • I was able to drop the transmission off the tractor, manipulate its orientation and have just enough room to use a 23mm service wrench holding the underside of the transmission hub against the frame and a 7/8" impact socket with an extension and a U joint to remove the flange nut.
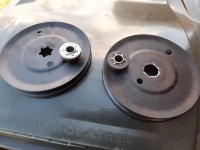
    • I had to order a replacement pulley and hub as both were stripped beyond usability - you can see a side by side comparison here:
    • Stripped_Pulley_and_Hub.jpg
    • Also I had to get a small pulley puller from Autozone in order to get the hub off the splined transmission shaft.
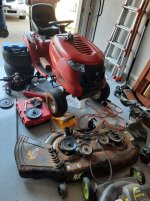
    • My tractor was in disassembled state for quite a while as I collected all the parts and tools I needed:

    • Tractor_Disassembled.jpg
  • Belts required replacement
    • The deck belt had slipped off multiple times and was either sized incorrectly or stretched out too far.
    • The internal belts looked serviceable but it seemed like the right time to swap them
    • I could not find a correctly sized transmission belt, but the original showed no signs of wear (probably because it doesn't slip across the pulleys like the other belts) so I left it in place. It is working so far.
  • Idler pulleys & bracket needed replacement
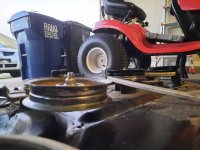
    • The old idler pulleys had been damaged by the belt slipping off. It seemed that they were not in proper alignment on top of the blade deck:
    • Old_Pulley_Alignment.jpg
    • I ordered a new bracket for the idler pulley that is connected directly to the PTO cable (the nearest pulley in this image), replacement idler pulleys and replacement "brakes" for the idlers. I also got new belt retainer brackets (those black guards that stick up and over the pulleys)
    • The new bracket did not come with tapped screw holes for the brake so I, again, had to tap new holes into it. It needed a 1/4 20 thread count tap for those screws.
    • Ironically the new bracket seemed identical to the old one in terms of its shape so I don't think the bracket was playing a part. I replaced it to be certain
    • Brackets_Compared.jpg
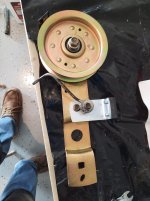
    • I should have taken a picture of the entire deck reassembled but I was tired and wanted to mow the lawn :p Here is the newly assembled bracket and idler with the new brake and belt guard. Notice that the new belt guard does not stick out over the top of the pulley. That will be super nice for replacing the belt as the older design required removal of the entire assembly. Now it can be done with just the pulley out.
    • Right_Idler_Pulley_w_Bracket_Reassembled.jpg
  • After all this it decided that it wouldn't start anymore :p
    • Turns out the PTO lever isn't returning home all the way so it has to be pushed further back towards "PTO off" in order to start the mower. I can live with that for now.
  • I just took it out for a spin
    • The new blade deck idler pulley aligns better with the main crankshaft pulley - I think the belt geometry is better than before
    • The new belt guards also seem to be keeping the belt in place.
    • The new transmission pulley combined with the new accelerator bracket have greatly improved the speed of the mower. Still not as fast as I'd like, but a lot better.
So my $500 mower has turned into about a $1300 mower after factoring in new tools, parts etc. Not quite the "deal" I was looking for but it works and it was a little less expensive than a new one. I've also learned *a lot* about small engine repair, carburetors etc. Hopefully this thing continues to run for a few more years.

Man I want to go buy an electric :p
 

StarTech

Lawn Royalty
Top Poster Of Month
Joined
Feb 19, 2020
Threads
79
Messages
10,260
  • / Kohler Courage 20 / SV600 Walbro 3 carburetor leaking from float valve
So my $500 mower has turned into about a $1300 mower after factoring in new tools, parts etc. Not quite the "deal" I was looking for but it works and it was a little less expensive than a new one. I've also learned *a lot* about small engine repair, carburetors etc. Hopefully this thing continues to run for a few more years.
And just I have nearly 10K in tools in order to run a decent shop. And I just spent $200 to do a $100 job but I wouldn't need to buy the same tools again on the next job.
 

Scrubcadet10

Moderator
Staff member
Joined
Sep 24, 2017
Threads
250
Messages
6,441
  • / Kohler Courage 20 / SV600 Walbro 3 carburetor leaking from float valve
Just a follow up to finish discussing my fixes. I've fixed just about everything so far... there were a few more problems...

  • Accelerator bracket replacement
    • I replaced the old accelerator bracket with a new one, but this was while replacing all the internal belts
    • View attachment 60983
    • In order to replace this I had to drop the blade deck and take off all the springs connected to the shaft this bracket is connected to.
    • There is a strange circular retaining clip in front of this bracket that has to be forced off (see item #31 in the diagram below)
    • The kotter pin (part #23) has to be removed and then the strange wrench like brace has to be separated from the bracket.
    • Once part 71 is removed (the mounting bracket for the shaft) then the accelerator bracket can slide off.
    • View attachment 60984
    • The new bracket did not have tapped screw holes for the pedal to mount in to - I had to tap it with a 5/16 18 thread count tap.
    • See the "Illustrated Parts Manual" for the transmatic 780 to get these same diagrams.
  • I had to replace the transmission pulley that sits underneath the driver's seat as it had become stripped:
    • View attachment 60985
    • The flange nut on the top was seized in place, making it impossible to remove the pulley without impact tools.
    • I was able to drop the transmission off the tractor, manipulate its orientation and have just enough room to use a 23mm service wrench holding the underside of the transmission hub against the frame and a 7/8" impact socket with an extension and a U joint to remove the flange nut.
    • I had to order a replacement pulley and hub as both were stripped beyond usability - you can see a side by side comparison here:
    • View attachment 60986
    • Also I had to get a small pulley puller from Autozone in order to get the hub off the splined transmission shaft.
    • My tractor was in disassembled state for quite a while as I collected all the parts and tools I needed:

    • View attachment 60987
  • Belts required replacement
    • The deck belt had slipped off multiple times and was either sized incorrectly or stretched out too far.
    • The internal belts looked serviceable but it seemed like the right time to swap them
    • I could not find a correctly sized transmission belt, but the original showed no signs of wear (probably because it doesn't slip across the pulleys like the other belts) so I left it in place. It is working so far.
  • Idler pulleys & bracket needed replacement
    • The old idler pulleys had been damaged by the belt slipping off. It seemed that they were not in proper alignment on top of the blade deck:
    • View attachment 60988
    • I ordered a new bracket for the idler pulley that is connected directly to the PTO cable (the nearest pulley in this image), replacement idler pulleys and replacement "brakes" for the idlers. I also got new belt retainer brackets (those black guards that stick up and over the pulleys)
    • The new bracket did not come with tapped screw holes for the brake so I, again, had to tap new holes into it. It needed a 1/4 20 thread count tap for those screws.
    • Ironically the new bracket seemed identical to the old one in terms of its shape so I don't think the bracket was playing a part. I replaced it to be certain
    • View attachment 60989
    • I should have taken a picture of the entire deck reassembled but I was tired and wanted to mow the lawn :p Here is the newly assembled bracket and idler with the new brake and belt guard. Notice that the new belt guard does not stick out over the top of the pulley. That will be super nice for replacing the belt as the older design required removal of the entire assembly. Now it can be done with just the pulley out.
    • View attachment 60990
  • After all this it decided that it wouldn't start anymore :p
    • Turns out the PTO lever isn't returning home all the way so it has to be pushed further back towards "PTO off" in order to start the mower. I can live with that for now.
  • I just took it out for a spin
    • The new blade deck idler pulley aligns better with the main crankshaft pulley - I think the belt geometry is better than before
    • The new belt guards also seem to be keeping the belt in place.
    • The new transmission pulley combined with the new accelerator bracket have greatly improved the speed of the mower. Still not as fast as I'd like, but a lot better.
So my $500 mower has turned into about a $1300 mower after factoring in new tools, parts etc. Not quite the "deal" I was looking for but it works and it was a little less expensive than a new one. I've also learned *a lot* about small engine repair, carburetors etc. Hopefully this thing continues to run for a few more years.

Man I want to go buy an electric :p
And plus, you know the work was done right! 👍
 

shrout1

Member
Joined
Mar 9, 2022
Threads
1
Messages
37
  • / Kohler Courage 20 / SV600 Walbro 3 carburetor leaking from float valve
And just I have nearly 10K in tools in order to run a decent shop. And I just spent $200 to do a $100 job but I wouldn't need to buy the same tools again on the next job.
I bought a '99 Maxima back in 2014 to learn to drive stick. I think I spent like $2k on tools while I owned it but a lot of them came in handy here. Shame is that I own everything needed to fix a Japanese import but nothing is standard lol. I had to go buy a 7/8" impact socket just for this thing :p At least I have what I need now!
 

shrout1

Member
Joined
Mar 9, 2022
Threads
1
Messages
37
  • / Kohler Courage 20 / SV600 Walbro 3 carburetor leaking from float valve
And plus, you know the work was done right! 👍
Haha that might be up for debate!!! :D We'll see how it holds up. Now I'm just waiting for the plastic cam gears in my Kohler Courage engine to break. It's just a matter of time ;)
 

shrout1

Member
Joined
Mar 9, 2022
Threads
1
Messages
37
  • / Kohler Courage 20 / SV600 Walbro 3 carburetor leaking from float valve
So my last dilemma...

I bought this mower from a fellow on Facebook... He buys, "fixes" and resells used mowers. He told me that "this is still his mower and he'll work on it for free, I just have to give him a call and get the parts for him..." I wasn't sure that I wanted to give him a call due to the state of the mower and the amount of effort involved.

I have thought about leaving him a review on his seller's page but... I never did call him. So... do I A) Do nothing whatsoever or B) reach out to this guy and be like, "Man, don't buy another mower like that, you're gonna get burnt".

I don't want anything from him but... *assuming* he was too inexperienced to understand how much of a mess this thing was (benefit of the doubt) then is it worth while to just give him my lessons learned and move on? Or do I just leave it? If the guy meant well then I want to try and help him... if he didn't then... so much water under a bridge.

I'd love your thoughts :)
 
Top