Ignition Coil Gapping

sgkent

Lawn Addict
Joined
Sep 27, 2017
Threads
33
Messages
1,695
That is probably true but the models mentioned early in the thread appear to have a different oil filler and flywheel magnet. I was hoping someone would look at the photo and recognize the engine. I mean you could have an engine that the flywheel and coil have both been swapped on. We see lots of strange things here.
 

VegetiveSteam

Well-Known Member
Joined
Jun 1, 2022
Threads
0
Messages
446
That is probably true but the models mentioned early in the thread appear to have a different oil filler and flywheel magnet. I was hoping someone would look at the photo and recognize the engine. I mean you could have an engine that the flywheel and coil have both been swapped on. We see lots of strange things here.
Of course that's exactly what I did. I looked at photo and recognized it as a Kohler. No question about it. It's a Kohler Command vertical shaft single cylinder. That blower housing and air filter and the upside down oil filter scream Kohler. 100% without a doubt.
 

Whalensdad

Member
Joined
Oct 19, 2022
Threads
3
Messages
29
There should never be any direct battery voltage going to any magneto type ignition coil so I don't quite follow what you have going on there. I actually taught Kohler technicians for 27 years and you definitely have something cobbled together there. And from you pictures you do for sure have a Kohler CV engine. What was the regulator part number and what wires did you connect to it? The fuel solenoid and Speed Advance Module shouldn't have any connection to the stator. Those two components should be powered through the key switch.
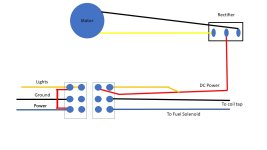
I agree about the direct battery voltage. There isn't any going to it the coil and there never was. I purchased a KH-25-755-03 replacement for the rectifier. The stator had 2 wires, Black and Yellow. I connected them to the outer connections of the rectifier. I connected my red power lead to the center. This is how the wiring was setup in both the before and after.original.jpgcurrent wiring.jpg
 

VegetiveSteam

Well-Known Member
Joined
Jun 1, 2022
Threads
0
Messages
446
Where you now have the regulator/rectifier mounted was there anything mounted there before? Normally on a 3 amp system there is a blank plate there. The 15 amp systems use that regulator/rectifier and have two white wires coming off the stator. The center spade on the regulator goes to the B+ side of the battery.
 

VegetiveSteam

Well-Known Member
Joined
Jun 1, 2022
Threads
0
Messages
446
Yeah that's because it doesn't need a regulator/rectifier. It's actually serving no useful purpose. If you can get your hands on an actual correct 12 584 04-S I'd try that.
 

StarTech

Lawn Royalty
Top Poster Of Month
Joined
Feb 19, 2020
Threads
91
Messages
11,476
Sorry the wiring posted is incorrect.

Personally I highly suggest the OP get a copy of the service manual.


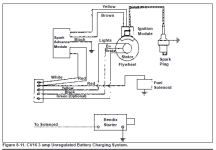
Wiring per the service manual for 3 amp system.
1666690627541.png
B+ Lead will have one 200v 3-5 amp diode in it. These do short out at times and need replacing.
Also note the stator brake is optional and may not even be wired. IE No green wire.

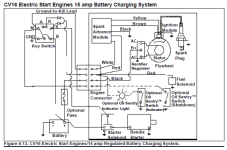
Wiring per Service manual for 15 amp system.
1666690731849.png
I hate to point this out but engine doesn't have the same flywheel as the CV11-CV15. Which is why the coil is not matching up.

With all the time wasted here it can be more productive just to dig out the high tension lead and replace it in the Tecumseh coil. It is replaceable with patience. Use a 7mm lead and a new terminal. straight or 90 degree version. Places like Oreilly's has the terminals. And probably one of local mower shops with have the lead. I know I buy all three in bulk here. Exacto knife is one of the tools needed along epoxy to seal the new lead.
 

Whalensdad

Member
Joined
Oct 19, 2022
Threads
3
Messages
29
Sorry the wiring posted is incorrect.

Personally I highly suggest the OP get a copy of the service manual.


Wiring per the service manual for 3 amp system.
View attachment 62638
B+ Lead will have one 200v 3-5 amp diode in it. These do short out at times and need replacing.
Also note the stator brake is optional and may not even be wired. IE No green wire.

Wiring per Service manual for 15 amp system.
View attachment 62639
I hate to point this out but engine doesn't have the same flywheel as the CV11-CV15. Which is why the coil is not matching up.

With all the time wasted here it can be more productive just to dig out the high tension lead and replace it in the Tecumseh coil. It is replaceable with patience. Use a 7mm lead and a new terminal. straight or 90 degree version. Places like Oreilly's has the terminals. And probably one of local mower shops with have the lead. I know I buy all three in bulk here. Exacto knife is one of the tools needed along epoxy to seal the new lead.
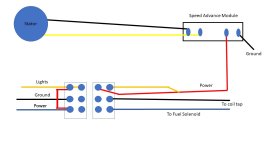
Thanks. Since the coil in the unit wasn't wired to the SAM in the first place, I just decided to go with another Tecumsah coil. It was cheaper than the time spent to replace the wire. I'll keep the old one as a spare. I'm keeping the rectifier though since I wasn't getting enough voltage to keep the battery charged. I don't think it will hurt. And yes, there was no green wire on my stator. Going through this thread helped me learn a lot about the engine I have. I'm guessing it was a rebuilt and someone swapped the flywheel at some point. This is what happens when you buy off craigslist. Thanks again for all of the advice.
 

StarTech

Lawn Royalty
Top Poster Of Month
Joined
Feb 19, 2020
Threads
91
Messages
11,476
Yes there plenty of rig jobs out there. And they frustrate the **** out of me of how they just keep getting by with things.

Personally I have always try to keep thing as they are intended as I think of the next tech beside myself that may get my repaired equipment later.

But lately I have someone in the area that I patching things up and then I got to straighten the mess out. Just had two of those crappy repairs to show up in my shop. It takes at least twice as long as I have to undo all the rig work before I can repair the equipment.

I got a Kawasaki 3010 Mule here that I have already put in over 24 hrs of labor to get it back to good condition. Even then it came with a water leak due to a warp part. Plus I just reworked the parking brakes yesterday finding intentionally bent parts on the left rear. Hopefully I can get the CVT drive back on today before the rain gets here.

I had to stop and fix a Husqvarna 455 Rancher for a customer. Simple repair of replacing primer, fuel lines, re-tune the carburetor, and sharpen the chain but still takes time to do.
 
Top