Honda HRX217HXA Grass Door

Griz

Member
Joined
Jan 7, 2013
Threads
6
Messages
17
Welcome to LawnMowerForum!

I moved your thread to the Honda forum. :smile:


Oops. My bad. You would think I would know better since I Admin another forum..
 
Joined
Jun 8, 2012
Threads
321
Messages
6,749
Just curious, what forum is it?
Some new members ask a question and then never log back on to see the answers, so I just wanted to tell you that robert@honda might not respond to you tonight, so don't forget to check back tomorrow. :smile:
Good luck! :smile:
 

Griz

Member
Joined
Jan 7, 2013
Threads
6
Messages
17
Just curious, what forum is it?
Some new members ask a question and then never log back on to see the answers, so I just wanted to tell you that robert@honda might not respond to you tonight, so don't forget to check back tomorrow. :smile:
Good luck! :smile:


Florida Sportsman Magazine forum Florida Sportsman Forums
 

robert@honda

Lawn Addict
Joined
Nov 2, 2011
Threads
97
Messages
1,791
Griz, take a look at these images from the parts catalog and shop manual. Should be enough for you to compare and see what's not right with your HRX. If not, see if you can upload a photo of where the problem is on the mower.

Before working on your HRX, always be sure to:
1. Turn the fuel valve to OFF.
2. Disconnect the spark plug cap.
3. Only tip the mower with the LEFT SIDE UP, right side down.
 

Attachments

  • HRX shutter shop manual.jpg
    HRX shutter shop manual.jpg
    251.8 KB · Views: 109
  • HRX shutter parts drawing.jpg
    HRX shutter parts drawing.jpg
    67.9 KB · Views: 76

Griz

Member
Joined
Jan 7, 2013
Threads
6
Messages
17
Thanks, Robert. That clears it up. Somehow the fork on the end of the lever came away from the bolt that connects it to the door. I don't think the nut fell off since the pin is still in place and I would think it would have fallen out otherwise. Perhaps the nut is loose.

Just out of curiosity, why only tilt with the left side up, because of the oil filler? I'm going to drain the fuel tank and go ahead and drain the oil while I'm at it so it shouldn't be an issue as long as I remember to fill with fresh oil when I am finished with the repair.

I even wonder if the repair might be easier if I removed the engine from the deck.

Thanks so much for your help. Great forum and resource, as are most.

Probably won't get to it until this weekend. I'll try to document and take some pictures.

Another question, do any of you have issues with the mowers loping while running at low RPM? Seems like the only fix I have found is to replace the carb, and that only seems to last for a while. I don't know if it's gas, ethanol, etc. I do stabilize and have decarboned the engine from time to time.
 

robert@honda

Lawn Addict
Joined
Nov 2, 2011
Threads
97
Messages
1,791
Just out of curiosity, why only tilt with the left side up, because of the oil filler?

If there's any oil in the engine, and you tip the mower right side up, the oil will drain through the breather tube and soak the air cleaner, filter, and possibly drain into the carburetor.

I even wonder if the repair might be easier if I removed the engine from the deck.

Probably not necessary. You may need to remove some scrolls and panels (maybe). Every part of the shutter should be serviceable with the engine in place.

Another question, do any of you have issues with the mowers loping while running at low RPM?

Probably some gunk in the carburetor. Here's a link with a detailed guide to cleaning the carburetor; a new one for your HRX, if necessary, is only about $20.

How To Clean a Honda Carburetor

If you expect to do regular service on your HRX, might want to invest in a paper shop manual. Honda sells them direct on eBay, free shipping, and free updates for 3 years. Here's a link:

Honda Power Equipment Shop Manuals on eBay
 

Griz

Member
Joined
Jan 7, 2013
Threads
6
Messages
17
Ok. With the help of Roberts drawing I got it repaired. I was going to take pictures, but my hands were filthy. I can give a walk through so if anyone encounters this issue in the future.

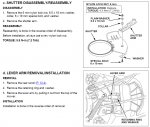
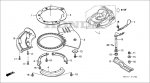
To access the grass door I tipped the lawn mower on its right side as per Robert's suggestion as well as unplugged the spark plug.You will first need to remove the blades. Then there are three retaining plates that are each held on by two bolts each. The main thing here is pay attention where the one plate goes that's held on by two bolts that are much longer than the other four, it will just make reassembly a little easier. Remove all of the bolts and retaining plates. Now you can remove the door.

On the door there is a carriage bolt that goes through a retaining plate on the bottom side and is held in place by a washer and lock nut. It is this lock not that sits in between the the tines in the fork at the end of the grass door lever. It is not attached to the fork as I first assumed. The nut was so corroded and rounded I had to use an angle grinder to get it off. In doing so I also damaged a spacer that went between the bolt and nut. I bought a stainless carriage bolt about an inch long, along with a fender washer and lock nut. I figured between the metal washer/retainer on one side of the door and a fender washer on the other I could get around replacing the spacer. Then it was just a matter of replacing the door and ensuring that the lock nut was placed between the tines of the fork. I then replaced the three retaining plates and then tested the door's operation. Then satisfied with the operation of the lever replaced the blades and reconnected the spark plug.

Let the mower sit upright for an hour or so just to make sure the oil had settled and then cranked ti to make sure everything operated ok.

I used a 3/8 impact wrench that made the job much easier than wrenches. If I had had the bolts or correct parts for this repair I could probably do it again in 15-20 minutes.

I started to order all new replacement parts (door, bolts, nuts, spacer, fork), but figured I don't use the door that much and it lasted almost eight years although all of the parts including shipping was about $502. Figure I'll wait until it wears out again and do it then. The reason I mention the fork is that it was pretty rusty.

Anyway, if you have this issue don't hesitate to tackle it yourself.
 
Joined
Jun 8, 2012
Threads
321
Messages
6,749
I'm glad you got it repaired! And thanks for the info on how you did it....that will definitely help people with the same problem! :smile:
 

Griz

Member
Joined
Jan 7, 2013
Threads
6
Messages
17
I'm glad you got it repaired! And thanks for the info on how you did it....that will definitely help people with the same problem! :smile:


After seeing the condition of the fork that operates the door and the door itself after grinding the bolt off I decided I would replace the parts with new since they were relatively cheap and the job was easy. So order the fork, door, bolt, spacer and nut to see what they originally looked like. Well, I was wrong about the nut being what the fork was operated by. Actually the spacer that bolts on through the door is a round affair. So I replaced it but used the same stainless carriage bolt and lock nut I bought since they were better than the original.

Getting the fork off was simple. When you remove the three plates that retain the door there's a silver metal piece that is retained by the plates and also holds the fork on the shaft. After you remove it there is a pin on the bottom of the shaft that you can remove with your fingers and then the fork lifts right off.

Going back together just make sure the spacer is between the tines in the fork before you bolt everything back together.
 
Top