Repairs Gas tank replacement for Craftsman (part #179115 )?

bertsmobile1

Lawn Royalty
Joined
Nov 29, 2014
Threads
65
Messages
24,995
I don't know if i am doing something wrong but i have not had much luck "welding" my tank(s).

While it is not a physical permanent fix, it has lasted several years on multiple equipment (stihl tank, briggs tank, etc)
It is goop in the walmart tape\glue section brand Goop in yellow tube.

I just rough the surface with sandpaper clean surface w/thinner, apply.
fwiw.

You are glueing, not welding.
Welding is very easy,'If the surfaces are clean they will weld together and become one with the application of enough heat for the surfaces to obtain a glassy appearance .
The molecules of the two pieces actually join together and never come apart.
If you rough up the surcase the two pieces of plastic can not make intermate contact as air gets trapped in all the grooves.

Most plastics have a symbol on them to tell you what type of plastic they are and just as long as they are the same, they will weld when heated.
I preffer to use the heat gun so nothing touches the bonding surfaces then use a hot iron to work then together and work out any trapped air.
 

upupandaway

Well-Known Member
Joined
Jul 3, 2015
Threads
36
Messages
620
You are glueing, not welding.
Welding is very easy,

When i say i tried welding, i bought the tool to weld\melt the tank pieces back together. I cleaned the surface and roughed it up but i just could not ever get the plastic to melt together. I tried on several machines and if it did melt together, many times it left new very small cracks. I assume the cracks from the plastic cracking from cooling unevenly?!?!?!? Whatever the case, as i said, I tried this glue a few years ago and so far knock on wood, they still don't leak- especially the trimmers where the tank is under pressure when running.
 

bertsmobile1

Lawn Royalty
Joined
Nov 29, 2014
Threads
65
Messages
24,995
Well, you have found a system that works for you so that is good.
Plastic is like metal, a generic term that covers a lot of different materials.
So when you weld plastic you have to use the same type of plastic to make the patch.

The most common fault is using one of the soldering iron type welders that makes the surfaces dirty if you are not very careful.
After that it is overheating so the plastic actually melts and just like metal when molten it will try to make a ball.
You don't need to melt the filler, like solder or metal filler rod, you just have to activate the ends of the molecules and visually that happens about the same time as the surface seems to look glassy or wet.

Finally, if the base material is really brittle then it is too late, UV light has degraded it to a point that a repair is not possible .
 

upupandaway

Well-Known Member
Joined
Jul 3, 2015
Threads
36
Messages
620
...you have found a system that works for you....
I made sure the surface was clean sanding it down, washing it with thinner, solvent, etc to remove any oil. On the briggs, i had the big tab so i had that to melt or else i had a busted tank to sacrifice , but alas, not for me...:-(
I would feel better welding especially being the trimmer tank is under pressure.
 

bertsmobile1

Lawn Royalty
Joined
Nov 29, 2014
Threads
65
Messages
24,995
Down here we get milk in HDPE bottles which are quite thin.
HDPE is what most hand held petrol tanks are made of.
Sanding is what you are doing wrong.
When you sand HDPE tiny bits of the abrasive get stuck in the plastic.
If you have to mechanicaly clean then soda blasting followed by a wash in vinegar ( or any other dilute acid ) is the best way to go.
Then very hot soapy water then plain water then acetone.
Heat the tank till it looks glassy then hold the patch against the tank and heat both till the patch droops onto the tank.
From the other side press it into the tank with the back of a spoon to work out all of the air bubbles.
Walk away and let it go stone cold then pump up to 15 psi ( tank works at 3 to 7 psi ) and check for pressure integrity.
 

GT50000000

Forum Newbie
Joined
Jul 24, 2020
Threads
0
Messages
2
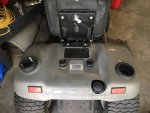
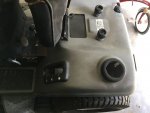
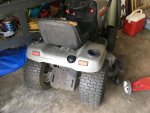
I had the same problem on my Craftsman GT5000 Model 917 276050, big hole in the back of the tank so likely not repairable. I searched online for the replacement part #179115 but it is discontinued. Looked in junkyards in my area and could not find it, an old tank may end up cracking soon anyway. Ended up using a fuel tank off a different model craftsman, part # 151346, about $60 new online. Its the same shape as the original tank minus the portion that sticks over the left rear wheel. The original bracket over the top of the tank is the same. The fuel filler neck is in the rear so I had to cut a hole in the fender behind the seat(used a jig saw with metal blade). This was the only modification other than zip ties to hold it down a little tighter, this may not even be necessary because when you bolt the fender back on it sits on top of the tank and holds it in place. I filled in the hole where the old fuel cap was with a cup holder and good to go. I will post pics later.
 

StarTech

Lawn Royalty
Top Poster Of Month
Joined
Feb 19, 2020
Threads
93
Messages
11,599
Yes it takes modifying as the 532179115 is a left hand fill and the 532151346 is a right hand fill.
 

GT50000000

Forum Newbie
Joined
Jul 24, 2020
Threads
0
Messages
2
I had the same problem on my Craftsman GT5000 Model 917 276050, big hole in the back of the tank so likely not repairable. I searched online for the replacement part #179115 but it is discontinued. Looked in junkyards in my area and could not find it, an old tank may end up cracking soon anyway. Ended up using a fuel tank off a different model craftsman, part # 151346, about $60 new online. Its the same shape as the original tank minus the portion that sticks over the left rear wheel. The original bracket over the top of the tank is the same. The fuel filler neck is in the rear so I had to cut a hole in the fender behind the seat(used a jig saw with metal blade). This was the only modification other than zip ties to hold it down a little tighter, this may not even be necessary because when you bolt the fender back on it sits on top of the tank and holds it in place. I filled in the hole where the old fuel cap was with a cup holder and good to go. I will post pics later.
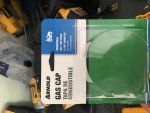
Fairly simple project, cut about a 4 inch hole in the fender so you have room to get the cap on and off. I prefer this over putting a tank in another location like under the hood. Probably holds more fuel too, I think this is 2.5 gallon tank. I picked up this tank at a junkyard and it had a leaky fuel cap. Picked up a universal fuel cap from Lowes for 6$.
 

Attachments

  • IMG_1911.JPG
    IMG_1911.JPG
    259.5 KB · Views: 10
  • IMG_1912.JPG
    IMG_1912.JPG
    159.3 KB · Views: 10
  • IMG_1913.JPG
    IMG_1913.JPG
    278.9 KB · Views: 9
  • IMG_1914.JPG
    IMG_1914.JPG
    186.4 KB · Views: 11

slomo

Lawn Pro
Joined
Jul 14, 2019
Threads
78
Messages
5,128
I weld them with a soldering iron. Actually just fixed my trimmer tank. Mine had a seem crack in it. Take a flat iron tip and do circles on the plastic. You will see the plastic start to melt and flow. Don't park the iron tip as you will melt a hole in it. Gentle circles was what worked for me. I used white/clear zip ties as filler rod. While doing circles, you will see you have to gently push the molten plastic where you want it. Sometimes you need to lift the tip off and back on which pushes the plastic say forward.

slomo
 
Top