Flywheel Removal

LSU-Mike

Member
Joined
Jun 10, 2019
Threads
15
Messages
46
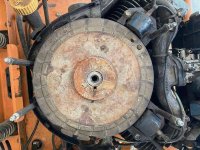
Any tips as to how I should attempt to remove the flywheel from my Kawasaki FH580v? As you can see in the photo it is held on by bolt, not by nut and there are no holes to attach a wheel puller. I've watched several videos, but none seem to apply to this engine. I'm trying to access the breather cover/gasket in hopes of stopping an oil leak. I've applied a good dose of PB Blaster penetrating oil and realize it might take more and plenty of time.
Thanks
 

Attachments

  • Flywheel.jpg
    Flywheel.jpg
    117.3 KB · Views: 14

txmowman

Well-Known Member
Joined
Oct 8, 2018
Threads
0
Messages
276
There are two indentations casted into the side of the flywheel. To do it properly, you will use a two jaw puller. You could probably borrow one from auto zone or similar. Make sure you put a washer on top of the crankshaft to protect the bolt theads.
 

LSU-Mike

Member
Joined
Jun 10, 2019
Threads
15
Messages
46
There are two indentations casted into the side of the flywheel. To do it properly, you will use a two jaw puller. You could probably borrow one from auto zone or similar. Make sure you put a washer on top of the crankshaft to protect the bolt theads.
I'm off to see if one available to borrow from O'Reilly's has enough "wingspan" to reach around the 8+" flywheel and if the grab ends will fit into the indentations.
Thanks again txmowman.
 

LSU-Mike

Member
Joined
Jun 10, 2019
Threads
15
Messages
46
I attached a two jaw puller as suggested. Several doses of PB Blaster. Tightened down and left over night. Doesn't appear to be moving at all. I tried heating the flywheel some with a heat gun. No help. Any other suggestions besides continuing to apply PB Blaster and waiting?
 

txmowman

Well-Known Member
Joined
Oct 8, 2018
Threads
0
Messages
276
Is the puller a beam style like pictured? Or more of a jaw type? A jaw puller my not exert enough force vertically.
 

Attachments

  • IMG_2615.jpeg
    IMG_2615.jpeg
    124.5 KB · Views: 3

Hammermechanicman

Lawn Addict
Joined
Jan 10, 2020
Threads
64
Messages
3,748
I remove those by installing a longer bolt that bottoms out in the crank threads then use a pry bar to bias up the flywheel and hit the bolt with the air hammer.
 

LSU-Mike

Member
Joined
Jun 10, 2019
Threads
15
Messages
46
Is the puller a beam style like pictured? Or more of a jaw type? A jaw puller my not exert enough force vertically.
This is what I've tried. I'll seek another style.
 

Attachments

  • JawPuller.png
    JawPuller.png
    19.9 KB · Views: 0

LSU-Mike

Member
Joined
Jun 10, 2019
Threads
15
Messages
46
I remove those by installing a longer bolt that bottoms out in the crank threads then use a pry bar to bias up the flywheel and hit the bolt with the air hammer.
Not sure what you mean by "pry bar to bias up.."
 

Hammermechanicman

Lawn Addict
Joined
Jan 10, 2020
Threads
64
Messages
3,748
Not sure what you mean by "pry bar to bias up.."
You should have .004-.008 endplay of the crankshaft and the block. You place some kind of small pry bar or screwdriver between the block and flywheel and pry up just enough to bias the crank and flywheel up that few thousandths.
 

StarTech

Lawn Royalty
Joined
Feb 19, 2020
Threads
86
Messages
11,051
And using a puller at the time you smack the forcing screw once the puller is tighten up; re-tighten forcing screw after each blow. Preferably with a brass hammer and not with Hammermechanicman.

So far in 14+ years only had one flywheel that I could not remove.
 
Top