Wildcat Drive Belt Transmission Belt Install

ottoslanding

Member
Joined
Sep 1, 2013
Threads
3
Messages
26
They say china on them

(( cowboy up and get over it ))


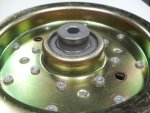
The pulley arrived and it had the bearings in so I don't know what they say on them. I saw no markings on the pulley. It looks exactly like the one that came off the mower and I am guessing the pulley was put on in the factory but I do not know that to be fact.

I pulled off the tensioner spring with my hand and checked the tensioner arm for play and I can feel no play in the assembly.

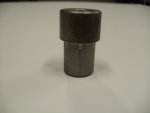
For removing the pulley I used a small cordless impact wrench on the bottom hex bolt while I held the locknut on the top of the tensioner arm with a ratchet and socket. This is all being done with the rear end in the air and on jack stands, the front wheels chocked and the left wheel removed.

When replacing the pulley I was able to star the bolt through the tensioner arm from below and then start the locknut on the top with my other hand. With the pulley assembly now suspended, I simply reversed the removal procedure. I did use some loctite 242(blue medium strength) on the pulley bolt threads to help the locknut.

The old pulley has some slight play in the bearing hub and the new pulley has no play.

The whole process took less than 30 minutes.

I did a follow up on the coolant. Here is what the Kawasaki engine owners manual states:

---------------------------------

Recommended Coolant Solution

Water 50% : Antifreeze 50% (1:1)

Recommended Antifreeze:

Permanent type antifreeze (ethylene glycol plus corrosion and rust inhibitor chemicals for cast iron engines and aluminum radiators.)

----------------------------------


I am nearly positive when I asked my scag dealer they recommended the old school green type antifreeze

I did take off the radiator screen and blow that off with compressed air and likewise with the radiator. Also pulled the two air filters and housing and blew it out.

Now just waiting for my belt as I watch my grass grow.

:tongue:
 

ottoslanding

Member
Joined
Sep 1, 2013
Threads
3
Messages
26
Hold the phone!!

:mur:


As I am sitting here watching my grass grow and waiting for my belt, I took a closer look at the parts schematic for the drive system components. I noticed that the locknut was on the top of the tensioner arm as opposed to on the bottom of the pulley. Probably not a biggie but then I noticed something else.

:banana:


The side of the pulley bearing that sticks out an inch or so is not visible on the top of the pulley in the diagram so I am guessing it is supposed to be pointed down. Mine was mounted the other way and I don't think the spacer that was there is correct. It is too short when I mount the pulley as I see it in the picture and the pulley binds. My spacer is too short and to compensate someone mounted the pulley upside down. So now I had this pulley bearing protrusion balancing on the too short pacer.

Anyone have the dimensions of the correct pulley spacer? Scag part number 43286.

Can someone confirm that the pulley is supposed to have the part of the bearing which sticks out facing down?

:confused3:

The way the old pulley was mounted with the protruding side facing up and balancing on the spacer could explain the belt not running true and probably had a lot of wobble.

I'm guessing.

:confused2:
 

Carscw

Lawn Pro
Joined
Aug 11, 2011
Threads
66
Messages
6,375
Hold the phone!!

:mur:

As I am sitting here watching my grass grow and waiting for my belt, I took a closer look at the parts schematic for the drive system components. I noticed that the locknut was on the top of the tensioner arm as opposed to on the bottom of the pulley. Probably not a biggie but then I noticed something else.

:banana:

The side of the pulley bearing that sticks out an inch or so is not visible on the top of the pulley in the diagram so I am guessing it is supposed to be pointed down. Mine was mounted the other way and I don't think the spacer that was there is correct. It is too short when I mount the pulley as I see it in the picture and the pulley binds. My spacer is too short and to compensate someone mounted the pulley upside down. So now I had this pulley bearing protrusion balancing on the too short pacer.

Anyone have the dimensions of the correct pulley spacer? Scag part number 43286.

Can someone confirm that the pulley is supposed to have the part of the bearing which sticks out facing down?

:confused3:

The way the old pulley was mounted with the protruding side facing up and balancing on the spacer could explain the belt not running true and probably had a lot of wobble.

I'm guessing.

:confused2:

That part that sticks out from the bearing is called a bearing bushing and is not part of the bearing but is inserted into the center of the bearing. Am not 100% sure on your model but everyone I have ever seen has been down

(( cowboy up and get over it ))
 

ottoslanding

Member
Joined
Sep 1, 2013
Threads
3
Messages
26
That part that sticks out from the bearing is called a bearing bushing and is not part of the bearing but is inserted into the center of the bearing. Am not 100% sure on your model but everyone I have ever seen has been down

(( cowboy up and get over it ))

Thanks!! :thumbsup:

The spacer which is there measures 11/16" long and 1" wide :banned:


When I look at the parts diagram I see a spacer that is longer than it is wide.

:drool:

I ordered one through my scag dealer for $1.86. Online was the same but add 8 to 15 bucks for shipping.


Back to watching my grass grow while I wait for the belt and the spacer


:banana:
 

Mad Mackie

Lawn Addict
Joined
Jul 11, 2011
Threads
50
Messages
1,851
Hi ottoslanding,
Your Wildcat has basically the same drive train as my Tiger Cub. I think that the small pulley was not installed correctly and caused the drive belt failure. In the pics attached is the large diameter pulley showing the bushing that is pressed into the pulley bearing in the up position and the same position for the small pulley. The other pic is the actual bushing from the small pulley that I replaced in my machine.
When installing the small pulley, it goes as follows, bolt from the top, thru the tensioner, the spacer, P/N 43286, goes up onto the bolt, the small pulley with the bushing up as in the pics, so the spacer and the pulley bushing are next to each other, the flat washer and then the locknut.
Mad Mackie in CT
 

Attachments

  • P9050001.JPG
    P9050001.JPG
    73.1 KB · Views: 11
  • P9050002.JPG
    P9050002.JPG
    63.3 KB · Views: 6
Last edited:

ottoslanding

Member
Joined
Sep 1, 2013
Threads
3
Messages
26
Hi ottoslanding,
Your Wildcat has basically the same drive train as my Tiger Cub. I think that the small pulley was not installed correctly and caused the drive belt failure. In the pics attached is the large diameter pulley showing the bushing that is pressed into the pulley bearing in the up position and the same position for the small pulley. The other pic is the actual bushing from the small pulley that I replaced in my machine.
When installing the small pulley, it goes as follows, bolt from the top, thru the tensioner, the spacer, P/N 43286, goes up onto the bolt, the small pulley with the bushing up as in the pics, so the spacer and the pulley bushing are next to each other, the flat washer and then the locknut.
Mad Mackie in CT


That is different than I was thinking. I was thinking the bushing would be on the bottom of the pulley with the washer and locknut. The spacer on the top side of the pulley between the pulley and the tensioner arm.

The spacer that was on my machine was wider than it was long. The picture in the parts schematic looks like the spacer is longer than it is wide. I also do not see the bushing on the top of the pulley in the parts schematic. The parts schematic does not show the bottom of the pulley and I was assuming the bushing was on the bottom.

My machine when I disassembled it had the lock nut on top of the tensioner arm, then the arm, then the spacer, then the bushing on top of the pulley, then the pulley, and then the washer and then the hex head of the bolt.

It seems to me that if I put the bushing upward and next to the spacer that it could create wobble.


:confused2:
 

Mad Mackie

Lawn Addict
Joined
Jul 11, 2011
Threads
50
Messages
1,851
ottoslanding,
Scag would not have installed a shouldered standoff bushing into the pulley bearing if it was not needed. Almost all pulleys have to be offset to prevent them from contacting the bracket or support to which they are installed.
The parts schematic in the manual is for reference only, the parts listing has the reference and the actual part number for the reference number. The spacer, P/N 43286 is in fact shorter in length than it's diameter. This spacer and the offset shoulder of the pulley bushing makeup the correct distance from the tensioner arm for the drive belt on your Wildcat. The bolt comes down from the top, thru the tensioner, next is the spacer, P/N 43286, then the pulley with the shoulder in the up position. The flat washer and locknut are then installed. If installed correctly, there will be no wobble in the pulley as mounted onto the tensioner arm. The tensioner arm does move and with the tension spring installed, it will push the pulley against the flat side of the drive belt. This system keeps the correct tension on the belt and increases the amount of belt wrap around the left hand pump pulley. The large diameter pulley is fixed to the frame of the machine and is there to increase the belt wrap around the right hand pump pulley and reduce belt whipping during operation.
Mad Mackie in CT
 

ottoslanding

Member
Joined
Sep 1, 2013
Threads
3
Messages
26
ottoslanding,
Scag would not have installed a shouldered standoff bushing into the pulley bearing if it was not needed. Almost all pulleys have to be offset to prevent them from contacting the bracket or support to which they are installed.
The parts schematic in the manual is for reference only, the parts listing has the reference and the actual part number for the reference number. The spacer, P/N 43286 is in fact shorter in length than it's diameter. This spacer and the offset shoulder of the pulley bushing makeup the correct distance from the tensioner arm for the drive belt on your Wildcat. The bolt comes down from the top, thru the tensioner, next is the spacer, P/N 43286, then the pulley with the shoulder in the up position. The flat washer and locknut are then installed. If installed correctly, there will be no wobble in the pulley as mounted onto the tensioner arm. The tensioner arm does move and with the tension spring installed, it will push the pulley against the flat side of the drive belt. This system keeps the correct tension on the belt and increases the amount of belt wrap around the left hand pump pulley. The large diameter pulley is fixed to the frame of the machine and is there to increase the belt wrap around the right hand pump pulley and reduce belt whipping during operation.
Mad Mackie in CT


:thumbsup:

ok. It seemed like having that bushing on top against the spacer would lend itself to wobble. So in the end, the pulley was installed correctly except that the locknut was on top of the tensioner bracket and the hex head of the bolt was on the bottom of the pulley with the washer. Perhaps having the hex head on the bottom and the locknut on top could contribute to the belt problem?

When I installed the new pulley that way it was lined up with the large pulley but I just thought it would wobble and figured that it was like that due to a spacer that was too short.

Thanks!!

:cool2:
 

ottoslanding

Member
Joined
Sep 1, 2013
Threads
3
Messages
26
I have the pulley on and I am looking at the bracket that the spring attaches to. It is #30 on the diagram and it has two holes in it. The forward end of my tensioner spring is hooked to a bolt in the aft hole of this bracket. With no belt on this tensioner pulley the spring is loose. I can grab it with two fingers and remove it. I do not have to stretch the spring to remove it.

Here is the question.

On my parts diagram the forward hole in bracket #30 there is supposed to be a bolt #27. I just have an empty hole in that position with no bolt. The aft hole is bolt #23 in bracket #30 and that is where the bolt is installed and the forward end of the tensioner spring is attached. The other end of the tensioner spring attached to the bolt #27 on the tensioner arm.

Is it possible that the forward end of my tensioner spring is attached to a bolt that it too far aft? Wrongly in the aft hole of bracket #30? Therefore not enough tension on the arm and perhaps causing the twisting belt/wandering belt problem?

:banana:
 

Mad Mackie

Lawn Addict
Joined
Jul 11, 2011
Threads
50
Messages
1,851
In a while I'm going to get my machine out of the trailer to do a small part of my lawn that has a bunch of leaves. I'll take a pic of the drive belt area under the seat and post it here. You Wildcat is the same basic machine as my Tiger Cub but with several upgrades, seat, levers, fuel tanks, different engine.
Mad Mackie in CT
 
Top