Troubleshooting Starting Issue?

LeakyBriggs

Member
Joined
Apr 26, 2023
Threads
4
Messages
29
Hello lawn and engine folks. Having an issue now with my lawn tractor starting

Details:
Older Simplicity Regency (20 years? Not sure. Time and memory gets away...)
Briggs & Stratton 22HP Intel V-Twin
Valve cover stamp:
Model 44K777
Type 0115 E1
Code 071015YG.

Issue I'm having is a no start situation. Meaning the engine does not turn over when turning the key to on.

Things I've confirmed:
Battery is good.
Foot pedal switch is not blocked and presses in normally.
When turning the switch to "On", the fuel cutoff solenoid clicks.

But that's it. Not sure where to start for troubleshooting. You know, test here first, if good, move to here, test, if good, move to here.

Thanks for any input & help.

LeakyBriggs.
 

mechanic mark

Lawn Pro
Joined
Jul 15, 2013
Threads
175
Messages
7,484
Post 7 digit Simplicity Model Number. Start with battery load test, hands on all electrical connections including ignition switch etc.
 

Rivets

Lawn Royalty
Joined
Mar 11, 2012
Threads
59
Messages
15,345
Here is the procedure I use and have posted many times. Each tech on this site has their own so you might have to pick the one which works best for you. Simplicity model is on the frame, under the foot rest.

Electrical problems can be very easy or very difficult, depending on four things.

1. How well you understand basic electricity.
2. What tools you have and know how to use.
3. How well you follow directions.
4. You don't overlook or assume anything and verify everything.

Remember we cannot see what you are doing. You are our eyes, ears and fingers in solving this problem. You must be as accurate as you can when you report back. The two basic tools we will ask you to use are a test light and a multi-meter. If you have an assistant when going through these tests it would be very helpful. These steps work the best when done in order, so please don't jump around. Now let's solve this problem.

First, check the fuse(s), check battery connections for corrosion (clean if necessary) and voltage - above 12.5 volts should be good. Check and make sure the chassis ground is clean and tight.
Second, check for power from the battery to one of the large terminals on the solenoid. One of the wires is connected directly to the battery and has power all the time so one of the large terminals should light a test light or show 12 volts on a meter at all times.
Third, check for power at the small terminal of the solenoid while depressing the clutch/brake pedal and holding the key in the start position (you may need an assistant to sit in the seat to override the safety switch). If your solenoid is a four wire solenoid, check both small wire terminals as one is ground and the other is power from the ignition switch. If your solenoid is a three wire solenoid, make sure the solenoid body is not corroded where it bolts to the chassis of the mower as this is your ground path back to the battery. If in doubt, remove the solenoid and clean the mounting area down to bare metal. If there is no power to the small terminal then your problem is most likely a safety switch, ignition switch or in the wiring.
Fourth, check for power on the other large terminal of the solenoid while holding the key in the start position (you may need an assistant to sit in the seat to override the safety switch).
Fifth, check for power at the starter while holding the key in the start position (assistant again).
Sixth, check your ground circuit back to the battery.

After you have gone through each of the above steps, let us know what happened when you did each step. At that point we will have great info to tell you how to proceed. Remember you are our eyes, ears, and fingers, so please be as accurate as possible.

Be as specific as possible with voltage readings as this will help diagnose your problem quicker. If you do not know how to perform the above checks, just ask and I will try to guide you through it. Youtube also has some videos and as you know a picture is worth a thousand words.
 

LeakyBriggs

Member
Joined
Apr 26, 2023
Threads
4
Messages
29
Post 7 digit Simplicity Model Number. Start with battery load test, hands on all electrical connections including ignition switch etc.
Simplicity Part# 2690575 (How it's labeled on sticker on frame.)

Thanks.
 

LeakyBriggs

Member
Joined
Apr 26, 2023
Threads
4
Messages
29
Here is the procedure I use and have posted many times. Each tech on this site has their own so you might have to pick the one which works best for you. Simplicity model is on the frame, under the foot rest.

Electrical problems can be very easy or very difficult, depending on four things.

1. How well you understand basic electricity.
2. What tools you have and know how to use.
3. How well you follow directions.
4. You don't overlook or assume anything and verify everything.

Remember we cannot see what you are doing. You are our eyes, ears and fingers in solving this problem. You must be as accurate as you can when you report back. The two basic tools we will ask you to use are a test light and a multi-meter. If you have an assistant when going through these tests it would be very helpful. These steps work the best when done in order, so please don't jump around. Now let's solve this problem.

First, check the fuse(s), check battery connections for corrosion (clean if necessary) and voltage - above 12.5 volts should be good. Check and make sure the chassis ground is clean and tight.
Second, check for power from the battery to one of the large terminals on the solenoid. One of the wires is connected directly to the battery and has power all the time so one of the large terminals should light a test light or show 12 volts on a meter at all times.
Third, check for power at the small terminal of the solenoid while depressing the clutch/brake pedal and holding the key in the start position (you may need an assistant to sit in the seat to override the safety switch). If your solenoid is a four wire solenoid, check both small wire terminals as one is ground and the other is power from the ignition switch. If your solenoid is a three wire solenoid, make sure the solenoid body is not corroded where it bolts to the chassis of the mower as this is your ground path back to the battery. If in doubt, remove the solenoid and clean the mounting area down to bare metal. If there is no power to the small terminal then your problem is most likely a safety switch, ignition switch or in the wiring.
Fourth, check for power on the other large terminal of the solenoid while holding the key in the start position (you may need an assistant to sit in the seat to override the safety switch).
Fifth, check for power at the starter while holding the key in the start position (assistant again).
Sixth, check your ground circuit back to the battery.

After you have gone through each of the above steps, let us know what happened when you did each step. At that point we will have great info to tell you how to proceed. Remember you are our eyes, ears, and fingers, so please be as accurate as possible.

Be as specific as possible with voltage readings as this will help diagnose your problem quicker. If you do not know how to perform the above checks, just ask and I will try to guide you through it. Youtube also has some videos and as you know a picture is worth a thousand words.
Thanks! I will be going through this with it soon. May take me a day or two with work and other things.

I have no assistant. But I do have a good meter and alligator test leads.

I will report back after going through your list.

Thanks again to both current replies and others are welcome.

LeakyBriggs.
 

packardv8

Well-Known Member
Joined
Sep 22, 2013
Threads
38
Messages
193
Every rider I've owned in the past fifty years has eventually developed electrical problems. Nearly every time it was in the OEM wiring connections and safety switches. The path to the spark plugs and the PTO runs through so many cheapo connections, corrosion and heat combine to stop the flow.

The official fix is to find the offending article and replace it. Then soon after find and replace the next; a merry-go-round.

The unapproved fix is to simplify the wiring and use industrial quality switches for the few actually required to operate the machine.

jack vines
 

LeakyBriggs

Member
Joined
Apr 26, 2023
Threads
4
Messages
29
Awesome replies. Thanks to all. I will dive in fully with the meter this weekend and let ya'll know how things go.

One thing that I noticed but left out, (sorry) is that with the switch on, when you pull the PTO to engage the blade clutch, nothing happens.
Normally you can hear it engage even if the engine is off, no one is sitting in the seat, and no one is pressing the clutch pedal.
 

bertsmobile1

Lawn Royalty
Joined
Nov 29, 2014
Threads
65
Messages
24,995
The PTO should not engage is there is no one in the seat , engine running or engine not running
Also note that if Star has posted the correct wiring diagram ( and he usually does ) that the seat switch plug has a anti-tamper shorting strip.
This type of plug is notorious for causing gries as on many of them the strip shorts out even when the plug is locked into the socket .
I have starteed to cut them off and fit standard sockets when I can get them because I am fed up with warranty call backs because of these garbage plugs .
To test your mower I use shart patch ( fancy name for jumper ) wires with a male on each end to connec the female terminals of the plugs as follows
Key, Red to Blue
Reverse blue to lue
PTO green to blue
Brake Green to yellow
IF the motor cranks when the Green to yellow is jumped ( do it last ) then the wires are good between the plugs
If not one of the plug wires is bad .
After that I use some longer ones to bypass each switch one at a time
so
Key blue at the reverse switch plug to solenoid Yellow engine should cank every time the key is on start , proves key switch is working
Reverse blue at PTO plug to solenoid as above proves reverse relay
PTO green to solenoid Yellow proves PTO switch is working
Note you may need to suspend yourself from the ceiling like a bat to get to some of the plugs
 
Last edited:

StarTech

Lawn Royalty
Top Poster Of Month
Joined
Feb 19, 2020
Threads
93
Messages
11,583
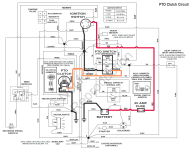
Here is the PTO circuit operation pathways. Seat switch on this mower only affects the ignition kill circuit. Otherwords your buns have to be on the seat for the engine to run; unless, PTO is off and the brake/clutch is depressed.
1698230211405.png
 
Top