LA150 Oil Sump & Other Adventures

Gumby83

Well-Known Member
Joined
Nov 23, 2014
Threads
10
Messages
103
I’m taking some time this winter to repair the oil sump leak on my mean-green-grass-cuttin-machine as well as repair or maybe improve some other things while I’m at it. I thought it’d be nice to have a dedicated thread to share pics and ask advice as needed along the way.

Here’s the beast in all its original radiance and glory - sans deck, of course. Since I have limited garage space, the deck was better off stored in the shed and out of the way.

20BFA927-48B8-4FDC-B191-D11554D08931.jpeg

The primary goals are:

1) Oil sump leak - resealing entire engine while I’m at it.
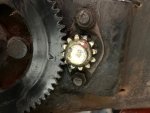
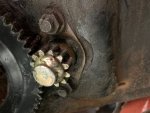
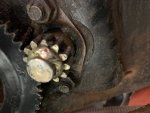
2) Steering & linkage - gears are nearly stripped and the right tie rod is loose.
3) Front axle spindles - Replacing with all new components if possible. I need to verify it, but a quick glance while replacing the bushings this past spring made it look as though the right spindle was bent.

If time allows, I’d also like to:

(Edit) -Add temp gauge just because I like being able to monitor it.
-Make a custom set of less-than-impressive hub caps.
-Figure out how to reinforce or further stabilize the wheel bearings.
-Thoroughly clean tractor and touch up paint.
-Repair tear in seat.
-Service transmission.
-Repair/replace miscellaneous wiring that has cracked insulation.

I’ll update once or twice a week depending on progress. I’m only putting a few hours a week into this as there’s always more irons in the fire than this blacksmith can keep up with.
 
Last edited:

Gumby83

Well-Known Member
Joined
Nov 23, 2014
Threads
10
Messages
103

Gumby83

Well-Known Member
Joined
Nov 23, 2014
Threads
10
Messages
103
So here’s a picture of the nasty mess I want to correct. It looked this way when I got it, so I washed it off as clean as possible with a pressure washer and took a closer look at the source the next time I ran it.

BA9FD6EB-2DFC-4362-8A91-E9CDDA18CC25.jpeg

I couldn’t see exactly where it’s coming from due to the shields, but using the google and looking at parts diagrams helped me determine it’s likely the sump gasket. And even if that’s not what it turns out to be, this is an oil leak I don’t want to deal with for another season. Every time I parked it after mowing, it reeked of burning oil - I was just waiting for a spontaneous fire.

And what is that white powdery substance, marked by red circles and arrows (undoubtedly inserted by someone with extensive photo editing experience ? ), you ask? That’s the contents of an ABC fire extinguisher courtesy of a rectifier that had a bad attitude about its job...

FB005E4D-3094-4262-976D-BC0129047FE5.jpeg

I tried for about 2 minutes to smother the flame but it was inside the regulator and blatantly refused to be extinguished by any other method. Jerk.

So far I’ve just started taking the shroud and external components off - I mostly just wanted to share those pics as I found them quite entertaining.
 

mechanic mark

Lawn Pro
Joined
Jul 15, 2013
Threads
175
Messages
7,414
So here’s a picture of the nasty mess I want to correct. It looked this way when I got it, so I washed it off as clean as possible with a pressure washer and took a closer look at the source the next time I ran it.

View attachment 55211

I couldn’t see exactly where it’s coming from due to the shields, but using the google and looking at parts diagrams helped me determine it’s likely the sump gasket. And even if that’s not what it turns out to be, this is an oil leak I don’t want to deal with for another season. Every time I parked it after mowing, it reeked of burning oil - I was just waiting for a spontaneous fire.

And what is that white powdery substance, marked by red circles and arrows (undoubtedly inserted by someone with extensive photo editing experience ? ), you ask? That’s the contents of an ABC fire extinguisher courtesy of a rectifier that had a bad attitude about its job...

View attachment 55210

I tried for about 2 minutes to smother the flame but it was inside the regulator and blatantly refused to be extinguished by any other method. Jerk.

So far I’ve just started taking the shroud and external components off - I mostly just wanted to share those pics as I found them quite entertaining.
Thanks for pictures, looks like you have your work cut out for you, good luck. I apply fresh grease to steering sector & pinion gears every service after wiping off old grease from gears. Pictures of my 2010 Simplicity Broadmoor steering & sector gears.
 

Attachments

  • IMG_5510.jpg
    IMG_5510.jpg
    87.9 KB · Views: 17
  • IMG_5511.jpg
    IMG_5511.jpg
    89.8 KB · Views: 16
  • IMG_5513.jpg
    IMG_5513.jpg
    96.2 KB · Views: 16
  • IMG_5512.jpg
    IMG_5512.jpg
    98.3 KB · Views: 15
Last edited:

Gumby83

Well-Known Member
Joined
Nov 23, 2014
Threads
10
Messages
103
Thanks for pictures, looks like you have your work cut out for you, good luck. I apply fresh grease to steering sector & pinion gears every service after wiping off old grease from gears. Pictures of my 2010 Simplicity Broadmoor steering & sector gears.

Yeah I doubt any kind of lubricant has been intentionally applied to these gears. The sector gear isn’t in too bad of shape but the column gear definitely needs replacement.

1C9A3ECB-0F80-4EB7-BD82-5D2776C8FB30.jpeg

In an effort to tighten the steering just for this past season, I removed the column gear and attempted to drill out the flange on it so I could invert the gear on the column. But that didn’t work out, so I just put it back on, knowing I’d be tackling it this winter.
 

Gumby83

Well-Known Member
Joined
Nov 23, 2014
Threads
10
Messages
103
And there it is - the source of the leak. I got the carburetor/intake and throttle linkage removed last night and found this near the #1 cylinder.

8530511F-61A6-4634-878D-B9B376F67265.jpeg

For those that don’t know - you can almost always identify the source of leak (especially one this bad) by looking for the area that appears clean, relative to its surroundings. As oil leaks out, it “washes” away the grime and filth that collects. This is true for any system that utilizes oil of any type, be it engine, transmission, hydraulics, or other applications.
 

Gumby83

Well-Known Member
Joined
Nov 23, 2014
Threads
10
Messages
103
So I got the engine removed from the mower and the case split tonight. The internals look pretty good - no signs of excessive contamination or damage to the bearing or gear surfaces.

Once the case was split, it was pretty easy to see why the gasket failed - I don’t know if this engine has been apart before, but it would appear that during assembly, the gasket was misaligned, or perhaps the case bolts were over torqued.

47C300F0-0894-40FC-B486-B50EFC96A1F0.jpegBC675160-C75F-4AC3-A2CD-431B04E2966A.jpeg

Also, while moving the engine around, I noticed the sound of something rattling around and thought “So begins the real fun.” It turned out to be a screen for the oil pump - looks like it can be pressed or tapped back into place, but I think I’ll apply some sleeve retainer to it to make sure it stays in place.

53F3C79F-DCFC-4386-BF89-0066CF01C11C.jpeg

I’m yet to remove the valves from the heads for inspection/cleaning, but other than normal carbon build up, everything looks good.

Also, I used some scrap aluminum and 2x4 to build a makeshift stand for the engine. I stripped it down as far as I could on the mower, but wanted it on the bench for removing the heads and splitting the case. I didn’t tie the 2x4 together, so I was able to split the halves apart while leaving them on.

Also, if you’re like me and you struggle with organizing, The second picture is an easy way to keep track of bolts/screws. Most of them will punch through the cardboard easily enough, but for some of the larger bolts, you can cut a slit using a knife or punch through with a screwdriver first. The advantage to using an old box is it will accommodate several different lengths and, for the most part, will keep a good enough grip on the bolts that they won’t scatter everywhere if the box is dropped or accidentally kicked. It can also be rotated to utilize more than one side at a time.

0FCDF9B2-8014-4F21-9863-DBB7045AFC8A.jpeg

8D6F4849-9383-4FDD-98D3-0451C3C4C829.jpeg
 

Gumby83

Well-Known Member
Joined
Nov 23, 2014
Threads
10
Messages
103
I’m still working on tear down, but I would like to take the case halves, heads and shields to work and use the hot tank to clean them. I prefer to have them completely stripped down when using the hot tank, so I’ve got a couple questions:

1) How can the governor & gear be removed? I don’t see a nut on the case exterior to suggest it’s anchored that way (and I would hope not, considering it butts up against the cylinder wall). If I open the jaws I can see what looks like a circlip on the shaft, just above the gear, which leads me to believe it should “pop” off of there, but for obvious reasons, I don’t want to try prying it.

D70768DF-647E-4E7E-99D9-681850CDAB5D.jpegFD82DEFD-2A60-473E-91D8-B5082BB85BEF.jpeg

2) Is the oil pressure relief valve a pain to replace? It looks like the only way to get the plug out is by using a chisel to pry it out - again, not ideal, but I’d like to have the case stripped down for cleaning. I haven’t yet checked on part availability yet either.

11E383E4-CEAC-44BC-811B-C1491018D1F8.jpeg
 

Gumby83

Well-Known Member
Joined
Nov 23, 2014
Threads
10
Messages
103
So I decided to give up on trying to remove the governor gear and oil pressure relief valve and got the case halves and heads into work to clean in the hot tank. I just made sure to blast them with compressed air and then give them a shot of penetrating oil afterwards.

I was surprised to learn there was an engine under all that filth! ?

I’m going to reassemble the case tonight, then finish cleaning the carbon off the heads and valves tomorrow.

I haven’t yet gotten into the carburetor or the steering/front axle work, but the engine work is going somewhat fast so I’ll probably be there by next week.

Here’s a pic of the chassis. I decided to strip it down this far so I could get it thoroughly cleaned. I’m going to load it on my trailer and take it to the car wash for that. Also a good time to replace the entire fuel line.

7442BA1A-1DF6-4EA4-8B20-953D28F86879.jpeg
 
Top