Ideas on carb replacement failure

sgkent

Lawn Addict
Joined
Sep 27, 2017
Threads
30
Messages
1,679
Have a pressure washer, 20 years old. Briggs 4 hp quattro engine. At the base of the carb are two gaskets/diaphrams where it sits on the fuel tank. The engine is very hard starting. Once it gets going it is fine. The primer bulb will fill will fuel in two or three pumps. In late October 2021 I once again replaced those gaskets/diaphragms and the engine was fairly easy to start. Now it is late Feb 2022, new fuel and once again it is hard to start. Air filter is a green universal one instead of the factory one. After pulling maybe 20 times I removed the air cleaner and tried it again. It started on the second or third pull. Does anyone have any experience with the engines that have the carb on the tank, where they are able to easy start their engine, and keep it that way for years without having to replace the carb etc once a year or two? Also does anyone have any experience where some of the universal air filters are too restrictive and they are the cause of the hard starting?

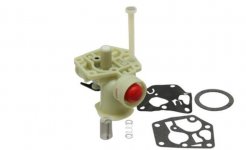
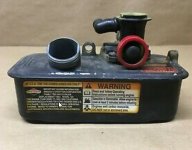
It is this style carb and tank, and filter. Photos are from the Internet. The filter in this image is the Briggs factory filter. The universal ones are a green dense foam.
 

Attachments

  • carb.jpg
    carb.jpg
    20.5 KB · Views: 5
  • tank.jpg
    tank.jpg
    33.8 KB · Views: 5
  • filter.jpg
    filter.jpg
    21.1 KB · Views: 5

bertsmobile1

Lawn Royalty
Joined
Nov 29, 2014
Threads
64
Messages
24,729
Remove the cowel & check the long manifold
These are prone to cracking
A small crack = hard starting
Large crack = surging
A badly worn O ring will also exhibit similar symptoms.
 

StarTech

Lawn Royalty
Top Poster Of Month
Joined
Feb 19, 2020
Threads
82
Messages
10,361
Also it can be that the valve clearances are closed up on that 20+ yr old engine as if I remember correctly that series is a L-head [side valve] engine.

Also on the carburetor make sure the base is not warped. They can warp for several reasons. One is heat, another is weight, and a third is over tightening the mounting screws. Then of course if it has that plastic manifold a crack in it.
 

sgkent

Lawn Addict
Joined
Sep 27, 2017
Threads
30
Messages
1,679
working on it now. New carb going in. One unrelated question. I've been cleaning up rust etc., as I go along. I am considering pulling the flywheel off to glass bead the rust off the lamination on the flywheel, then oil it or hit it with a light coat of clear. Any one have ideas on whether that is a good or bad thing? I think I still have some Briggs flywheel tools around here, if not I can get some. Or I could lightly sand the rust but that magnet is so strong I am concerned that the particles will just stick to it. Maybe hit it with compressed air to get rid of them.

Last, I have a Tecumseh air gap tool, is the small Briggs engine air gap about the same?
 

StarTech

Lawn Royalty
Top Poster Of Month
Joined
Feb 19, 2020
Threads
82
Messages
10,361
Rust does not affect magnetism. Rust however can cause air gap issues. Just use a standard business to set the air gap of coil pack to flywheel. Now rust between coil and its mounting posts does prevent the coil from working.
 

Rivets

Lawn Royalty
Joined
Mar 11, 2012
Threads
55
Messages
14,814
No need to clean the flywheel magnets, unless making it look good is what you are after. Won’t affect how it runs. I set armature air gap at .008”-.010” on all engines.
 

sgkent

Lawn Addict
Joined
Sep 27, 2017
Threads
30
Messages
1,679
Thanks. I just set it with the Tecumseh .010 tool, and am waiting for the starter housing to dry as I also cleaned and painted it. I turned the engine over by hand and don't feel a lot of compression so I know it is worn. Just hope this gets it another year or two. It is a 4hp Briggs vertical on a pressure washer that has gotten a lot of use. I replaced the head gasket and followed the correct pattern and torque so I am sure the head is on tight.Either the rings are worn or maybe a tight valve. The exhaust was a lite gray, and the intake carbon, even carbon on the piston so not a lot of oil washing over it. It isn't worth going all the way thru it with new rings etc.. I know when I start the other small motors I own, I can feel the compression better than this one.
 

sgkent

Lawn Addict
Joined
Sep 27, 2017
Threads
30
Messages
1,679
it is back together. Now to get some non-ethanol fuel. I fear that my hard starting issue is low compression. I cannot feel the compression stroke when I pull, however it feels no different than before. We'll see when it is hooked up to water and fuel is added.

40 lbs cold compression on the little 4 hp engine. Guess when I have time maybe Ican pull the head again and adjust the valves in case the exhaust is tight. Never done one of these small motors before so I have no idea what valve gaps I am even looking for. I have no access any longer to a valve grinding machine so I would have to tip them on a grinder if need be. I guess I could check with the local shop to see what they might charge if I brought it to them with the head off.
 
Last edited:

sgkent

Lawn Addict
Joined
Sep 27, 2017
Threads
30
Messages
1,679
Even though I have not starter it, I'll close this thread since no one seems interested. Th exhaust valve was tight so I opened it up to .009". Intake was good at .005" Compression is at 60 psi now. The carb was replaced, the intake manifold removed, cleaned and inspected, the engine cleaned up and painted, head gasket replaced, plug, magneto to coil clearance set to .010" using a Tecumseh coil tool. I was able to compress the valve spring with a thin spanner and then small zip ties going back together to hold it while I slid the retainer in. Spring starter was disassembled and cleaned so it pulls better, the starter thing on top of the flywheel was removed and lubricated. Hopefully once I get some non-ethanol gas it will start nicely. Engine is worn, valve guides worn. It is what it is. If I get another year from it I'll be happy. Not worth rebuilding further as too many internal parts will be worn.
 
Last edited:
Top