You are using an out of date browser. It may not display this or other websites correctly.
You should upgrade or use an alternative browser.
You should upgrade or use an alternative browser.
Export thread
Husqvarna 125b issues
#1
B
Bounje
B
Bounje
Hi there,
I am trying to figure out what is going wrong with my 125b leaf blower. Any advice would be appreciated.
I was running it fine on Husqvarna 50:1 mix (I just mix the small bottle with 5 l gas as recommended) with premium fuel (stabilizer added to can right on pumping) and then I added a tank of Trufuel 50:1 premix in the hopes of cleaning the engine out a bit (maybe Moto Mix is better for this?). At that point I started to see issues. The engine started to run differently and I tried adjusting the carb. I went too low on the high speed adjuster and the engine just cut out and wouldn't start again.
At this point I cleaned the carburetor out with carb cleaner after taking it apart. The carb components appeared to be in decent condition with no bends or brittleness. I still ordered a rebuild kit anyways just to keep things in good order. I had already cleaned the spark arrestor a few weeks but checked it and the muffler again. There was no significant buildup behind it or on the spark arrestor. What I did notice was the piston had some black oil on it... I also checked the spark plug for spark and found it had some but didn't seem strong. However, it had oil fouling. So I cleaned it off and reinstalled it. New one is on the way. The engine started up and I adjusted the low and high speed carb screws until it was running well. Both seem to be on the faster side but I can't idle it with the idle speed too low or it cuts out. Do i need to adjust the Phillips idle screw more? I ran it for about 7 minutes full throttle and then it cut out. I was able to get it to restart and finished blowing the driveway off today (about 4-5 more minutes).
Is there enough information here to begin looking deeper into this problem? I ordered a compression tester and a multimeter but I don't know if these will be helpful to diagnose this issue.
#2
R
Rivets
R
Rivets
Are you adjusting the high and low fuel adjusting screws in the right order? I’ve always adjusted the high speed screw first. When it is running the way I want it, I adjust the idle speed screw so the engine is running to fast. Next I turn the idle speed screw out to slow the engine down until it starts to stumble. Now I adjust the idle mixture screw until it runs smoothly. Go back and adjust the idle speed screw again until it stumbles and then readjust the idle mixture screw until smooth. Keep doing this until I get the idle speed I want. Once I reach my desired idle speed I open the idle mixture screw about 1/8 turn. I do this to eliminate stumbling when I quickly open the throttle. Don’t know if this helps, but it’s worth a try.
#4

StarTech
StarTech
Side Note> Standard carburetor cleaner should never be used to cube carburetors nor should high pressure air. There are delicate tiny (under 2 mm) rubber internal check valves which are damage by carburetor cleaners and high pressure air. Now Walbro does make specific carburetor cleaner for these but I just use soap and water in an Ultrasonic cleaner. Just watch out for loose welch plugs that may get shaken out.
#5
R
Rivets
R
Rivets
Then I must have been teaching and doing it wrong since the early 70’s. Manuals for Walbro, Tecumseh, and Briggs carb adjustment all indicate adjusting High speed mixture first, then idle mixture. This is because the idle circuit gets its fuel from the high speed circuit. If you adjust the idle circuit first, then high speed, you will be changing how much fuel is available for the idle circuit, so will then have to go back and adjust the idle mixture screw again. I’ve been using the procedure I posted forever and never have a problem.
#7
R
Rivets
R
Rivets
This is from Tecumseh manual for Tecumseh and Walbro carbs.
FINAL ADJUSTMENTS (NON EMISSION ENGINES)
Start the engine and allow it to warm up to normal operating temperature (3 - 5 minutes). Set the speed control to the HIGH or FAST position. From the recommended preset position, turn the main mixture adjustment screw in (clockwise) slowly until the engine begins to run erratic (lean). Note the position of the screw. Now, turn the screw out (counterclockwise) until the engine begins to run erratic (rich). Turn the screw in (clockwise) midway between these two positions. This will be the best setting. (diag. 24, 25 & 26).
Set the speed control to the IDLE or SLOW position. Adjust the idle mixture screw following the same procedure used to adjust the main mixture adjustment screw.
Page 16 of this manual. https://www.mymowerparts.com/pdf/Te...P-4-CYCLE-L-HEAD-FLAT-HEAD-ENGINES-692509.pdf
#8

StarTech
StarTech
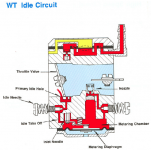
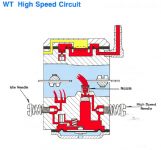
Two completely different carburetor designs for one thing but if you look closely at the idle and main paths of the diaphragm version they are two separate circuits.
Only float version has the main restricting the idle mixture path.
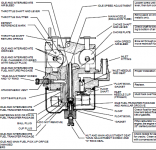
The diaphragm version has no such restriction.
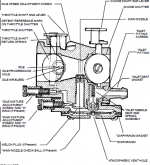
Any way I do know the cubes are adjust L first then H when they have two separate adjustments or at least that is the way I have done it the last 13 yrs of working with the Walbro WT cubes.
Only float version has the main restricting the idle mixture path.

The diaphragm version has no such restriction.

Any way I do know the cubes are adjust L first then H when they have two separate adjustments or at least that is the way I have done it the last 13 yrs of working with the Walbro WT cubes.
#10

StarTech
Service manuals are only reference materials for me as I have numerous mistakes in them over the years. It like the time Victor told me it was impossible for an electronic calcuator to add wrong. I add 300 of them that did.
StarTech
That fine besides Tecumseh engines here a dead animal anyways. I only seen one in the last three years and it was toast as the parts were NLA. No rebuilding it. Ended up repowering with HFT engine.Not getting into a pi…..ing match over this. You do it your way, I’ll do it mine.
Service manuals are only reference materials for me as I have numerous mistakes in them over the years. It like the time Victor told me it was impossible for an electronic calcuator to add wrong. I add 300 of them that did.
#12

StarTech
StarTech
No just means that I only take less than 15 minutes to tune a chainsaw or other 2 cycle vs an hour of hunting the sweet spot. An Echo chainsaw can be a bear to tune if you don't use their procedure of tuning idle first.Which means your way is the only right way?
#13
B
bertsmobile1
B
bertsmobile1
FWIW I always do mine high first then low.
This method works best for me particularly as I have very limited technical information available so am often working blind as the owners have usually had a fiddle using wrong information they pulled off you tube for the right brand but wrong model .
I rather feel it is one of those technique prefference things like setting valve lash at TDC or as the opposing valve just opens .
If nothing else , a small adjustment on the H makes a big difference to the engine while big adjustments on the idle make small differences anywhere except at idle .
I have noticed some machine manuals say to do then H then L while others say L then H for what appear to identical carbs .
Machine manuals seem to fixate on over reving damaging the engine so perhaps there has been a rewrite to avoid the brain dead running engine way above the speed limits of the bearings & doint severe internal damage although I am yet to see any internal damage other than pistons that break up that could be attributed to over reving the engine.
#14
B
bertsmobile1
The modern low emission carbs with the very long shallow needles are a PIA to find sweet spots as some have a running range of two full turns .
Fine if you have a meter up the exhaust pipe but a PIA when working by ear .
B
bertsmobile1
I will pay you this one though.No just means that I only take less than 15 minutes to tune a chainsaw or other 2 cycle vs an hour of hunting the sweet spot. An Echo chainsaw can be a bear to tune if you don't use their procedure of tuning idle first.
The modern low emission carbs with the very long shallow needles are a PIA to find sweet spots as some have a running range of two full turns .
Fine if you have a meter up the exhaust pipe but a PIA when working by ear .
#16
R
Rivets
R
Rivets
Star, you state manuals are full of mistakes and for reference only, but when ever you try to prove a point you use illustrations which you cut and paste from a manual. So you’re telling us that every manual which states H before L is a mistake, but L before H, plus your illustrations are correct? Can’t have it both ways. Second, Tecumseh might be dead, Briggs on life support, but the theory as to how the five different circuits in a carb work has not changed. It doesn’t take me anywhere close to an hour to adjust 99% of the carbs I work on, both 2 & 4 cycle. Using my ear and a Vibratach I can normally can do a carb in about 20 minutes. In your mind I might be an old fart who shouldn’t be allowed around an engine, but the procedure I taught and posted has served me well for the last 50 years and just because you do it a different ways, doesn’t make yours the absolute truth. Just means there is more than one way to get an old fart fired up.
#17

StarTech
StarTech
First Rivets don't be assuming things. It make an (***)(u)(me).
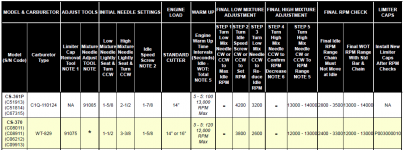
Yes I said manuals do have printed mistakes like in the case of the Tecumseh L-head manual a half truth as it assume both carburetor styles are tuned the same. If you note the last image is a Wabro make and model specific tuning. Each make and model carburetor will have different tuning procedures depending on what it is on. Some manual errors are translation errors too.
It like the Kawasaki 57001-1003 oil pressure gauge adapter that the service manual only give partial info. Actually doesn't indicate if 1/8-27 NTP or 1/8-28 BSP threads. Big difference when buying after market parts.
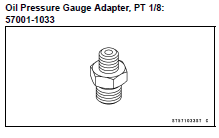
In my case I need 1/8-28 BSP threads for the pressure switch so I be either rethreading the switches or the engine's port. I just can't spend $30 for one switch plus another $20 for shipping for $4.30 ($7 with shc) per switch. Just ordered 5 switches for $34.87 including 2 day shipping.
It is also like the JD Z915 where the 2015 service manual stated to remove the axle hub with a hub puller for axle seal replacement. And when they reprinted the manual in 2020 they changed it to remove the axle for seal replacement. The little change costed me $200 for a tool that I could not use.
Yes I said manuals do have printed mistakes like in the case of the Tecumseh L-head manual a half truth as it assume both carburetor styles are tuned the same. If you note the last image is a Wabro make and model specific tuning. Each make and model carburetor will have different tuning procedures depending on what it is on. Some manual errors are translation errors too.
It like the Kawasaki 57001-1003 oil pressure gauge adapter that the service manual only give partial info. Actually doesn't indicate if 1/8-27 NTP or 1/8-28 BSP threads. Big difference when buying after market parts.

In my case I need 1/8-28 BSP threads for the pressure switch so I be either rethreading the switches or the engine's port. I just can't spend $30 for one switch plus another $20 for shipping for $4.30 ($7 with shc) per switch. Just ordered 5 switches for $34.87 including 2 day shipping.
It is also like the JD Z915 where the 2015 service manual stated to remove the axle hub with a hub puller for axle seal replacement. And when they reprinted the manual in 2020 they changed it to remove the axle for seal replacement. The little change costed me $200 for a tool that I could not use.
#18
B
bertsmobile1
B
bertsmobile1
Full of mistakes is a bit of an over statement.
Having written, proof read & updated them on a contract basis for decades I can assure you that most are as close to 100% correct at time of printing as any publication can be.
However what happens is things change from the time the manual is published to the time you end up reading it 3, 5 , 10, 20 ,50 years later .
What differs is how the particular company handles any things that changes &/or post publication mistakes that are found.
Now days when they are digital they can be updated very cheaply to cover materials &/or specification changed but in the paper only days , updating was a major cost so in most cases manufacturers simply issued dealer notes and in many cases these never made it into the manual as the dealers were expected to keep them with the manuals and notify their technicians about the changes .
Manuals were never meant to be used by ameteurs apart from a very small number of companies like JD who write their manuals for the mechanically ignorant public .
Then companies change the method of doing things and this I fear is what you two are locking horns about .
Public Liability assesors look at things and decide that there is a possibility of a run away engine self destructing if a lazy tech does some thing like hold the throttle WFO with a velcro strap / tie down start an engine off propane or starting fluid then allow it to scream WFO in the shop without the cooling covers on and no load on the motor.
For all we know this could have happened.
Then smart arse lawyers sue the manufacturer because the manual does not say not to tie the throttle open so the proceedure gets changed to an idiot proof one .
There is no real difference in either technique.
Both the H & L need to be adjusted and both affect each other so adjusting the one will require a compensating adjustment to the other .
If you have access to initial settings then you can adjust Low speed first because the engine will start and run at low speed .
However if you don't then it is easier to set WFO then work back because as you are letting the throttle off you should be able to hear that it is starting to run rich or lean or not responding as it should .
I am in the latter category and while I do write down the needle settings before I strip a cube carb, often these are very much wrong because either the owner has had a fiddle or has been adjusting to compensate for failing diaphragms or air leaks.
Thus when properly cleaned & rebuilt the owners settings are so far out the machine will just not start .
It is the same story as valve adjustment
TDC or Base Circle , makes little difference unless it is a very old cam grind with a long slow closing ramp ( makes the valves quieter ) .
So you two are argueing abut nothing.
Rivets is working off what was the original information and Star is argueing off the updated information , both work, neither is more correct than the other
#19

Mower King
Mower King
I'm going to show my age with this old quote to Rivets and Star but...."there is more than one way to skin a cat"
I do know those "cube" carbs on hand-held equipment are very sensitive to adjustment and can be adjusted out of spec real easy, so that they won't even start. Most the pros can probably get them running right but, your guy wanting info on how to adjust them, probably not so easy!
We don't work on chainsaws anymore but, I still get to "enjoy" trimmers and blowers.
#20

StarTech
StarTech
Now I understand why the EPA doesn't want techs to have the carburetor adjustment tools. And I don't blame them either though it makes my job a lot harder as I at times have to make the tools.
Now do I loan those custom tools out or give out the design plans? H*** no.
Now do I loan those custom tools out or give out the design plans? H*** no.
#21
R
Rivets
R
Rivets
I skin the cat my way and others do it their way, but our resident EXPERT on all things small engine, thinks his way is the only right way to do things. He thinks he knows more than everyone else and loves to point out his expertise by calling out anything that is not up to his standards. There are mistakes in manuals, but everyone of us, except our resident expert, has made more mistakes than we will find in all manuals combined. My old fart OCD loves to confront people like him and have fun at their expense. He will probably just say I’m done with you peons and leaving, going back to the top of my mountain where I can watch you suffer.
#22
F
fowvay
F
fowvay
Because the original poster asked a question about his 125B handheld blower, it should be noted that Husqvarna states to adjust the low speed setting first followed by the high speed setting and lastly set the idle speed.
#23
B
Bounje
B
Bounje
Thanks for advice on carb adjustments. I don't think that was the issue.
Once I changed the spark plug things ran a lot better. I adjusted the carb appropriately and it runs decent.
My concern, however, is that the last spark plug was oil fouled so there must be an underlying problem. Would it likely be with the carburetor? I use the Husqvarna oil mix as per specs on the box and basically only run it on full throttle.
#24

StarTech
StarTech
It would not hurt to check the muffler's spark arrester. If it was a Stihl I would it definitely would be partial clog but I have near zero experience with Husqvarna blowers. I think I have seen one in the shop in 12 yrs.
#25
B
Bounje
B
Bounje
I cleaned this out about 2 months ago and haven't been running it as heavily in the summer. Might be worth burning the muffler out and re-cleaning the spark arrestor screen before heavier usage begins come summer.It would not hurt to check the muffler's spark arrester. If it was a Stihl I would it definitely would be partial clog but I have near zero experience with Husqvarna blowers. I think I have seen one in the shop in 12 yrs.
#26

Scrubcadet10
Scrubcadet10
please continue this thread here. https://www.lawnmowerforum.com/threads/husqvarna-125b-blower-problem.67842/#post-421932

