Craftsman head gasket issue?

Rickcin

Well-Known Member
Joined
Jul 4, 2012
Threads
73
Messages
279
Works well as long as you make sure the piston is TDC on the compression stroke before you remove the head. After the head is removed you no longer have the rocker lever positions for reference.

Meaning the piston is flush with the top of the block ?
 

tigercat

Well-Known Member
Joined
Nov 17, 2012
Threads
19
Messages
280
When you start the job, remove the spark plug and remove the valve cover. Rotate the engine with the bottom pulley. It will rotate with no effort because the plug is removed. Notice the valve and valve springs opening and closing. When both valves are closed insert a screw driver into the spark plug hole. Now carefully rotate the engine until the screw driver rises no further. When valves are both closed and piston is up all the way, you are at top dead center of the engine. When setting the valve lash, rotate the engine a bit more so the screwdriver falls 1/4" (or the piston falls 1/4").
At this exact spot you set the valve clearance with your feeler gauge.
This is as easy as eatting a bowl of ice cream! :licking:
 

SeniorCitizen

Lawn Addict
Joined
Aug 28, 2010
Threads
132
Messages
2,183
Meaning the piston is flush with the top of the block ?
No, not necessarily. The piston is at the top twice in a complete cycle. Once at the end of the exhaust stroke and beginning of the intake stroke. You'll see the exhaust valve just close and the intake valve beginning to open at that point.

The next time it is at the top will be at the end of the compression stroke and beginning of the power stroke. Both the exhaust valve and intake valve will have been closed the full duration of the piston travel during compression and a good portion of the power stroke.

https://www.youtube.com/watch?v=-8cXXjsRg70
 

Rivets

Lawn Royalty
Joined
Mar 11, 2012
Threads
59
Messages
15,348
Senior Citizen you are correct, unless the engine has a compression release mechanism. Then you must rotate a little farther, 1/4" down, to make sure that the compression release has been removed.
 

Rickcin

Well-Known Member
Joined
Jul 4, 2012
Threads
73
Messages
279
When you start the job, remove the spark plug and remove the valve cover. Rotate the engine with the bottom pulley. It will rotate with no effort because the plug is removed. Notice the valve and valve springs opening and closing. When both valves are closed insert a screw driver into the spark plug hole. Now carefully rotate the engine until the screw driver rises no further. When valves are both closed and piston is up all the way, you are at top dead center of the engine. When setting the valve lash, rotate the engine a bit more so the screwdriver falls 1/4" (or the piston falls 1/4").
At this exact spot you set the valve clearance with your feeler gauge.
This is as easy as eatting a bowl of ice cream! :licking:

Confusing to me, but I think I got it. After removing the valve cover, just watch the operation to see when both valves are closed, from that point you want the piston to be dropped 1/4 inch.
So, when I reassemble everything, do the same thing, closed valves then lower the piston 1/4 inch and adjust the valves, correct?

I have an electronic PTO on my Craftsman so the pullys will still turn the crank? Sorry for all of the questions, I need to understand it all 100%!

Thanks again - Rick
 

tigercat

Well-Known Member
Joined
Nov 17, 2012
Threads
19
Messages
280
Confusing to me, but I think I got it. After removing the valve cover, just watch the operation to see when both valves are closed, from that point you want the piston to be dropped 1/4 inch.
So, when I reassemble everything, do the same thing, closed valves then lower the piston 1/4 inch and adjust the valves, correct?

I have an electronic PTO on my Craftsman so the pullys will still turn the crank? Sorry for all of the questions, I need to understand it all 100%!

Thanks again - Rick

Correct. On the PTO, The engine spins when you crank it around right? so it will spin by hand too. Without the spark plug there is no compression, so you can roll the engine around with 2 fingers. Find the largest pulley and push it....:smile:
 

Rickcin

Well-Known Member
Joined
Jul 4, 2012
Threads
73
Messages
279
Correct. On the PTO, The engine spins when you crank it around right? so it will spin by hand too. Without the spark plug there is no compression, so you can roll the engine around with 2 fingers. Find the largest pulley and push it....:smile:

Thanks much! I am waiting for my parts to arrive and some time on a weekend and I will give it a shot. I am looking forward to doing it because if I get it right, it will be satisfying.

I will let you know how I make out. Thanks again - Rick
 

Rickcin

Well-Known Member
Joined
Jul 4, 2012
Threads
73
Messages
279
When you start the job, remove the spark plug and remove the valve cover. Rotate the engine with the bottom pulley. It will rotate with no effort because the plug is removed. Notice the valve and valve springs opening and closing. When both valves are closed insert a screw driver into the spark plug hole. Now carefully rotate the engine until the screw driver rises no further. When valves are both closed and piston is up all the way, you are at top dead center of the engine. When setting the valve lash, rotate the engine a bit more so the screwdriver falls 1/4" (or the piston falls 1/4").
At this exact spot you set the valve clearance with your feeler gauge.
This is as easy as eatting a bowl of ice cream! :licking:

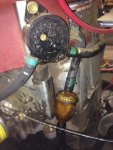
Okay, today is the day I decided to change the head gasket and I now see a bunch of what looks like oil on this black part, which I believe to be a fuel pump?

The reason I am thinking it is the head gasket is because it fialed about 4 years ago and the sympton was it was burning oil nad ocassionally back firing.

Perhaps the head gasket has not failed again but it is using oil and I see some blue smoke when engaging the mower deck.

Wondreing what to do, thanks - RickIMG_1926.jpg
 
Last edited:

Rickcin

Well-Known Member
Joined
Jul 4, 2012
Threads
73
Messages
279
When you start the job, remove the spark plug and remove the valve cover. Rotate the engine with the bottom pulley. It will rotate with no effort because the plug is removed. Notice the valve and valve springs opening and closing. When both valves are closed insert a screw driver into the spark plug hole. Now carefully rotate the engine until the screw driver rises no further. When valves are both closed and piston is up all the way, you are at top dead center of the engine. When setting the valve lash, rotate the engine a bit more so the screwdriver falls 1/4" (or the piston falls 1/4").
At this exact spot you set the valve clearance with your feeler gauge.
This is as easy as eatting a bowl of ice cream! :licking:

I did it and it works!!!! Thanks to your help and the youtube video. After getting done, it would not start. I pulled the valve cover off, re-adjusted the valves and it still would not start. This time I used my head, I removed the vlave cover and turned the flyweheel to watch the valves move and th eintake valve was not moving at all. I play around until I found the sweet spot where it moved, then reassembled adjusted and it started right up.
The head torque called for 220 inch pounds and I went somewhere around 20 foot pounds so I hope thta is good for the long haul.

I feel great that I was able to make th erepair myslf and save $220 that Sears would have charged.

Thanks again - Rick
 

tigercat

Well-Known Member
Joined
Nov 17, 2012
Threads
19
Messages
280
20 foot pounds will be fine.

Congrats! :thumbsup:
 
Top