Clutch Actuator Swivels Around the Handle (Honda HRR216K10VKAA)

WhidbeyTomas

Member
Joined
Mar 26, 2020
Threads
1
Messages
11
  • / Clutch Actuator Swivels Around the Handle (Honda HRR216K10VKAA)
I know..nice trick. This past week, I found that the drive stopped responding to the actuator. I didn't know what I was doing, and with a big lawn, I was desperate for an easy quick solution. I took the actuator apart, hoping that the clutch cable had simply come loose there. Then I panicked because there was no quick access to the cable. I pushed the mower through the lawn and suffered for it.

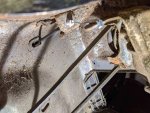
This week, I watched the RepairClick video on clutch cable replacement. I took the cover off underneath, and found the cable break at the attachment to the transmission arm. I purchased the parts and installed the new cable. Unfortunately, the actuator still swivels and the cable doesn't pull the belt tight. The RepairClick video helpfully recommends that you check to be sure that the belt is tensioned. Sadly, they don't tell me what to do if it doesn't. I've taken the actuator apart and reassembled it three times and was seriously frustrated at the lack of result.

I can't see a reason for the swiveling. In taking the actuator apart, I was concerned to ensure that the pin sat properly in the groves. I didn't check to be sure the cable didn't come free of the actuator (the black plastic piece it fits into), but I don't see how it could have come free. Any ideas about what is going on with this? What keeps the actuator in place? I didn't zip tie the cable to the handle, does that matter (definitely grasping at straws).
 
Last edited:

WhidbeyTomas

Member
Joined
Mar 26, 2020
Threads
1
Messages
11
  • / Clutch Actuator Swivels Around the Handle (Honda HRR216K10VKAA)
This reminds me of the old days with a CB radio. Lots of chatter, but I could never get anyone to respond. I'm sure people would respond to this post, if actuator information wasn't classified.

It seems to me that the actuator might require that the opening for the pin be positioned left or right of center. The pin could displace from the grooves in the difficult task of bringing those two plastic grooved halves together (you have to make the two parts come together by squeezing them), and who knows what happens to groove and pin positioning during that process. There has to be a simple solution, but yes, it may be reserved for those in the know.
 
Last edited:

Rivets

Lawn Royalty
Joined
Mar 11, 2012
Threads
59
Messages
15,291
  • / Clutch Actuator Swivels Around the Handle (Honda HRR216K10VKAA)
Wow, new member bad mouthing the forum because he hasn’t gotten any responses in less than 24 hours. Maybe you don’t know how this works? 1. Most of the experienced techs on this site have jobs, which means they don’t jump when posts are made. 2. Most of the experienced techs on this site respond to threads when they have a good idea of the problem. They don’t shoot from the hip, guessing at solutions. 3. In some cases the manufacturer (Honda and others) don’t allow their service manuals to be easily available on the web. That means unless the tech is working in a Honda service center they can’t look up assembly or service materials. 4. Most of the experienced techs on this site look down on members who feel that they are not getting help fast enough. They offer their service for free and can tell you that over 75% of the time they never even receive a thank you. 5. Most people coming here for help understand these things and are patient, not rude or condescending to those who may be able to help them. I myself have been working on small equipment for over 50 years, but can’t help with this problem because I have not seen this problem before, can’t get service materials and am not going to offer an guesses. If you can be patient and understanding I know someone will be along to give you a hand, but you have to remember not to bite it.
 

bertsmobile1

Lawn Royalty
Joined
Nov 29, 2014
Threads
65
Messages
24,995
  • / Clutch Actuator Swivels Around the Handle (Honda HRR216K10VKAA)
I would have loved to reply but those numbers mean nothing to me as I am not a Honda dealers and can not look it up
A photo would have been more helpful so I would know what exactly you are talking about.
We are in our off season dow here so I am probably a little less busy then the USA lads.
And please remember this is not face book.
I for one browse the forum ( and about 20 others ) when I come up for a cuppa , check a parts list , write an invoice .
It is not plugged into my head 24/7 .

I have read your post a dozen times but can not visualise your problem .
We get mainly 2 & 3 speed gear drives down here , them I can help with, and am currently doing that right now.
 

ILENGINE

Lawn Royalty
Joined
May 6, 2010
Threads
43
Messages
10,713
  • / Clutch Actuator Swivels Around the Handle (Honda HRR216K10VKAA)
I have looked at the service manual and like Rivets said it is not a manual available to the general public, Is not written for the average person. Like Bert asked pictures would help us to figure out what is wrong with the drive system. so detailed pictures would give us some visualization.
 

WhidbeyTomas

Member
Joined
Mar 26, 2020
Threads
1
Messages
11
  • / Clutch Actuator Swivels Around the Handle (Honda HRR216K10VKAA)
Thanks guys, I am sorry if it seemed like I was ragging on the community, that wasn't my intent. It was more about my experience. Information about this "smartdrive" actuator seems to be restricted to manuals for authorized Honda service centers. Thank you for the reality check. I do have considerable experience in forums like this, but that was in the heady early days of internet development. There were thousands of members in each section. That audience lived on computers with a keyboard in hand, this audience lives in a shop with a wrench in hand.

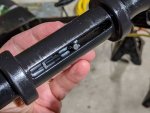
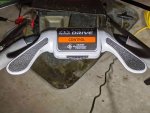
The problem isn't with the gearbox or engine, it is with the plastic thingy that sits on the horizontal bar. Honda calls the drive a "smartdrive. That thingy on the bar is called an actuator.

It is a real challenge to describe mechanics, especially for those without a mechanical vocabulary. Even having such, and attempting to understand a word description of an arcane mechanical system is a challenge - one only the most brave should attempt. Skip this next part if you don't want a headache.

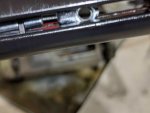
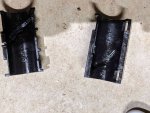
The user rotates this component to increase or decrease power. It should not rotate more than about twenty degrees. The clutch cable inserts inside the handle about midway up and ends in the middle of the horizontal bar. The actuator clamps over the bar in three two halve parts. The inner two halves feature a window into the bar (the bar is open top and bottom). A pin is inserted through this opening and through the eyelet of the cable. The pin extents out on each end inserting into a s- like groves on the inside of both of these inside halves (If the actuator were an Oreo cookie, this is the cream layer). Rotating the actuator should force the pin to slide right, through the grove applying tension on the clutch cable and thus moving the transmission pulley and engaging the transmission belt. Clear as mud?

I don't expect people will want to watch a video - a bit annoying with its didactice yet cavalier descriptions, but the best way to see this is through this video. If you want, turn off the sound and drag on the progress bar until you see actuator disassembly and assembly sections (disassembly/assembly required to replace the clutch cable).
 
Last edited:

WhidbeyTomas

Member
Joined
Mar 26, 2020
Threads
1
Messages
11
  • / Clutch Actuator Swivels Around the Handle (Honda HRR216K10VKAA)
Images are probably as obfuscating as my description, but give them a try. I've named the images to hopefully help. Unfortunately, all my images are too big to upload. Zipped together or individually, too big. I'd normally import these to Photoshop and optimize them, but my Photoshop is cuput with the move to 64bit software.
 
Last edited:

bertsmobile1

Lawn Royalty
Joined
Nov 29, 2014
Threads
65
Messages
24,995
  • / Clutch Actuator Swivels Around the Handle (Honda HRR216K10VKAA)
Images are probably as obfuscating as my description, but give them a try. I've named the images to hopefully help. Unfortunately, all my images are too big to upload. Zipped together or individually, too big. I'd normally import these to Photoshop and optimize them, but my Photoshop is cuput with the move to 64bit software.
Email them to yourself
usually this reduces the file size when you attach them
And yes 64 bit makes for very large files but the trick is to resize to 21 x 8 " or there abouts then CHANGE THE RESOLUTION to 72 dpi .
If you don't the file size stays the same and all that changes is the display size.
 

WhidbeyTomas

Member
Joined
Mar 26, 2020
Threads
1
Messages
11
  • / Clutch Actuator Swivels Around the Handle (Honda HRR216K10VKAA)
Actually, Google didn't make them smaller, but found a free app to do it. Here ya go (still think the video would give you a clearer understanding in less than a minute).
 

Attachments

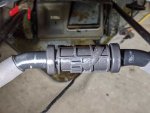
  • CableConnectionAtTransmission.jpg
    CableConnectionAtTransmission.jpg
    166.9 KB · Views: 8
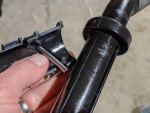
  • HorzBarWithClutchCableEyelet.jpg
    HorzBarWithClutchCableEyelet.jpg
    58.4 KB · Views: 8
  • InnerHalvesInPlace.jpg
    InnerHalvesInPlace.jpg
    78.8 KB · Views: 8
  • MiddleHalvesApart.jpg
    MiddleHalvesApart.jpg
    122.3 KB · Views: 7
  • MiddleHalvesInPlace.jpg
    MiddleHalvesInPlace.jpg
    67.2 KB · Views: 7
  • PinAndMiddleWithGrove.jpg
    PinAndMiddleWithGrove.jpg
    81.5 KB · Views: 7
  • TheActuator.jpg
    TheActuator.jpg
    88.3 KB · Views: 8

Rivets

Lawn Royalty
Joined
Mar 11, 2012
Threads
59
Messages
15,291
  • / Clutch Actuator Swivels Around the Handle (Honda HRR216K10VKAA)
Having to look at a video might seen good to you, but that would mean we would have to constantly be starting, stopping and backing up to see parts. This is far easier for me. Now I’ve got questions. 1. Have you stuck a screwdriver through the cable shown in pic #2? If you pull the cable to the right, it should put more tension on the belt. 2. You must set this hole (privet point) so you have a slight tension on the belt, before installing the two halves in pic #4. This will be your starting point. 3. It looks like you have the halves installed correctly in pic #5. 4. Pic #6 is the key as the pin which goes through the cable must rest in the slot of the black halves. Install the bottom one first and twist it to see if the cable looks like it will move to the right. It probably will not work well or pop out without the top half on. 5. Install the top half, squeeze tight, and twist the halves. You must make sure that the pin ends are in the curved grooves of the two halves for it to work. If it is working you should see the belt tensioner move. 6. If it is working install the paddles and adjust the drive. If it spins around the pin ends are not in the groove or the groove stops are worn. Try and get back to us.
 
Top