Really need some help here, Craftsman YTD 4000 Hydro

Thales

Forum Newbie
Joined
Aug 30, 2022
Threads
1
Messages
5
Hi all, very frustrated/tired after two days off of fighting with this. Hope I can get some help!
Seems like I'm just missing something.

I had to change the deck belt (42" deck", I have the correct belt (number on belt and package is what it should be. Blades were disengaged before starting this.

I dropped the deck, followed the diagrams and such. Belt is installed correctly BUT WILL NOT FIT around the front pulley.

I followed the instructions in the manual to the letter but there just isn't enough slack. The only way to make enough slack is to take the "spring Ext Elect Clutch" off (makes more slack in the belt) but then there is no way to reattach that when everything else is attached. Or if I get that (spring) back on, the deck support arms and such will NOT line up.

This is very hard to explain and just baffles me, this should not be a huge deal. I have had the thing on and off so many times it's just nuts, but I just can't figure it out.

I hope someone can tell me it's something really dumb that I'm missing. I really need to get this done so I can use it....

Thanks in Advance!!!

I tried to attach some photos but it says they are too Large?
 

bertsmobile1

Lawn Royalty
Joined
Nov 29, 2014
Threads
64
Messages
24,645
The spring has to be stretched to get the belt on
Usually that will be about 1/2 of its travel Did you measure the new against the old belt ?
Is it a genuine Craftsman belt
Where are you ?
In the EU belt lengths are the effective length
In the USA length is the outside
in UK, NZ, PNG, AUS and a few other commonwealth countries the belt is measured on the inside
SO an EU belt will be about 1" smaller than the same size US belt & a UK belt will be 2" shorter
Belts bought of Evilpay or Ammozone could be measures according to any standard or even be reject belts because they were branded with the wrong size
 

Thales

Forum Newbie
Joined
Aug 30, 2022
Threads
1
Messages
5
The spring has to be stretched to get the belt on
Usually that will be about 1/2 of its travel Did you measure the new against the old belt ?
Is it a genuine Craftsman belt
Where are you ?
In the EU belt lengths are the effective length
In the USA length is the outside
in UK, NZ, PNG, AUS and a few other commonwealth countries the belt is measured on the inside
SO an EU belt will be about 1" smaller than the same size US belt & a UK belt will be 2" shorter
Belts bought of Evilpay or Ammozone could be measures according to any standard or even be reject belts because they were branded with the wrong size
Thanks.
Figured about the spring, just no way to get to it once everything is in place.
Not a genuine Craftsman part, but number stamped on it is correct per manual parts #.
US. Purchased from a well known mower supply store in a locally. I may (time allowing) take the "new" belt to a local repair shop that has been good to me in the past and see how it stacks up against theirs if they have that particular belt in stock. Really only other thing I can think of at this point, it just doesn't make sense
Thanks for reading and replying!!
 

bertsmobile1

Lawn Royalty
Joined
Nov 29, 2014
Threads
64
Messages
24,645
When fitting a new belt you need to make the tension arm spring stretch
On better makes there is a square hole for a breaker bar to give you the leverage needed to stretch the spring
Some times I pop a long spanner on the idler bolt
A little old lady customer uses a ratchet tie down on the arm to stretch the spring.
Being in OZ I have problems accessing the new Craftsman site .
I am assuming your mower is the electric PTO model
 

Thales

Forum Newbie
Joined
Aug 30, 2022
Threads
1
Messages
5
When fitting a new belt you need to make the tension arm spring stretch
On better makes there is a square hole for a breaker bar to give you the leverage needed to stretch the spring
Some times I pop a long spanner on the idler bolt
A little old lady customer uses a ratchet tie down on the arm to stretch the spring.
Being in OZ I have problems accessing the new Craftsman site .
I am assuming your mower is the electric PTO model
Yes electric PTO!
Model 917.275684
I really don't see how you could get anything under there for leverage once the deck is back in place.
Frustrating thing is there is NO mention of anything other than the order to re-attach support arms and such and then "install belt into electric pulley groove"...... Uh NO....
Thanks for the reply!
 

bertsmobile1

Lawn Royalty
Joined
Nov 29, 2014
Threads
64
Messages
24,645
Please have a think
You have the standard 2 idler dick on a dunny wall T shaped belt run
With the deck on the ground there is 5 to 8 inches of clear space between the deck & the mower
SO
Belt on both blade pulleys and both idler pulleys
Strap on tension arm going to the front of the mower
Clickety clickety click and pulley is forwards , spring is stretched
Belt gets hooked over the clutch pulley, job done .
Only trick to it is making sure the belt goes under the belt keepers and depending upon which year modle your is , some had brake pads on the pulleys as well that the belt has to go under .
 

StarTech

Lawn Royalty
Top Poster Of Month
Joined
Feb 19, 2020
Threads
74
Messages
10,100
First just the correct number on the belt doesn't mean it is the correct belt so when in doubt measure it. This one is 5/8 x 97.5 OD. Aftermarket are especially bad about having the correct belt number imprinted but on a belt the wrong size. I quit Sunbelt (A&I) because of this. Nearly every 5/8 belt I got from them was nearly 2" short. Impossible to get them when they are this short.

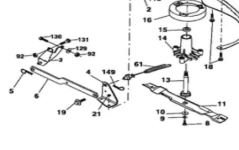
Second with an electric PTO setup normally the idler spring must be removed to install the correct belt. The spring is reinstalled once the belt is in place. To do this you need a spring hook tool.

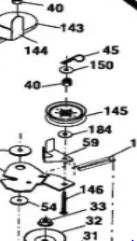
But this deck was originally a manual PTO setup. All they did was to install a fixed engagement cable and spring. So it is more of a pain to install the belt then usual. Basically you install the belt on all the pulleys except one of the deck spindle pulleys. Then you walk on the deck belt on the last pulley or using something around the idler pulley center bolt pull it forward to remove the tension on it caused by the spring. Item 61 is the spring assembly.
1661934304954.png
The bolt I am referring to is item 146. It protruding above the pulley (item 145). Just be careful to only stretch item 61 enough to get the belt on. Here I still use my spring hook to remove and install item 61 just I have the tool available.

1661934396744.png
 

Thales

Forum Newbie
Joined
Aug 30, 2022
Threads
1
Messages
5
First just the correct number on the belt doesn't mean it is the correct belt so when in doubt measure it. This one is 5/8 x 97.5 OD. Aftermarket are especially bad about having the correct belt number imprinted but on a belt the wrong size. I quit Sunbelt (A&I) because of this. Nearly every 5/8 belt I got from them was nearly 2" short. Impossible to get them when they are this short.

Second with an electric PTO setup normally the idler spring must be removed to install the correct belt. The spring is reinstalled once the belt is in place. To do this you need a spring hook tool.

But this deck was originally a manual PTO setup. All they did was to install a fixed engagement cable and spring. So it is more of a pain to install the belt then usual. Basically you install the belt on all the pulleys except one of the deck spindle pulleys. Then you walk on the deck belt on the last pulley or using something around the idler pulley center bolt pull it forward to remove the tension on it caused by the spring. Item 61 is the spring assembly.
View attachment 62062
The bolt I am referring to is item 146. It protruding above the pulley (item 145). Just be careful to only stretch item 61 enough to get the belt on. Here I still use my spring hook to remove and install item 61 just I have the tool available.

View attachment 62063
Still no time today to run to the repair place and compare a belt if they have that one in stock. I can measure it when I get home.
Those are the pictures I have been staring at for so long now, you nailed it!
So I was on the right track with that spring, only thing that made any sense.
I just can't picture in my head (not at home) how I'm going to get anything around that little bit of bolt to pull it forward.
I will start with the belt then see if I can figure out how to move that spring. I can't believe just changing a deck belt has turned into such a nightmare.
Is there any place to get a "spring hook tool" ? Did some basic searching but didn't have much time.
Thanks for the reply!
 

bertsmobile1

Lawn Royalty
Joined
Nov 29, 2014
Threads
64
Messages
24,645
Spring hook
Standard item from most bearing / engineering supply shops
Length of fence wire bent over at one end then ground down wrapped around a handle at the other end ( most of mine )
Ratchet tie down with the strap looped around the TENSION ARM then hooked over itself
Even seem a customer use a welded eye bolt to replace the factory bolt that holds the pulley onto the tension arm and of course fitted from the top rather than from the bottom, This makes replacing the pulley a bit more difficult but usually it is 2 or more belts for every pulley
 

Thales

Forum Newbie
Joined
Aug 30, 2022
Threads
1
Messages
5
  • / Really need some help here, Craftsman YTD 4000 Hydro
Thanks for the replies, good news!

I took the belt over to my local repair shop late Friday and as always these folks were very patient with me. After we had checked the belt with what they had in stock that was ruled out as a problem. The gentleman that actually does the tractor/mower work came out from the back and spent some time with me. Sweaty and covered with grease as he was it was very nice of him to take the time.

Long story shorter, after discussing the spring and other things he stopped short and hit on something.

I was following the Craftsman manual and it states the last step as putting the belt around the main front "electric clutch pulley. He told me NO don't do that! Install the deck and the belt around/on all the pulleys EXCEPT the spindle on the discharge side. Then work the belt around that by slowly rotating the spindle as you hold/feed the belt on.... Sure enough, it was tight but it SNAPPED in that last little bit and all was as it should be. Held my breath, started it up and it cuts just fine.

Again, thanks to all that replied! Lots of info here and I'm sure I will need it again in the future, just not right away I hope...
 
Top