Yard Man 3hp 18" Chain Drive Rototiller repairs

Joined
Sep 3, 2019
Threads
8
Messages
33
Hello. Bought one of these locally and despite being from, I'm guessing the mid 1970's, it's super tough and breaks up 8" chunks of clay and whatever else I throw at it. A 2' pile of chunks of clay/soil and it just rips.

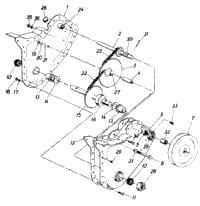
Anyhow, started popping the belt and noticed the shaft the V pulley is attached to had a lot of end-play. Pulled everything apart, and it has a bearing on the pulley side, but appears to have had some type of thrust collar on the opposite end of the shaft that exits out the opposite chain cover. Very little of the collar left and the shaft is basically sitting loose inside a tube. Tried searching images and schematics and can NOT find this rototiller anywhere. Closest thing I could find was schematics for a model that came later on.
https://www.partswarehouse.com/MTD-TMO-39029-Tiller-s/250895.htm

IF looking at the exploded view of the "Chain Case", mine does NOT have 2 shafts for the V pulley and smallest chain drive sprocket (#38). They are instead on the same shaft. The pulley-side of the shaft, has same/similar #5, #6, and #7. Might even be the same #6 bearing. However, it does NOT have #28, #10, #11, and #5 bearing. It has what I think might have been a #30.

So, to reiterate, my V-pulley is on same shaft as the #38 sprocket (my chain case ONLY has 2 chains) but instead of having a #5 bearing, it has what appears to be (whats left of it is just the rim so guessing at this point) a #30. Am I right in assuming this would be some sort of thrust collar? Can't believe they'd go that route instead of a bearing.

Limited on time, but trying to think of repair options. If I take a very small gauge steel, wrap it around the shaft and stick a washer on the end, and applied liberal amount of axle grease, would that suffice? Also, if ANYONE knows the model number for the "Yardman 3hp 18" Chain Drive" I'd appreciate it. Ink is long faded on the sticker. Unit is torn apart atm so no pics. Also, it doesn't appear to be a 5010 unless it's a later model. Engine pulley is on same side (left side if standing behind rototiller) as the drive pulley on the chain case. Pull start on right side.
 
Joined
Sep 3, 2019
Threads
8
Messages
33
Just got lucky and found something that virtually identical:
tiller:
Chain case:

Guessing I need #24 and the #26 plug.
 

Richie F

Well-Known Member
Joined
Aug 8, 2019
Threads
17
Messages
268
If the shaft is still OK, yes all that would be needed is the bushing and plug.
I would change the roller bearing on the other end of the shaft also.
Could you post a picture or two of the problem also ?
 
Joined
Sep 3, 2019
Threads
8
Messages
33
OK, figured out what it is. 21031-9 made in 1989 (must have had it's roots in the late 70's given it's appearance). Dunno why, but was finally able to read the tags which had no ink showing before. All the clay mud caked on there must have reactivated the ink LOL.

Upon closer inspection in the daylight, the bearing is still in the tube shaft, but heavily worn. Rim is completely gone. Looked at numerous sites (all of which stated unavailable and even epay didn't have it, then finally "Lawnmower Pros" (not an advert or support for them) actually had the #24 bushing/bearing (MTD 748-0154 .62" I.D. x .813") at a reasonable price so ordered it.

Hopefully it'll prolong this awesome little tiller's life expectancy a bit longer as it's just a beast for the size. Still can't believe 18" and 3hp with heavily abused tines can level 10 x 10 x 2' in a few minutes to nearly flat. Graded a large swath of 65' x 10' of front yard in front of house foundation with zero yard prep. Ran it and pulled a good 8" down off the slope with was WAY to high and allowing water to sit AT the slab. Other than it's tiny gas tank needing refilled often, it usually starts on 1-3 pulls and just runs.

Anyhow, gotta weld up some cracking on the shield top plate where the motor attaches and wait for that bushing and hopefully get back at it.

EDIT: Tried attaching pics but site is griping about the size....
 

tom3

Lawn Addict
Joined
Apr 9, 2018
Threads
25
Messages
1,579
Site doesn't like cell phone pictures. I download to the computer, resize and save with paint, then goes to site easy. Those old front tine tillers are tough, used to see the bouncing around and killing the operator, but keep on going.
 
Joined
Sep 3, 2019
Threads
8
Messages
33
Know what the size cap per picture is? I turned resolution down to 1.5mb size range and still too big.

Yeah it's a tough little tiller minus the stress cracks that need attention. I removed the adjustable drag bar off the rear and just let it do what it wants then walk forward. When it digs itself in or there's a mound of dirt, I just pull back and tilt forward and let it climb itself up. For leveling dirt or moving it in large amounts over the tilled area, I can pull the entire thing back quickly over an already tilled mound, then let it run forward and pull back again. It'll throw up and "pull" a large amount of dirt back towards me, faster than I could shovel it or rake it. Leveled the entire front section that way. Used a level w/ a 2x4 and rake for minor spots, but the tiller did everything else. Had to crisscross to pull it evenly, but worked. A little heavy and unwieldy at first, but after getting used to it pretty easy and fun.
 

bertsmobile1

Lawn Royalty
Joined
Nov 29, 2014
Threads
64
Messages
24,647
It is not resolution, which is an instruction to the computer about how to display the photo that needs to be changed.
It is they file size and the file format
JPEG ( jpg ) is a compact file format sppecifically designed to make files small for the purpose of transport & storeage.
IT is almost the equivalent to a Zip file .

Phone cameras use a unique file format that allows the camera to save the image data quickly and make bad pictures look better by pretending the file has more data in there than it has .
So a 1Mb camera file will appear to a computer server as a 100 Mb file and be rejected.
To get your photos into the forum save a copy on your device ( computer, tablet etc ) save a copy as a jpg and resize it to 12" ( on the longer axis ) with a resolution of 72 or 144 Dpi .
Note the massive difference between the before & after file sizes.
Some times you can just email them to yourself and the email app will automatically send a down sized version of the photo and you can post that .
 
Joined
Sep 3, 2019
Threads
8
Messages
33
Found a free sharing site that seems to work.

Dirt near rear of house with water was currently being filled (all the fresh tilled was about 12" of build up being pulled back to fill water which is 100% clay at the base) and large square that was tilled down was done before I noticed the shaft was wobbling. Area around the well pipe near white fence, was also being built up. Dug out a 25' x 35' x 5-12' deep pond behind the shrub in the one image, and spread all the take out w/o realizing it had too much clay content, so having to pull the heavier clay areas up and move it, then till the anaerobic dirt underneath with small clay amounts mixed in this time so it'll hopefully drain and not grow oxygen-less bacteria. That little tiller is a straight up beast as it's making most of the work go easier w/o renting a Bobcat.

 
Last edited:
Joined
Sep 3, 2019
Threads
8
Messages
33
Bearing never arrived and message left at seller's business was not returned despite the money being paid. Got very lucky though and noticed a bushing at local Tractor Supply store which fit the shaft. Was around 0.252 mm too small to fit the tube on the case snugly, so cut a band out of a soda can and test fit until snug. Used some heavy duty thread locker to secure the can banding to the tube and then the bushing to the banding. Dunno how well it'll hold up to spinning but it's at least a soft metal if it does. Also added an internal shim to the pulley shaft. Used oven cleaner to clean the grease residue as best as possible, then used an entire tub of grease to refill the chain case, making sure it was spread everywhere, including shafts, bearings, chains, and under sprockets.

Replaced the large pulley with a 5" steel TS store one they had in stock. Dropped belt length by about 1". Factory used a soft pot metal around 5.5" (?) that appears to be a fractional hp pulley and quickly deformed while using a puller. Replacement was steel. Lined up one of the set screw holes to the shaft hole, and left other set screw in (other one was at offset angle) and tightened, then used the empty hole as a guide to drill the pulley straight through to run a pin.

Also not pictured, cut some 1/8" x 1" steel stock down to make a "square" and welded that to the case where the motor attaches. The case's thin wall was cracking at the flange, so the added square now supports the motor and bolts run through it.

Ran it a good 45 minutes last night for a shake down and seems OK. Motor still needs some sort of top bracket to secure it to the handle frame as the motor's weight + the added support welded in is stressing/flexing a portion of the vertical case wall I can't weld to easily. Also need to reattach an idler pulley I fabbed up to keep more tension on the belt, but not until the bracket is on the motor top.

Definitely spins faster, but can now pull throttle back to about 75% from WOT, and still get decent speed around where it was with the older pulley AT WOT. So a little further mileage from a tank at less throttle and similar speeds, with minor loss in tq that doesn't appear to be missed. Have a 4hp B&S motor on an edger I rarely use, that would probably work great and replace the loss in tq if really needed.

 
Last edited:
Top