tutorial blade sharpening ,freehand grind

motoman

Lawn Addict
Joined
Aug 11, 2011
Threads
66
Messages
2,577
BALANCE The use of a 5/8" shanked bolt as a pivot point to check blade balance is specified in the Craftsman owners manual. The writer has used this method and never balanced in 9 years of grinding. Elsewhere in this forum another owner has had similar experience after 11 years grinding. This technique can not detect imbalance of just under 1/2 oz because in the course of this thread the author has assembeld a ball bearing based balance that shows one blade apparently balanced with the bolt method that is off 1/8 oz. The author's second blade that is apparently balanced is off 1/4 oz. The third blade is n/a as a show- and -tell for this thread, and only ground one side. Just below the 1/2 oz. imbalance the bolt method starts to work by allowing the heavy side of the blade to deflect. This raises the question: Is Crafstman telling us that blade imbalance below 1/2 oz is ok? Not balancing the author's tractor in 9 years has apparently not hurt, but last week 2 sump bolts loosened. This tractor is a rough ride over heavily rutted 1 -1/2acres. Let's not forget the "Harley" engine with its "potato" "potato" motion and solid motor mounts. I'll use my new balancer.
 
Last edited:

motoman

Lawn Addict
Joined
Aug 11, 2011
Threads
66
Messages
2,577
I use a 36 grit stone & a fine stone just to take off the lip on the back side. Follow the angle on the blade. If the angle is gone, time to chuck the blade. The 36 grit removes the metal faster and doesn't heat the blade so much. If I have some real heavy blades to sharpen, I will dip the blade in water every so often to avoid overheating. I also use a magna matic blade balancer. It also has a rod attached to the balancer to check if the blade is bent. If the blade isn't too bad, I use a 4 1/2 grinder with the blade in a vise. That works well on some of those odd shaped curved mulching blades.

Why do you chuck the blade, and why don't you just keep regrinding it?:smile:
 

motoman

Lawn Addict
Joined
Aug 11, 2011
Threads
66
Messages
2,577
Well folks, motoman has raved on enough in this thread. I will start 3 others for your continued reading enjoyment : (1)Two-way tractor tool a simple DIY (2) No stinking walking grinders (aka Put your knows to the grindstone (3) Your trick blade balancer cost WHAT? $250?...$25.?...$2.50? yep. Tell me stop anytime.:laughing:
 

motoman

Lawn Addict
Joined
Aug 11, 2011
Threads
66
Messages
2,577
What is the blue and red tool? Looks some thing like a blade holder. Is it home made or store bought? Thanks for the info David

It's not below . Look for a new thread.
 

motoman

Lawn Addict
Joined
Aug 11, 2011
Threads
66
Messages
2,577
FREEHAND GRINDING This means no jigs, or guides, just your feel and judgement. You all have it or can develop it. Practice on an old blade or even mild steel sheet if you want. Be as careful as you can with the blades, but I have found them forgiving .

TAPER Either final edge or the larger taper can be done first. It seems easier to start with taper. Hold the grinding side of the blade to the wheel at an angle (pic) You may find another way, but horizontal seems to encourage a notch at the end of the grinding passes near the center ( see "R" with semicircle in bluing on previous blade pics). Notches provide a weak area for cracks. Rotate the cutting edge toward you (top edge) so the wheel meets the taper area . An air gap shoulld be seen between the cutting edge and the wheel which must be maintained while grinding the taper. (...do not grind the final edge now). Start grinding at the end and moving up the blade toward the center . At the radius reduce pressure. If confident , rotate the blade slightly , (maintain the air gap), and start toward the end. If unsure , lift blade and inspect grinding path. Start over. After confidence is reached you will be able to make numerous heavy passes and reduce the .200" to a slope of your choosing. A taper pass with my beast takes 4-5 seconds, no burning. Keep wheel clean ( below). Swap blade ends and apply same number of passes and pressure . Keep blade moving.
I noticed that after carefully choosing "slope" I used "taper" here. Same thing, sorry.
 

motoman

Lawn Addict
Joined
Aug 11, 2011
Threads
66
Messages
2,577
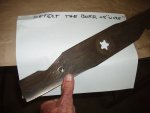
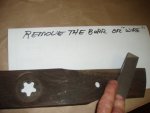
CUTTING EDGE Rotate the blade edge (top) away from you toward the wheel, eliminating the air gap. With lighter pressure than on the taper , grind toward center. Again try to finish the pass with a gentle radius rather than a notch. Feel the backside of the blade for a burr or "wire." If detected, and if you are satisfied with the cutting edge width, stop. If no burr you probably have not completed the cutting edge. Rotate the cutting edge a little further onto the wheel and repeat. You should not burn with this gentle pass ( and you keep moving , right?). Putting on the final cutting edge can be done on a finer grit wheel if you have one ( say 80 grit). You will get a smoother edge which may hold up a little better. Under magnification however , all edges look sawthooth . Finer grit wheels are more prone to burn. Just kiss the edge. Remove the wire backside with flat strokes from a mill file (flat, no angle). The first pic below shows cutting edge blued. The 4th pic below has slope blued to show the ground cutting edge. Total one way grind pass duration is about 3 seconds ( you are not presssuring the blade nearly as much as on slope )
Somehow these two pics did not make it before
 

Attachments

  • burr.jpg
    burr.jpg
    108.8 KB · Views: 19
  • file.jpg
    file.jpg
    84.4 KB · Views: 20

motoman

Lawn Addict
Joined
Aug 11, 2011
Threads
66
Messages
2,577
BALANCE The use of a 5/8" shanked bolt as a pivot point to check blade balance is specified in the Craftsman owners manual. The writer has used this method and never balanced in 9 years of grinding. Elsewhere in this forum another owner has had similar experience after 11 years grinding. This technique can not detect imbalance of just under 1/2 oz because in the course of this thread the author has assembeld a ball bearing based balance that shows one blade apparently balanced with the bolt method that is off 1/8 oz. The author's second blade that is apparently balanced is off 1/4 oz. The third blade is n/a as a show- and -tell for this thread, and only ground one side. Just below the 1/2 oz. imbalance the bolt method starts to work by allowing the heavy side of the blade to deflect. This raises the question: Is Crafstman telling us that blade imbalance below 1/2 oz is ok? Not balancing the author's tractor in 9 years has apparently not hurt, but last week 2 sump bolts loosened. This tractor is a rough ride over heavily rutted 1 -1/2acres. Let's not forget the "Harley" engine with its "potato" "potato" motion and solid motor mounts. I'll use my new balancer.

After all this time I realize "...Just below the 1/2 oz ..." should read "Just above the 1/2 oz ..." Sorry :ashamed:
 
Top