Toro 522XI cylinder head work suggestions

tkos115

Well-Known Member
I have a Toro 522XI lawn tractor that has a cylinder head that has had a small head gasket leak on the left side cylinder head for awhile but otherwise has been running fine. I can see where it is blowing exhaust between the head and block, as there is some black soot and I can feel it puff a small amount when throttling up quickly. Anyway, from what I can gather I will have to remove the engine to do this job, and I plan on doing both heads as well as both crank seals and some other miscellaneous seals/gaskets while I have it out. Has anyone on here done this job before, and if so do you have any tips or tricks to doing this job? I will be using all OEM parts when doing this as well. The mower has about 550 hours on it.

The engine model number is: CH22S (Kohler)
Spec number: 66545
Serial number: 3012904481

Thanks for any help and input
 
Depends how woorn the head is. You will need either new heads, or at least a 5/16" piece of glass, some wet and dry sandpaper, and some time. You make figure eights on the sandpaper sitting on the glass while rotating the head a little each figure 8. That keeps the head even. Try to keep it level and not let it up on the side at all. Once the polishing is even across the head, you are done. That will get rid of any warp. Carefully clean the piston tops and lap the valves at the same time. Adjsut them when done. Follow the patter and torque settings when bolting the head back down.
 
Sorry I didn’t read thread like I should. Doing seals and other gaskets will require pulling the engine
 
Are you certain it is not just a blown exhaust flange gasket?

With a leaking head gasket, you would have a considerable loss of power especially under load.
 
I believe I have a sheet of glass to resurface the head. Im certain its rhe head gasket. Its leaking nowhere near the exhaust port. It probably is down a little on power but its not worked very hard so I don't really notice it.

Ill probably be pulling the engine at some point this week and ill see if I can upload some pictures.
 
Hello T.,

Use only strong tempered glass. Window glass flexes to easy.

I use a door section of rigid tempered glass from and old rotisserie oven I once had (Thanks Ron Popel) I use it on a flat surface with 220-grit wet/dry sandpaper to get it close to perfectly level, then I switch to 400-grit for a fine finish. Some people prefer 600-grit or finer. The graphite coating is what provides the microscopic seal between the head and the block, so don't try to reuse the old ones (I've seen people try that too many times and it ever turns out good)

That tempered glass door has served me well over the years. (The wife used to get mad at me for wanting to use the tempered glass table top we have in the kitchen, so I had to stop that.)

I do not have the updated head bolt torque for this engine, but maybe Star Tech or one of the other members who get spec updates can chime in.

Typically, excess debris built up in the cooling fins creates constant overheating or the carburetor is running too lean and causing elevated combustion temperatures. Even a chronically dirty air cleaner can cause overheating.

I look forward to seeing your pictures.
 
Use only strong tempered glass. Window glass flexes to easy.
Been doing my used junker mowers on the garage side walk-in door window. Yes it is thin glass not plate glass. I do not push hard at all. Let the paper do all the work. Works for me anyway. I can see where material is being removed evenly. Then a sanding block for the cylinder side where the head sits.
 
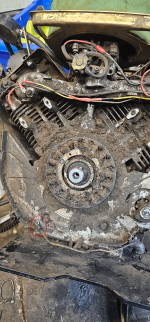
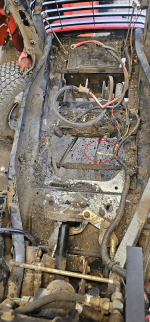
So just an update, I've pulled the engine and removed the cylinder heads. Installed new valve seals, lapped the valves, and cleaned the head surfaces on a piece of glass from an old coffee table we were tossing out. The engine was extremely dirty and the cooling fins were full of junk. The flywheel side crank seal was leaking really badly so that was replaced as well. I found a wire that I'm not sure where it goes to. (See attached pictures) Its a yellow wire that has a bullet style connector on one end, and a ring connector on the other. Now I remember unplugging the bullet connector end when I was removing the engine, but I don't recall unbolting the other end of it. The bullet side plugs into a yellow wire in the main harness. The wire ran from side to side if you were looking at the flywheel side of the engine. So the ring side would be on the left side of the mower if sitting in the seat. Does anyone know where that wire might go on the ring side? Looking at the wiring diagram it looks like it would be for either the cruise control or a seat kill switch. But still no idea where it would bolt to.


I will post some pictures of the job in the coming days.


Thanks for any help!.


Wire.pngwire1.png
 
Back
Top