You are using an out of date browser. It may not display this or other websites correctly.
You should upgrade or use an alternative browser.
You should upgrade or use an alternative browser.
Export thread
Swapping Contents From One Block To Another Straightforward?
#1
J
JonnyBlaze
J
JonnyBlaze
Generally speaking...? 31 Series Intek. I'll post serial numbers when I get a chance. But was wondering if it's something a novice could tackle? I have good engine with broken head bolts and can buy a used empty block on eBay for $69 shipped...
#2
B
bertsmobile1
B
bertsmobile1
Not an overly difficult job to do.
patient and methodical will win the day
OTOH if the other block is good
1) try to drill the broken bolts out using left hand drills,
It is amazing how many times the 3rd of 4th stepped increase will free the bolt and screw it out
2) rectangular easy outs, they work so much better than the spiral ones.
I buy cheap masionary drills from the supermarket.
Regrind the carbide tip to a flat chisel point on the leading edge.
You now have a hard steel drill for a few pennies.
3) start the hole with a Dremel tool and the smallest round burr cause you can adjust it if like me the punch is always way off center.
When you have it where you want use a LATHE centre drill to start the hole.
Every ( not so ) handy man should have a set of centre drills.
It saves breaking all of those 1/16" , 3/32", 7/64" & 1/8" bits we unsuccessfully use to start holes with.
#3
J
JonnyBlaze
J
JonnyBlaze
I already messed up the block trying to get the broken bolts out. Broken bolt removal is my nemesis.Not an overly difficult job to do.
patient and methodical will win the day
OTOH if the other block is good
1) try to drill the broken bolts out using left hand drills,
It is amazing how many times the 3rd of 4th stepped increase will free the bolt and screw it out
2) rectangular easy outs, they work so much better than the spiral ones.
I buy cheap masionary drills from the supermarket.
Regrind the carbide tip to a flat chisel point on the leading edge.
You now have a hard steel drill for a few pennies.
3) start the hole with a Dremel tool and the smallest round burr cause you can adjust it if like me the punch is always way off center.
When you have it where you want use a LATHE centre drill to start the hole.
Every ( not so ) handy man should have a set of centre drills.
It saves breaking all of those 1/16" , 3/32", 7/64" & 1/8" bits we unsuccessfully use to start holes with.
#4

Boobala
Well, if you REALLY messed up your block to the point of BER ( beyond economical repair) then you've answered your own question, the bad part about Evil-Bay is you're not there to actually SEE what you're getting, sometimes you do get a good deal, and then there are other's that "bend you over" ... AND they DON'T use the Vaseline either !! .. ..:cool2:..:mur:
Boobala
I already messed up the block trying to get the broken bolts out. Broken bolt removal is my nemesis.
Well, if you REALLY messed up your block to the point of BER ( beyond economical repair) then you've answered your own question, the bad part about Evil-Bay is you're not there to actually SEE what you're getting, sometimes you do get a good deal, and then there are other's that "bend you over" ... AND they DON'T use the Vaseline either !! ..
#5
T
Tinkerer200
Be aware there are 2 drastically different 31 series engine blocks and they do not interchange. Will know better when you post the MODEL numbers of both. Depending on which bolt it is you might be able to use a "Thread Insert" once broken one is removed. Not in area adjacent to the push rod gallery.
I may have a good block for $20 plus shipping which would be around $15.
Walt Conner
T
Tinkerer200
Generally speaking...? 31 Series Intek. I'll post serial numbers when I get a chance. But was wondering if it's something a novice could tackle? I have good engine with broken head bolts and can buy a used empty block on eBay for $69 shipped...
Be aware there are 2 drastically different 31 series engine blocks and they do not interchange. Will know better when you post the MODEL numbers of both. Depending on which bolt it is you might be able to use a "Thread Insert" once broken one is removed. Not in area adjacent to the push rod gallery.
I may have a good block for $20 plus shipping which would be around $15.
Walt Conner
#6

Boobala
GEEEZZZ Walt, me thinks you could have posted the P/Ns and maybe the difference in your post, might save the "next-guy" a headache !! .. NO, .. not tryin to be a wise arse, just a curious question. Hope he buy's YOUR block if it's what he need's ..! ..:thumbsup:
Boobala
Be aware there are 2 drastically different 31 series engine blocks and they do not interchange. Will know better when you post the MODEL numbers of both. Depending on which bolt it is you might be able to use a "Thread Insert" once broken one is removed. Not in area adjacent to the push rod gallery.
I may have a good block for $20 plus shipping which would be around $15.
Walt Conner
GEEEZZZ Walt, me thinks you could have posted the P/Ns and maybe the difference in your post, might save the "next-guy" a headache !! .. NO, .. not tryin to be a wise arse, just a curious question. Hope he buy's YOUR block if it's what he need's ..! ..:thumbsup:
#7
T
Tinkerer200
I don't know the part numbers and have no inclination to find them. When the Model numbers are posted check the IPLs if there is a difference it will be evident. Some difference is a completely different counter weight system, different shaped sump and matching difference in bloc, different crankcase breather, piston, and more. Haven't checked but I now think my block is for a 28 series. Could be used but not by a novice, again, depending on which 31 series it is.
Walt Conner
T
Tinkerer200
GEEEZZZ Walt, me thinks you could have posted the P/Ns and maybe the difference in your post, might save the "next-guy" a headache !! .. NO, .. not tryin to be a wise arse, just a curious question. Hope he buy's YOUR block if it's what he need's ..! ..:thumbsup:
I don't know the part numbers and have no inclination to find them. When the Model numbers are posted check the IPLs if there is a difference it will be evident. Some difference is a completely different counter weight system, different shaped sump and matching difference in bloc, different crankcase breather, piston, and more. Haven't checked but I now think my block is for a 28 series. Could be used but not by a novice, again, depending on which 31 series it is.
Walt Conner
#8

NorthBama
NorthBama
#9
J
JonnyBlaze
J
JonnyBlaze
Ok. So I got another blown motor today and it has a good block, its already torn down. The connecting rod let go. Only had 52 hours on it. So the number on the valve cover is 31H777-0202-E1.
The motor I'm working on is 331877-0113-B1.
I went to erepalcementparts.com and the gasket set part number is the same.
https://www.ereplacementparts.com/b...engine-parts-c-16758_17347_234322_234329.html
https://www.ereplacementparts.com/b...-engine-parts-c-16758_17347_17444_218440.html
Do you think I'm good to go? I found this gasket set which is a lot cheaper but the part number doesn't cross reference but looks the same?
https://www.ebay.com/itm/796181-Eng...e=STRK:MEBIDX:IT&_trksid=p2055119.m1438.l2649
#10

Boobala
AND what if it is WRONG ?? do you want the Hassle ?? Sometimes John, it's better to bite that ( $60.00-$70.00+ ) bullet and be assured you're getting the RIGHT set with ALL the needed gaskets , I know, I know,... it's easy to spend other folks money but I'm sure, there are several folks here that would agree with me. UNLESS you are 100% sure its the RIGHT & COMPLETE set I wouldn't go there ...... it's your call .... Good Luck , either way ... Boo
ALSO : check the P/N : I found it to be ( 796187 )
Boobala
Ok. So I got another blown motor today and it has a good block, its already torn down. The connecting rod let go. Only had 52 hours on it. So the number on the valve cover is 31H777-0202-E1.
The motor I'm working on is 331877-0113-B1.
I went to erepalcementparts.com and the gasket set part number is the same.
https://www.ereplacementparts.com/b...engine-parts-c-16758_17347_234322_234329.html
https://www.ereplacementparts.com/b...-engine-parts-c-16758_17347_17444_218440.html
Do you think I'm good to go? I found this gasket set which is a lot cheaper but the part number doesn't cross reference but looks the same?
https://www.ebay.com/itm/796181-Eng...e=STRK:MEBIDX:IT&_trksid=p2055119.m1438.l2649
AND what if it is WRONG ?? do you want the Hassle ?? Sometimes John, it's better to bite that ( $60.00-$70.00+ ) bullet and be assured you're getting the RIGHT set with ALL the needed gaskets , I know, I know,... it's easy to spend other folks money but I'm sure, there are several folks here that would agree with me. UNLESS you are 100% sure its the RIGHT & COMPLETE set I wouldn't go there ...... it's your call .... Good Luck , either way ... Boo
ALSO : check the P/N : I found it to be ( 796187 )
#11
T
Tinkerer200
T
Tinkerer200
Wait a minute I thought you were asking about switching parts from one 31 series to another 31 series engine. You do realize the 33 series engine is a larger bore than the 31 series? It appears the gasket set is the same but I don't know what else without checking each part number. I know the flywheels do not interchange nor piston/rings of course. The 31 series is the newer style 31 series.
Walt Conner
Walt Conner
#12
J
JonnyBlaze
J
JonnyBlaze
Yes, I was talking about a 31 to 31 swap if I got a block on ebay. I'm still considering that route if need be but I was just saying that today I got another John Deere with a blown motor but good block and was wondering if that would work in place of the 31? Don't know the differences, that's why I am asking you guys. If the 33 is a larger bore, can I just use the piston and rings from the 33?Wait a minute I thought you were asking about switching parts from one 31 series to another 31 series engine. You do realize the 33 series engine is a larger bore than the 31 series? It appears the gasket set is the same but I don't know what else without checking each part number. I know the flywheels do not interchange nor piston/rings of course. The 31 series is the newer style.
Walt Conner
#13

Boobala
How bad is the damage to the 33 ?? can you rebuild that one, instead of the 31 ?? MAYBE you should check with WALT about HIS block ! ..:confused2:
Boobala
Yes, I was talking about a 31 to 31 swap if I got a block on ebay. I'm still considering that route if need be but I was just saying that today I got another John Deere with a blown motor but good block and was wondering if that would work in place of the 31? Don't know the differences, that's why I am asking you guys. If the 33 is a larger bore, can I just use the piston and rings from the 33?
How bad is the damage to the 33 ?? can you rebuild that one, instead of the 31 ?? MAYBE you should check with WALT about HIS block ! ..:confused2:
#14
J
JonnyBlaze
J
JonnyBlaze
Didn't Walt say his was a 28? The connecting rod broke on the 33 and the crank is pretty messed up where the rod clamped onto the journal. Everything else seemed to be ok but I'm no expert. I was kinda hoping I could do something with what I had since I already have all the parts.How bad is the damage to the 33 ?? can you rebuild that one, instead of the 31 ?? MAYBE you should check with WALT about HIS block ! ..:confused2:
#15

Boobala
ONE thing FOR SURE John, MAKE DAMN sure whatever you're doing, you CHECK ALL the P/Ns on all the items and keep all parts separated as to what goes with what, you don't want any last minute surprises. Might also be a good idea to take loads of pics during disassembly, it will be a GREAT aid during REassembly. I really admire your patience AND persistance, you'll get there I'm not sure what Walt has, you need to check with him. stay close to the forum... Boo
Boobala
Didn't Walt say his was a 28? The connecting rod broke on the 33 and the crank is pretty messed up where the rod clamped onto the journal. Everything else seemed to be ok but I'm no expert. I was kinda hoping I could do something with what I had since I already have all the parts.
ONE thing FOR SURE John, MAKE DAMN sure whatever you're doing, you CHECK ALL the P/Ns on all the items and keep all parts separated as to what goes with what, you don't want any last minute surprises. Might also be a good idea to take loads of pics during disassembly, it will be a GREAT aid during REassembly. I really admire your patience AND persistance, you'll get there I'm not sure what Walt has, you need to check with him. stay close to the forum... Boo
#16
J
JonnyBlaze
J
JonnyBlaze
Absolutely. I take pics of everything.ONE thing FOR SURE John, MAKE DAMN sure whatever you're doing, you CHECK ALL the P/Ns on all the items and keep all parts separated as to what goes with what, you don't want any last minute surprises. Might also be a good idea to take loads of pics during disassembly, it will be a GREAT aid during REassembly. I really admire your patience AND persistance, you'll get there I'm not sure what Walt has, you need to check with him. stay close to the forum... Boo
#17
J
JonnyBlaze
J
JonnyBlaze
Were you able to identify your block?Wait a minute I thought you were asking about switching parts from one 31 series to another 31 series engine. You do realize the 33 series engine is a larger bore than the 31 series? It appears the gasket set is the same but I don't know what else without checking each part number. I know the flywheels do not interchange nor piston/rings of course. The 31 series is the newer style 31 series.
Walt Conner
#18

Boobala
Boobala
John while searching for parts I found this, lowest price for gasket set so far....
http://www.smallenginesuppliers.com/shop/html/pages/products/Briggs_Gasket_Set3038.html
https://www.smallenginesuppliers.co...arts/gasket_sets/Briggs_Gasket_Set_796187.pdf
Appears to be compatable in BOTH engines ( 31 & 33 )
http://www.smallenginesuppliers.com/shop/html/pages/products/Briggs_Gasket_Set3038.html
https://www.smallenginesuppliers.co...arts/gasket_sets/Briggs_Gasket_Set_796187.pdf
Appears to be compatable in BOTH engines ( 31 & 33 )
#19
T
Tinkerer200
I have never attempted that switch so do not know except that if the flywheel does not interchange obviously the crankshaft will not either without going as a pair and since B&S went to the trouble to distinguish these it is likely there may be such things as different bearing sizes etc. As I said you will have to check the part numbers and make your own decisions.
Walt Conner
T
Tinkerer200
Yes, I was talking about a 31 to 31 swap if I got a block on ebay. I'm still considering that route if need be but I was just saying that today I got another John Deere with a blown motor but good block and was wondering if that would work in place of the 31? Don't know the differences, that's why I am asking you guys. If the 33 is a larger bore, can I just use the piston and rings from the 33?
I have never attempted that switch so do not know except that if the flywheel does not interchange obviously the crankshaft will not either without going as a pair and since B&S went to the trouble to distinguish these it is likely there may be such things as different bearing sizes etc. As I said you will have to check the part numbers and make your own decisions.
Walt Conner
#21

Boobala
Wonder why he doesn't reply on that ??? ..:confused2:
Boobala
Were you able to identify your block?
Wonder why he doesn't reply on that ??? ..:confused2:
#22
T
Tinkerer200
Might be because I am an 85 year old man and have been preparing the entire house for new carpet which is being installed today. Doors down, furniture out, padding up, staples pulled, screws put in squeaking areas, drapes down, floors cleaned etc.
OP, checked today, sorry do not have a block you can use.
Walt Conner
T
Tinkerer200
Wonder why he doesn't reply on that ??? ..:confused2:
Might be because I am an 85 year old man and have been preparing the entire house for new carpet which is being installed today. Doors down, furniture out, padding up, staples pulled, screws put in squeaking areas, drapes down, floors cleaned etc.
OP, checked today, sorry do not have a block you can use.
Walt Conner
#23

Boobala
Boobala
Wow 85 Walt, that's great, you still have a lot of gumption coupled with that Get-Up N Go ! Busy man !! ..:thumbsup:
Bummer on the block for John, too bad it didn't work-out.
Bummer on the block for John, too bad it didn't work-out.
#24
J
JonnyBlaze
J
JonnyBlaze
Just an update. Swap is almost done. Everything is going great. All I had to do was swap pistons. Waiting for the gasket set to get here so that I can put the sump on the block.
Only concern I have is with the governor, external portion. I'm sure it needs some kind of adjustment, right? How do I know if the lever that clamps onto the lever that goes through the brass tube into the block is in the right position?
Only concern I have is with the governor, external portion. I'm sure it needs some kind of adjustment, right? How do I know if the lever that clamps onto the lever that goes through the brass tube into the block is in the right position?
#25
T
Tinkerer200
Loosen clamp, manually place carb throttle in wide open position and hold there, turn shaft coming out side of engine in the same direction, clockwise in your case, as far as it will go, re-tighten clamp.
Walt Conner
T
Tinkerer200
Just an update. Swap is almost done. Everything is going great. All I had to do was swap pistons. Waiting for the gasket set to get here so that I can put the sump on the block.
Only concern I have is with the governor, external portion. I'm sure it needs some kind of adjustment, right? How do I know if the lever that clamps onto the lever that goes through the brass tube into the block is in the right position?
Loosen clamp, manually place carb throttle in wide open position and hold there, turn shaft coming out side of engine in the same direction, clockwise in your case, as far as it will go, re-tighten clamp.
Walt Conner
#26

Boobala
Boobala
The procedure to adjust the Governor will be found in here ! ... SEE Section 5
https://docs.google.com/file/d/0B6NaqjIxWV1ybEN0LWo3azl6OUU/edit
https://docs.google.com/file/d/0B6NaqjIxWV1ybEN0LWo3azl6OUU/edit
#27
J
JonnyBlaze
J
JonnyBlaze
Thanks, guys! The gaskets come in tomorrow according to tracking. So I will get to that part tomorrow. Looking forward to firing it up! I'll take a video. Wish me luck!
Anything else I should be weary of or is it all down hill from here?
Anything else I should be weary of or is it all down hill from here?
#28
B
bertsmobile1
End play.
Very important
Too little and the crank will chew out the bottom bearing section on the sump plate, too much and the flywheel will destroy the starter gears and perhaps even the magneto coils.
So bolt everything up tight with no gaskets , then measure the end float and select the appropriate number ( or single if you are lucky ) gaskets to take up the float.
Yes that is right, the end play is adjusted by increasing or removing the sump gaskets.
Do not put any sealant on them when you have worked out what the stack size should be.
I put a light coat of high temp axel grease on both the engine & sump so the gaskets do not stick & strip cleanly.
There should be 3 or 4 of them in the kit and usually each one is a different thickness.
B
bertsmobile1
Thanks, guys! The gaskets come in tomorrow according to tracking. So I will get to that part tomorrow. Looking forward to firing it up! I'll take a video. Wish me luck!
Anything else I should be weary of or is it all down hill from here?
End play.
Very important
Too little and the crank will chew out the bottom bearing section on the sump plate, too much and the flywheel will destroy the starter gears and perhaps even the magneto coils.
So bolt everything up tight with no gaskets , then measure the end float and select the appropriate number ( or single if you are lucky ) gaskets to take up the float.
Yes that is right, the end play is adjusted by increasing or removing the sump gaskets.
Do not put any sealant on them when you have worked out what the stack size should be.
I put a light coat of high temp axel grease on both the engine & sump so the gaskets do not stick & strip cleanly.
There should be 3 or 4 of them in the kit and usually each one is a different thickness.
#29
J
JonnyBlaze
J
JonnyBlaze
I didn't see anything about that mentioned in the above pdf manual provided above or on the youtube videos Ive been watching. Pretty sure kit only comes with one size gasket. .015 or something like that.End play.
Very important
Too little and the crank will chew out the bottom bearing section on the sump plate, too much and the flywheel will destroy the starter gears and perhaps even the magneto coils.
So bolt everything up tight with no gaskets , then measure the end float and select the appropriate number ( or single if you are lucky ) gaskets to take up the float.
Yes that is right, the end play is adjusted by increasing or removing the sump gaskets.
Do not put any sealant on them when you have worked out what the stack size should be.
I put a light coat of high temp axel grease on both the engine & sump so the gaskets do not stick & strip cleanly.
There should be 3 or 4 of them in the kit and usually each one is a different thickness.
#30

Boobala
This Specs chart is in the Manual I sent, ..... SECTION 12, ... Pg. 174
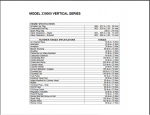
2 Grand up to 20 grand ... that's a LOT of wiggle room !
Boobala
I didn't see anything about that mentioned in the above pdf manual provided above or on the youtube videos Ive been watching. Pretty sure kit only comes with one size gasket. .015 or something like that.
This Specs chart is in the Manual I sent, ..... SECTION 12, ... Pg. 174

2 Grand up to 20 grand ... that's a LOT of wiggle room !
#31
J
JonnyBlaze
J
JonnyBlaze
Just saw that. Lol. So how exactly do I measure that? Tolerances don't seem that tight, so I should be good to go. No?This Specs chart is in the Manual I sent, ..... SECTION 12, ... Pg. 174
View attachment 36633
2 Grand up to 20 grand ... that's a LOT of wiggle room !
#32

Boobala
John, I HAD a video of how to set the end play on the crank, (looking for it still) the CORRECT way is using a dial indicator (see pics) you assemble the engine (as though it's final assembly, then check the end-play, if NOT in range then DIS-assemble and use gaskets ..OR.. a thrust washer ( rare) if required, sometimes a few tries required, BUT some guys are able to "feel" the play and determine if it's acceptable to them and they just "button it up " NOT trying to delay you I will try to find the video TODAY, and will post my results later TODAY ! do what YOU have to do, ..... Boo
...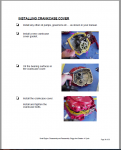 ...
...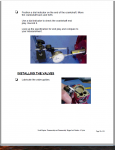
you will have to enlarge the pics ....SORRY !! ..
Boobala
Just saw that. Lol. So how exactly do I measure that? Tolerances don't seem that tight, so I should be good to go. No?
John, I HAD a video of how to set the end play on the crank, (looking for it still) the CORRECT way is using a dial indicator (see pics) you assemble the engine (as though it's final assembly, then check the end-play, if NOT in range then DIS-assemble and use gaskets ..OR.. a thrust washer ( rare) if required, sometimes a few tries required, BUT some guys are able to "feel" the play and determine if it's acceptable to them and they just "button it up " NOT trying to delay you I will try to find the video TODAY, and will post my results later TODAY ! do what YOU have to do, ..... Boo
...
 ...
...
you will have to enlarge the pics ....SORRY !! ..
#33
B
bertsmobile1
B
bertsmobile1
Put the flywheel on the crank and assemble the two halves together.
Clamp or bolt it down.
Put a dial indicator under the bottom of the crank then lever the flywheel up & take a reading
OR measure the distance from the flywheel to the crankcase then lever up and measure again
If you have a good vernier with a depth gauge, measure the length of the PTO shaft to crankshaft seal base ( don't out the seal in yet ) while pushing down on the flywheel then put the levers under it and measure again
#34
J
JonnyBlaze
J
JonnyBlaze
Well, I got it together. I will admit that I didn't measure the endplay. It did start up, however, and runs great! Doesn't smoke or anything.
I do have two issues. 1 is with the throttle. I only have a 1/2" of throttle position with the tractors throttle lever. All the way up closes choke completely and 3 or 4 inches down doesn't do anything and then the last 1/2 inch idles down.
2 is the transmission. It doesn't go anywhere. It's a hydrostatic. Whoever pulled the motor took out the single nut on the belt tensioner when they removed the motor. I put the nut back on and tightened tensioner back on but maybe I overtightened it? I just realized it has a stop nut so maybe I did over do it.
John Deere LA125. Only 52 hours.
#35

Boobala
Boobala
About the throttle, .. IN YOUR MANUAL, .. section 1 see pages 16 & 17 adjust linkage,
Sorry John, am UN-able to locate the crankshaft end-play video yet,
Sorry John, am UN-able to locate the crankshaft end-play video yet,
#36
J
JonnyBlaze

J
JonnyBlaze
What do they mean by step 3?About the throttle, .. IN YOUR MANUAL, .. section 1 see pages 16 & 17 adjust linkage,
Sorry John, am UN-able to locate the crankshaft end-play video yet,
Attachments
#37

Boobala

In above pic .. push your throttle lever on the dash, full fwd. loosen the screw on the throttle cable that's on the engine bracket, now move the white plastic throttle cable mount ( by pushing with your fingers ) you will see the CHOKE linkage arm ( top of bracket, the end is a loop ) and main linkage move toward the carb. NOW tighten the clamp screw against the cable jacketing, the hole in the bracket should line up with the hole in the bracket behind it that pushes the choke linkakage fwd. actually, close is good enough , NOW return the dash throttle lever back to idle or off position, check to see that the choke linkage rod, is moved back towards the dash (rearward movement and the main throttle linkakage also moved back,) the idle screw on top of the carb should be resting against it's stop crew, you may have to loosen the cable screw again (just a bit loose) and "jockey" either the white piece or the cable jacket a LITTLE bit, but throttle lever should move FULL fwd. and all the way back to idle moving the linkages full open and full closed !
I hope you understand all that .......
Boobala
What do they mean by step 3?

In above pic .. push your throttle lever on the dash, full fwd. loosen the screw on the throttle cable that's on the engine bracket, now move the white plastic throttle cable mount ( by pushing with your fingers ) you will see the CHOKE linkage arm ( top of bracket, the end is a loop ) and main linkage move toward the carb. NOW tighten the clamp screw against the cable jacketing, the hole in the bracket should line up with the hole in the bracket behind it that pushes the choke linkakage fwd. actually, close is good enough , NOW return the dash throttle lever back to idle or off position, check to see that the choke linkage rod, is moved back towards the dash (rearward movement and the main throttle linkakage also moved back,) the idle screw on top of the carb should be resting against it's stop crew, you may have to loosen the cable screw again (just a bit loose) and "jockey" either the white piece or the cable jacket a LITTLE bit, but throttle lever should move FULL fwd. and all the way back to idle moving the linkages full open and full closed !
I hope you understand all that .......
#39
J
JonnyBlaze
I followed all the steps above but no real difference. I saw the hole they were talking about and aligned that up. Not sure what's going on.
When they say put tractor throttle in fast position, they dont mean on choke, correct?
J
JonnyBlaze
Ok, I was right about transmission. I overtightened that nut. So that's fixed.
I followed all the steps above but no real difference. I saw the hole they were talking about and aligned that up. Not sure what's going on.
When they say put tractor throttle in fast position, they dont mean on choke, correct?
#41
J
JonnyBlaze
J
JonnyBlaze
That's what I figured. I put throttle all the way up and backed off where I felt the notch for the choke.NO they mean throttle full open....
#42

Boobala
NO... when adjusting the cable IF you have a SINGLE lever for throttle AND choke...FULL fwd is the CHOKE position..
pulling back to the detent is FULL throttle .. when cold starting push the lever FULL fwd. to use choke,
when engine fires move throttle BACK past the detent to about half throttle. see OP instructions in link I THINK this is your mower model .... LA125 is the series, NOT the model, and look at the linkage when adjusting your cable.
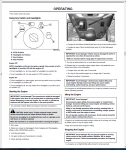
Boobala
That's what I figured. I put throttle all the way up and backed off where I felt the notch for the choke.
NO... when adjusting the cable IF you have a SINGLE lever for throttle AND choke...FULL fwd is the CHOKE position..
pulling back to the detent is FULL throttle .. when cold starting push the lever FULL fwd. to use choke,
when engine fires move throttle BACK past the detent to about half throttle. see OP instructions in link I THINK this is your mower model .... LA125 is the series, NOT the model, and look at the linkage when adjusting your cable.

#43
J
JonnyBlaze
J
JonnyBlaze
Right. That's what I did. I have the single lever. Model is LA125A according to the sticker on serial number tag. So what I said I did above is right, right?NO... when adjusting the cable IF you have a SINGLE lever for throttle AND choke...FULL fwd is the CHOKE position..
pulling back to the detent is FULL throttle .. when cold starting push the lever FULL fwd. to use choke,
when engine fires move throttle BACK past the detent to about half throttle. see OP instructions in link I THINK this is your mower model .... LA125 is the series, NOT the model, and look at the linkage when adjusting your cable.
View attachment 36680
#44

Boobala
YOU said you moved it BACK from full fwd to the detent, WRONG !!!! lever full fwd. loosen screw, locking the cable OUTER jacket, push white piece ( if that's what YOU have, ) fwd to where the CHOKE linkage is moved FULL fwd. ( CHOKE in closed position, ) lever still in full fwd. pos., .. keep white piece in position and tighten locking screw, now throttle lever should move from CHOKE position, to detent ( WOT ) then idle position, FULL back
(or ALMOST full back) Pics of your linkage would be helpful, or maybe another member can explain it better than I can.
Boobala
Right. That's what I did. I have the single lever. Model is LA125A according to the sticker on serial number tag. So what I said I did above is right, right?
YOU said you moved it BACK from full fwd to the detent, WRONG !!!! lever full fwd. loosen screw, locking the cable OUTER jacket, push white piece ( if that's what YOU have, ) fwd to where the CHOKE linkage is moved FULL fwd. ( CHOKE in closed position, ) lever still in full fwd. pos., .. keep white piece in position and tighten locking screw, now throttle lever should move from CHOKE position, to detent ( WOT ) then idle position, FULL back
(or ALMOST full back) Pics of your linkage would be helpful, or maybe another member can explain it better than I can.
#45
J
JonnyBlaze
J
JonnyBlaze
ok. I understand now. I didn't think lever was supposed to be all the way forward, choke engaged. I'll do it tomorrow morning. Thanks. Sorry for being a pita.YOU said you moved it BACK from full fwd to the detent, WRONG !!!! lever full fwd. loosen screw, locking the cable OUTER jacket, push white piece ( if that's what YOU have, ) fwd to where the CHOKE linkage is moved FULL fwd. ( CHOKE in closed position, ) lever still in full fwd. pos., .. keep white piece in position and tighten locking screw, now throttle lever should move from CHOKE position, to detent ( WOT ) then idle position, FULL back
(or ALMOST full back) Pics of your linkage would be helpful, or maybe another member can explain it better than I can.
#46

Boobala
RE-post if we need to go over it........ Boo
Boobala
ok. I understand now. I didn't think lever was supposed to be all the way forward, choke engaged. I'll do it tomorrow morning. Thanks. Sorry for being a pita.
RE-post if we need to go over it........ Boo
#47
J
JonnyBlaze
J
JonnyBlaze
Do I have to adjust the governor again after?RE-post if we need to go over it........ Boo
#48

Boobala
Not for just adjusting the throttle linkage.
Boobala
Do I have to adjust the governor again after?
Not for just adjusting the throttle linkage.
#50
J
JonnyBlaze
J
JonnyBlaze
I think I'm getting it now. I did the above but with the lever all the way down and now it feels better. Too late to start it up tonight so I'll try tomorrow.
I dont see how I can do step 3 with lining up that hole by going any of this though.
I dont see how I can do step 3 with lining up that hole by going any of this though.
#51

Boobala
I can't rotate your pics for some reason, are you using a cellphone to take pics ?? use a digital camera !! on MACRO setting..??? but what I CAN see is someone REALLY screwed -up with what looks like an extra spring on the linkage/bracket assy.that DOES NOT belong there .. I will try to find some pics of the linkage in correct position. off to hunting info............
Boobala
I think I'm getting it now. I did the above but with the lever all the way down and now it feels better. Too late to start it up tonight so I'll try tomorrow.
I dont see how I can do step 3 with lining up that hole by going any of this though.
I can't rotate your pics for some reason, are you using a cellphone to take pics ?? use a digital camera !! on MACRO setting..??? but what I CAN see is someone REALLY screwed -up with what looks like an extra spring on the linkage/bracket assy.that DOES NOT belong there .. I will try to find some pics of the linkage in correct position. off to hunting info............
#52
J
JonnyBlaze
I did notice an extra spring that isn't on the that bracket on my other motor. (If you're referring to that really thin spring that attaches to that choke lever wire thingy.)
J
JonnyBlaze
I used a phone but when they upload to the site, they get rotated somehow. I don't have a camera.I can't rotate your pics for some reason, are you using a cellphone to take pics ?? use a digital camera !! on MACRO setting..??? but what I CAN see is someone REALLY screwed -up with what looks like an extra spring on the linkage/bracket assy.that DOES NOT belong there .. I will try to find some pics of the linkage in correct position. off to hunting info............
I did notice an extra spring that isn't on the that bracket on my other motor. (If you're referring to that really thin spring that attaches to that choke lever wire thingy.)
#53

Boobala


Boobala
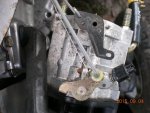
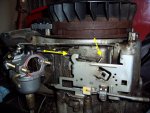
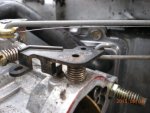
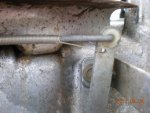
JOHN : I'm asking you, PLEEEEEZE !!! study, ..... & RE-study these pics .. NOTICE the location of EACH spring !!!
Do you see ... what I see... in your pics, compared to mine ??
It looks to ME, like someone put an EXTRA spring on the choke linkage at the "loop" end .... then conneccted it, to ..??? ( can't tell)
you might need to replace some springs I can't tell, because I cant get a decent view of YOUR pics, I use a real DIGITAL CAMERA NOT a cellphone !! .on MACRO setting ( close-up ) when I need to...
 ..
.. ..
.. ..
.. ..
.. ..
..

SEE NEXT POST FOR MORE......... only allowed 10 pics per post !
Do you see ... what I see... in your pics, compared to mine ??
It looks to ME, like someone put an EXTRA spring on the choke linkage at the "loop" end .... then conneccted it, to ..??? ( can't tell)
you might need to replace some springs I can't tell, because I cant get a decent view of YOUR pics, I use a real DIGITAL CAMERA NOT a cellphone !! .on MACRO setting ( close-up ) when I need to...
 ..
.. ..
.. ..
.. ..
.. ..
..

SEE NEXT POST FOR MORE......... only allowed 10 pics per post !
Attachments
#54

Boobala
Boobala
NEXT set of pics....
View attachment 36708..View attachment 36709..View attachment 36710..View attachment 36711..View attachment 36712
NO wonder you can't set the linkage !!!!
View attachment 36708..View attachment 36709..View attachment 36710..View attachment 36711..View attachment 36712
NO wonder you can't set the linkage !!!!
#55
J
JonnyBlaze
J
JonnyBlaze
Yes, on the choke linkage, there is a spring attached to it for some reason. Yours doesn't have it nor is there one on my other block. Should I remove it?JOHN : I'm asking you, PLEEEEEZE !!! study, ..... & RE-study these pics .. NOTICE the location of EACH spring !!!
Do you see ... what I see... in your pics, compared to mine ??
It looks to ME, like someone put an EXTRA spring on the choke linkage at the "loop" end .... then conneccted it, to ..??? ( can't tell)
you might need to replace some springs I can't tell, because I cant get a decent view of YOUR pics, I use a real DIGITAL CAMERA NOT a cellphone !! .on MACRO setting ( close-up ) when I need to...
View attachment 36696..View attachment 36706..View attachment 36705..View attachment 36704..View attachment 36698..View attachment 36697View attachment 36707
SEE NEXT POST FOR MORE......... only allowed 10 pics per post !
#56
J
JonnyBlaze


J
JonnyBlaze
I took it off. Throttle lever feels perfect now! Lol. Weird. Wonder what that was all about. Here are pics.
Attachments
#57

Boobala
YESSSSSS !!! now WTF was that there for ..?? NOW try to set up your linkage as we went over earlier, re-read what I posted ....many times, if need be, remember, CHOKE linkage FULL fwd. and be sure short spring on lever in back ( which the choke link passes through is hooked like in MY pics .......... I'm outa here, ....... wifey having a schitt-fit............. manyana
Boobala
I took it off. Throttle lever feels perfect now! Lol. Weird. Wonder what that was all about. Here are pics.
YESSSSSS !!! now WTF was that there for ..?? NOW try to set up your linkage as we went over earlier, re-read what I posted ....many times, if need be, remember, CHOKE linkage FULL fwd. and be sure short spring on lever in back ( which the choke link passes through is hooked like in MY pics .......... I'm outa here, ....... wifey having a schitt-fit............. manyana
#58
J
JonnyBlaze
J
JonnyBlaze
Will do! Thank you and your wife for having patience with me! Much appreciated! Happy Easter!YESSSSSS !!! now WTF was that there for ..?? NOW try to set up your linkage as we went over earlier, re-read what I posted ....many times, if need be, remember, CHOKE linkage FULL fwd. and be sure short spring on lever in back ( which the choke link passes through is hooked like in MY pics .......... I'm outa here, ....... wifey having a schitt-fit............. manyana
#59

Boobala
Boobala
Was able to better view your pics this morn, yep that issue, is because you used your cellphone, no problem, I just can't manipulate your pics as I can from a REGULAR digital camera .........
WOW !! I'm still trying to figure out why the hell that contortionist sping was on there ... WEIRD schitt ! I would guess it was holding the CHOKE rod from moving fwd all the way ( and,the throttle rod maybe ..?? ) for what reason ..??? well, with that off, and if you have the short spring (on rear bracket) in place, as I explained earlier,... and the Lonnnnng delicate trottle rod spring looks just right, we should have THIS issue solved !
I wanna hear GOOD news John !! .. :thumbsup:
#60
J
JonnyBlaze
J
JonnyBlaze
All fixed and good to go! That WAS the problem! Runs as good as new! Thanks again, everyone!Was able to better view your pics this morn, yep that issue, is because you used your cellphone, no problem, I just can't manipulate your pics as I can from a REGULAR digital camera .........
WOW !! I'm still trying to figure out why the hell that contortionist sping was on there ... WEIRD schitt ! I would guess it was holding the CHOKE rod from moving fwd all the way ( and,the throttle rod maybe ..?? ) for what reason ..??? well, with that off, and if you have the short spring (on rear bracket) in place, as I explained earlier,... and the Lonnnnng delicate trottle rod spring looks just right, we should have THIS issue solved !
I wanna hear GOOD news John !! .. :thumbsup:
#63

Boobala
Boobala

