Something went terribly wrong trying to replace the stationary idler pully

natesi

Forum Newbie
Joined
May 2, 2021
Threads
2
Messages
8
  • / Something went terribly wrong trying to replace the stationary idler pully
Howdy! I have a YTH 24V48 rider.

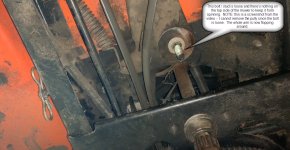
Something went terribly wrong trying to replace the stationary idler pully -- part “C” in the attached diagram.

It should have been VERY simple, as in the video below. But when I went to take the pully off, the post (coming down from the top of the chassis) came loose – and the whole assembly is now flopping around.


Problem is: I STILL cannot get the pully off, as the nut just spins with the bolt coming down through the chassis. I also can’t tighten it back up. So you’re probably thinking, “Just put a wrench or a socket on the other side of the post, from the top-side”, right? Well, from the top-side of the mower, there’s nothing to be seen. I’m not sure if the fastener is sandwiched between two pieces of metal (the chassis and the body) or what. But there’s definitely not anything to get a socket, or a wrench on, from the top side.

Any ideas?

Thanks!

-Nathan
[ATTACHREUSE]
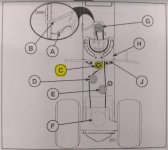
figure c pully.jpgpuly arm.jpg
 

bertsmobile1

Lawn Royalty
Joined
Nov 29, 2014
Threads
64
Messages
24,705
  • / Something went terribly wrong trying to replace the stationary idler pully
It is a coach bolt so is square under the domed head
So you turn it while pulling down then when it engages put your finger on top of it to keep the square section in the square hole
Part # 171 in the diagram linked to here
Note the square hole clearly shown in the frame
If you use a rattle gun, a deep socket will help to prevent pushing up and unseating it
 

StarTech

Lawn Royalty
Top Poster Of Month
Joined
Feb 19, 2020
Threads
79
Messages
10,255
  • / Something went terribly wrong trying to replace the stationary idler pully
Wait a minute in the photo the pulley is already off. The only other pulley in the area is held on with a carriage bolt which as Bert said you must pull out to keep the head engaged with the square hole. It the same when installing you put the nut on by hand and then while pulling against the nut tighten it. Just be careful not to dislocate the stepped washer on the idler arm.

Also note on some model years they stupidity use standard hex head bolts so the fender pan has be taken loose to access the hex head. But first before loosening the pan try pulling out to engage the square as it is likely a carriage bolt.
 

natesi

Forum Newbie
Joined
May 2, 2021
Threads
2
Messages
8
  • / Something went terribly wrong trying to replace the stationary idler pully
Thanks dudes -- I have a LONG morning ahead of me, but will try this out this afternoon!
 

bertsmobile1

Lawn Royalty
Joined
Nov 29, 2014
Threads
64
Messages
24,705
  • / Something went terribly wrong trying to replace the stationary idler pully
I stand the mower vertical on the back wheels when I do those pulleys
Put some clingwrap over the filler hole then screw the petrol cap back on.
Other tip the mower on it's side , if you do that remember CARBY SIDE GOES UP or you will be back here with more problems .
 

natesi

Forum Newbie
Joined
May 2, 2021
Threads
2
Messages
8
  • / Something went terribly wrong trying to replace the stationary idler pully
Bad news. The carriage bolt is rounded off. I can tighten it but I can't loosen it. What now? Do I have to take the whole top part of the mower off to get to the carriage bolt?
 

StarTech

Lawn Royalty
Top Poster Of Month
Joined
Feb 19, 2020
Threads
79
Messages
10,255
  • / Something went terribly wrong trying to replace the stationary idler pully
Yes the fender pan has to come loose, And it is a very enjoyable job; NOT.
 

natesi

Forum Newbie
Joined
May 2, 2021
Threads
2
Messages
8
  • / Something went terribly wrong trying to replace the stationary idler pully
I want to cry
 

bertsmobile1

Lawn Royalty
Joined
Nov 29, 2014
Threads
64
Messages
24,705
  • / Something went terribly wrong trying to replace the stationary idler pully
Now you have 2 problems
1) getting the bolt off
2) replacing it

1a) clean the threads really well, a Dremel type tool with a wire brush works really well
Compulsory eye warning here, I have removed the wires from one of these brushes on the inside of a leather welding jacket .
Heaven only knows what they would do to an eye .
From there cut a slot for a screwdriver in the end of the bolt & hold that with an impact driver head held in a ratchet or ring spanner.
By the time you get to the slot bit there should be enough of the shaft free to pop the head up enough to get a needle nose lockjaw in there .
1b) go to a good quality tool store & buy a nut splitter and split the nut , pry it open and slide it off
A good nut splitter will cost upwards of $30 US anything else will break the pin inside 1/2 way through so it will then need to be fixed to finish the job.
How does that song go ?
There is a hole in my bucket dear Lisa dear Lisa
1c) Remove enough of the body work to get to the top & try to find some thing to hold it ( after cleaning the threads per 1a )
A pack of builders wedges are really handy here because you can loosen the dash tower bolts to the end of the threads then push the wedge in to hold them apart & provide clearance .

2a) remove the body work , weld the hole then remake the square
2b) get some flat strap about 2" wide & a nut
Drill a clearing hole in the strap & tack weld the nut to it .
From there it is up to you, a second nut welded right at the edge will allow an open ended to be slipped over it to hold it while you tighten the bolt
A couple of pop rivets, a couple of button headed self tappers etc etc.
Just beware that anything up there will make cleaning the region of clippings difficult
I bend the overhanging end into a tight U
Check carefully because it is easy to end up fouling the clutch travel so that bucket gets another hole in it .
 

natesi

Forum Newbie
Joined
May 2, 2021
Threads
2
Messages
8
  • / Something went terribly wrong trying to replace the stationary idler pully
Thanks for all the help!!

Everything came apart a LOT faster than I thought, although it was not fun. LOL.

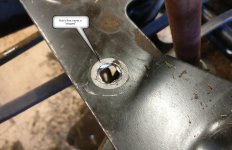
So, the carriage bolt is fine -- but the frame is "stripped" (see pic). Only thing I can think of is to find a welder. I managed to get the pully off by using a pair of locking pliers to hold the head. It's honestly a miracle that it even worked -- I can't believe it. But everything is apart now!

Few questions:
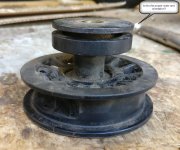
1 -- The pully fell down before I could catch it. So I didn't get to see the proper orientation of the washer and spacer above it. Can someone confirm that this is the correct orientation please (see attached pic)?
2 -- When it comes time to put things back together, I have NO IDEA how I'm going to get the spring back on pully arm, which attaches to the frame -- it's really strong. If anyone can point me in the right direction, that would be helpful.
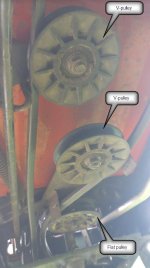
3 -- Other than that, just need to order parts. There is an error in the parts-lookup though: It lists two “flat idler” pullies and one V-groove – whereas my mower has two “V-groove” pullies and one “flat idler”. https://www.jackssmallengines.com/j...ide-mowers/yth24v48-96045004600-2013-09/drive
The diagram lists part 50 as a “flat idler”, but mine is a “V-groove” idler (see pic). Other sites do the same.
The diagram lists parts 52 as a “V-groove”, but mine is a “flat idler” (see pic). Other sites do the same.

Sooo......:
I’m guessing I need TWO of the V-groove idler pullies (910 offset) (part number 532194326) -- and one “flat idler” 910 offset (part number 532194327)?? Does that sound right?

Thanks again for everything -- this has helped a TON!

-Nathanstripped.jpgis this right.jpg

pulley.jpg
 
Top