Murray Cut Quality

motomike

Member
Joined
May 11, 2016
Threads
10
Messages
43
Recently the cut quality has deteriorated quite a bit on my mower. It seems as if the deck isn't level and the blades aren't sharp. Cutting hybrid Bermuda so a good cut is necessary for the lawn to look good.

I've replaced the blades, belt and leveled the deck 3x so far. The spindles seem true, there doesn't seem to be any play in them and I've completely greased the unit. Been keeping a close eye on tire pressure, the tires are 23 yrs old and do lose air some.

The front suspension hangar rod has been bent for a long time before the cut went bad but I've got a new one on the way now to replace it.

I put the spring to the engagement rod back in the top hole as instructions indicate when I replaced the belt.

Thinking about sharpening up the old blades and reinstalling them. Any other ideas?

Thanks!
 

sgkent

Lawn Addict
Joined
Sep 27, 2017
Threads
30
Messages
1,679
maybe cut more frequently? Hybrid Bermuda grass hates to be cut too much at a time, and shows a much better cut with reels than horizontal blades. Walk part of the area that you don't like and see if you can figure out what the pattern is to the defects. That may give you a better clue what is going on.
 

motomike

Member
Joined
May 11, 2016
Threads
10
Messages
43
I'm cutting it every 4-6 days now, the rotary Murray has delivered a great cut in the past. Its actually better than my almost new 50" Cub Cadet.
 

Rivets

Lawn Royalty
Joined
Mar 11, 2012
Threads
55
Messages
14,681
Quality of cut is controlled by a variety of things, so l‘m going to give you a few things to recheck. Remember that it could be one cause or combination of a couple, so you will need to go through everything again. This is how I would proceed. I know you have done some of these things before, but when I get a problem like this, I go back to square one.
1. Remove the deck and set it on a flat surface. You are looking to see that all edges of the deck are contacting the surface and your deck isn’t sprung.
2. Remove the belt and make sure the brake pads are not touching the pulleys. Spin each pulley, looking to see that the pulley is turning flat and true with ease and no sound.
3. Tip the deck over resting on a couple of blocks so that you can spin each blade.
4. Check to see if the blade tips are at the same height when you rotate them close to each other.
5. Pick a point on the deck to check the each blade tip is matching that point. What you are looking for here is to see that the spindle assemblies are square and the deck has not been tweaked.
6. Check both sets of blades, for sharpness and balance.
A couple of questions before proceeding. Was the new belt an OEM belt or aftermarket? Are the new blades OEM or aftermarket? Wouldn’t be the first time I’ve seen customers install the wrong belt and/or blades. Provide us with the Murray numbers to do some checking for you, as well as the part numbers for the parts you purchased. Ok, let’s get back to your problem. I’m assuming everything you’ve checked is good and you’ve found no problems.
7. Reinstall the blades and belt.
8. Install the deck on the mower.
9. Set rear tire pressure at 10 psi and front tire pressure at 22 psi.
10. Set the deck height adjuster to one step lower than middle position. Level the deck side to side using the blade tips not the deck housing.
11. Level the deck front to rear using the blade opposite the discharge chute. The front blade tip should be 3/16”-1/4” lower than the rear blade tip.
We should now be ready to test the unit. When testing the unit make sure that your engine speed is at full throttle, which on the older Murray’s was about 3300 RPMs. Set your deck height where you would normally operate at and make 3 passes at the lowest ground speed. Increase ground speed one step and repeat. Do this until you get to your normal ground speed. Report back with your findings, hopefully you have resolved the problem.
This is just my opinion and procedure if the unit was brought to me. I know this is time consuming, but trying to do it hit and miss could easily result in starting over. How you proceed is up to you.
 

motomike

Member
Joined
May 11, 2016
Threads
10
Messages
43
Thanks for the detailed write up! I've done most of the things you suggest but will again and follow your suggestions. My front tire pressure on this unit is 14 psi not 22 psi.

This is a 1999 Murray Widebody model # 42591x31A , I should have stated that in my first post.

The deck leveling procedure in the book has you lower the deck to the floor for adjustment with the special lever position. Then its a matter of assuring the 4 hangars are loose and not binding anywhere. I did notice that the left front corner of the deck does not seem to contact the floor but I think its always been like this? Not 100% sure. The rest seems pretty true.

New blades are supposed to b 95100E701MA Murray OE(Now Briggs). Belt arrived loose in package but it appears to be the correct one, its a Made in Mexico, 37x88, looks the same as my prior belt that arrived in a Murray cardboard sleeve. Seems to fit ok.

With the deck removed, the brake pads are against the pulleys. Pulling on the mechanism that the rods pulls, the pads do retract properly. I have a new spring coming, thinking maybe the 23 yo OE has lost some of its tension and might be allowing the pads to contact pulleys when mowing?

My old blades look fine, no nicks or anything, I'm going to put an edge on them and check the balance and try them again. I may have already dulled the new ones on my uneven yard, I have one place in particular that the blades contact dirt if I don't raise the deck when passing.

It will be later this week, maybe weekend when the parts arrive so won't be able to work on it again until then. I'll report back though.

Thanks!
 

Rivets

Lawn Royalty
Joined
Mar 11, 2012
Threads
55
Messages
14,681
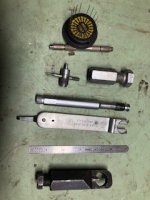
My procedure is different than many of the techs on this forum, but it works for me. When leveling a deck, tire pressure is critical. I’ve never liked Murrays deck leveling instructions, that’s why I gave you the way I do it. Before testing the unit, without engine running, engage the PTO and see that the brake pads release from the pulleys and blades turn freely, but have resistance from a tight belt. To check blade tip height I use a threaded rod connector and bolt, like the one in this picture. 1662409665750.jpeg
 

SeniorCitizen

Lawn Addict
Joined
Aug 28, 2010
Threads
123
Messages
2,074
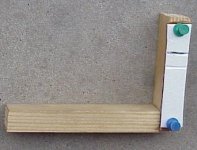
1662572949300.jpegQuit screwing around with all the deck leveling tools and make one that's easy to read . You won't need a ruler , tape measure , caliper , micrometer or any of those tools that have numbers and need to be read . All you need is this tool and a flat surface to park on and doesn't even need to be level because even a 20° incline is OK as long as it's relatively flat .
 

motomike

Member
Joined
May 11, 2016
Threads
10
Messages
43
Got the new spring for the blade control lever. Tension with the old spring: the belt deflected about 3/4 inch in the middle of the longest belt run between the 2 pulleys. With the new spring it deflected about 1/2 inch. So figure the blades may not have been spinning consistently at proper speed. Leveled the deck again using Murray published procedure.

Anyway the cut quality is MUCH improved.

(Did not use the new front suspension hanger bar I ordered. Turns out the bar is apparently supposed to be bent as the new one is bent the same way in the bag from the supplier.)

Thanks for all the helpful input!
 
Last edited:
Top