You are using an out of date browser. It may not display this or other websites correctly.
You should upgrade or use an alternative browser.
You should upgrade or use an alternative browser.
Export thread
Lawn-Boy 7268 Restomod Odyssey - Grab some popcorn and your favorite beverage!
#1

FuzzyDriver
FuzzyDriver
"How I Spent My 2020 Summer Vacation" by FuzzyDriver
Nothing on this mower was left as-is. This was not originally intended to be a museum display candidate, but it almost turned out that way during the three-month rebuild. Everything was torn down to individual components, inspected, cleaned, lubricated as necessary, painted as necessary, and reassembled using Lawn-Boy procedures and torque specifications, with the exception of the engine, which didn't need it.
The 7268 Aluminum deck didn't have any cracks or gouges so all I really had to do to it was brush it real good and repaint it. Automotive 'Grabber Green' works great. I put a NOS OEM 'Easy-Mulch' plate on (see photo at end) and couldn't see any color difference at all.
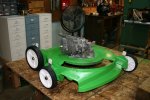
Compression checks showed that the original engine on this mower was OK, 95 psi (minimum is 80 psi), but, considering all the other work I was doing to 'new-ify' it, I wasn't going to settle for less than new specs (100-115 psi), so I replaced it with a newer engine I had on hand. The replacement engine is from a 7073. The 7073 compression was at the high-end of new engine specs, 115 psi, so I didn't see any need to mess with it. I figured the 7073 engine was so unused because the 7073 is a steel-deck - which doesn't last very long compared to the AL deck Lawn-Boys. Yeah, the deck that great engine was sitting on was awful, and I was happy to pitch it. Well, at least initially I thought the steel deck was the reason why the engine was like-new. It turned out there was ANOTHER reason they had stopped using it - but I'm getting ahead of myself (keep reading!) Note that the 7073 is a safety-mower, while the 7268 is pre-safety bale, so I had to use the 7073 handle assembly. Here's the 7073 engine sitting on the repainted 7268 deck:
During pre-teardown evaluation on the 7073, I found that the starter was filthy enough that sometimes it didn't return when you let the cord back in. When this happens, you can still pull the starter and it returns back, but it doesn't engage the flywheel. Obviously you can't start the engine when the starter assembly has this issue.
For those of you who need to work on their starter assembly, it is a bear to get off. You will probably have to remove the carburetor to get enough access to the set screw that holds it onto the engine. The set screw points down and is an allen-head. It was very tight. I ended up using a mirror to see it and an allen-head socket on a ratchet to turn it. I couldn't get an allen-wrench into it due to the narrow access angle. I painted the set screw red so at least now it's easy to see that bad boy, heh.
Once I got the starter assembly off, I completely disassembled it (including the return spring), cleaned, lubricated per specs, and put it back together with a new pull cord. I never messed with a Lawn-Boy spring itself before. The first time I put it back together, I had cleaned the spring, but not lubricated it.... So I took it back apart, lubricated it, and put it back together...backwards. 8^O The THIRD time I put it back together was the charm. If you've ever recoiled a spring back into the housing you know how much fun that is. Do it three times and it's Miller-time for sure.
I completely rebuilt the Walbro carburetor. Looks new and works like new. IMHO, switch your Lawn-Boy to a Walbro if you can (rather than the plastic carburetor).
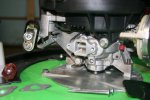
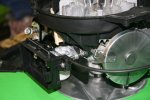
Here's how the starter assembly and carburetor looked during install:
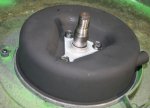
The muffler was good, but not good enough for me. So I cooked it on my propane camp stove. Lots of flame and black smoke. Once cooled, I brushed, cleaned, and painted it with VHT Flame-Proof exhaust system paint rated at 2,000 ºF. It looks better than new. It's a shame we have to turn our Lawn-Boys on their side to show off the muffler. ;^)
Since it's for sale, I got it an actual new OEM Lawn-Boy Tri-Cut blade. I can't show you the blade picture or me torquing it on because I've already attached 10 photos, which is the limit.
I got new after-market wheels and Rotary brand bolts for them. Original Lawn-Boy wheels have felt seals in recesses on the inside and outside of the wheel to keep crud from getting between the wheel bore and shoulder bolt. I think the purpose of these felts is to keep crud from getting in there and grinding away the plastic, causing rapid wear and wheel wobble.
The new wheels didn't have these recesses so I machined recesses in and put in new felt seals. I have a separate thread here on making a jig to fix this issue, if anyone is interested. I'm thinking about adding a pay-service to supply modded wheels/bolts, but I don't know if I would get enough customers to make it worthwhile.
Anyway, now the mower rolls as smooth as a new Lawn-Boy, and I expect the wheels to last a long time with those seals. :^)
Most of the photos show it with a new deck plate. Why are new plates black?? I have one picture of the mower with the original (brushed clean) plate. I also took a picture with the NOS 'Easy-Mulch' plate for comparison. Compare them - you can see how much the original plate is faded.
So what makes me think the steel deck isn't the only reason the mower prematurely stopped getting used? When I had the mower COMPLETELY finished and ready for first start....I put fuel in the tank, and it dribbled slowly out of a crack onto my *new* mower... Aaarrrgh!!! A previous owner had apparently wacked the shroud hard enough against something to crack it. This is also probably why the starter mechanism was so filthy (dried pre-mix oil), but I didn't put two-and-two together then.
Once I replaced the shroud (with a tank that doesn't leak!) the mower was all ready. It runs great and looks like new!
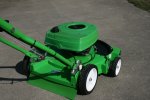
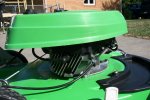
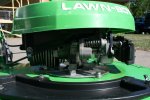
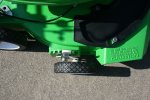
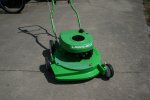
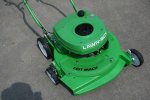
TL; DR: I turned a 1978 Lawn-Boy 7268 into a brand-new resto-modded mower that anyone would be proud to own.
Nothing on this mower was left as-is. This was not originally intended to be a museum display candidate, but it almost turned out that way during the three-month rebuild. Everything was torn down to individual components, inspected, cleaned, lubricated as necessary, painted as necessary, and reassembled using Lawn-Boy procedures and torque specifications, with the exception of the engine, which didn't need it.
The 7268 Aluminum deck didn't have any cracks or gouges so all I really had to do to it was brush it real good and repaint it. Automotive 'Grabber Green' works great. I put a NOS OEM 'Easy-Mulch' plate on (see photo at end) and couldn't see any color difference at all.
Compression checks showed that the original engine on this mower was OK, 95 psi (minimum is 80 psi), but, considering all the other work I was doing to 'new-ify' it, I wasn't going to settle for less than new specs (100-115 psi), so I replaced it with a newer engine I had on hand. The replacement engine is from a 7073. The 7073 compression was at the high-end of new engine specs, 115 psi, so I didn't see any need to mess with it. I figured the 7073 engine was so unused because the 7073 is a steel-deck - which doesn't last very long compared to the AL deck Lawn-Boys. Yeah, the deck that great engine was sitting on was awful, and I was happy to pitch it. Well, at least initially I thought the steel deck was the reason why the engine was like-new. It turned out there was ANOTHER reason they had stopped using it - but I'm getting ahead of myself (keep reading!) Note that the 7073 is a safety-mower, while the 7268 is pre-safety bale, so I had to use the 7073 handle assembly. Here's the 7073 engine sitting on the repainted 7268 deck:

During pre-teardown evaluation on the 7073, I found that the starter was filthy enough that sometimes it didn't return when you let the cord back in. When this happens, you can still pull the starter and it returns back, but it doesn't engage the flywheel. Obviously you can't start the engine when the starter assembly has this issue.
For those of you who need to work on their starter assembly, it is a bear to get off. You will probably have to remove the carburetor to get enough access to the set screw that holds it onto the engine. The set screw points down and is an allen-head. It was very tight. I ended up using a mirror to see it and an allen-head socket on a ratchet to turn it. I couldn't get an allen-wrench into it due to the narrow access angle. I painted the set screw red so at least now it's easy to see that bad boy, heh.
Once I got the starter assembly off, I completely disassembled it (including the return spring), cleaned, lubricated per specs, and put it back together with a new pull cord. I never messed with a Lawn-Boy spring itself before. The first time I put it back together, I had cleaned the spring, but not lubricated it.... So I took it back apart, lubricated it, and put it back together...backwards. 8^O The THIRD time I put it back together was the charm. If you've ever recoiled a spring back into the housing you know how much fun that is. Do it three times and it's Miller-time for sure.
I completely rebuilt the Walbro carburetor. Looks new and works like new. IMHO, switch your Lawn-Boy to a Walbro if you can (rather than the plastic carburetor).
Here's how the starter assembly and carburetor looked during install:


The muffler was good, but not good enough for me. So I cooked it on my propane camp stove. Lots of flame and black smoke. Once cooled, I brushed, cleaned, and painted it with VHT Flame-Proof exhaust system paint rated at 2,000 ºF. It looks better than new. It's a shame we have to turn our Lawn-Boys on their side to show off the muffler. ;^)

Since it's for sale, I got it an actual new OEM Lawn-Boy Tri-Cut blade. I can't show you the blade picture or me torquing it on because I've already attached 10 photos, which is the limit.
I got new after-market wheels and Rotary brand bolts for them. Original Lawn-Boy wheels have felt seals in recesses on the inside and outside of the wheel to keep crud from getting between the wheel bore and shoulder bolt. I think the purpose of these felts is to keep crud from getting in there and grinding away the plastic, causing rapid wear and wheel wobble.
The new wheels didn't have these recesses so I machined recesses in and put in new felt seals. I have a separate thread here on making a jig to fix this issue, if anyone is interested. I'm thinking about adding a pay-service to supply modded wheels/bolts, but I don't know if I would get enough customers to make it worthwhile.
Anyway, now the mower rolls as smooth as a new Lawn-Boy, and I expect the wheels to last a long time with those seals. :^)
Most of the photos show it with a new deck plate. Why are new plates black?? I have one picture of the mower with the original (brushed clean) plate. I also took a picture with the NOS 'Easy-Mulch' plate for comparison. Compare them - you can see how much the original plate is faded.
So what makes me think the steel deck isn't the only reason the mower prematurely stopped getting used? When I had the mower COMPLETELY finished and ready for first start....I put fuel in the tank, and it dribbled slowly out of a crack onto my *new* mower... Aaarrrgh!!! A previous owner had apparently wacked the shroud hard enough against something to crack it. This is also probably why the starter mechanism was so filthy (dried pre-mix oil), but I didn't put two-and-two together then.
Once I replaced the shroud (with a tank that doesn't leak!) the mower was all ready. It runs great and looks like new!


TL; DR: I turned a 1978 Lawn-Boy 7268 into a brand-new resto-modded mower that anyone would be proud to own.
#3

tom3
tom3
Might check on that gas tank issue. There was/is a recall on a lot of the LB tanks like yours. I checked into it for my leaky F engine tank and it was covered but I would have had to take it to a dealer for replacement. Can't imagine any mower dealer these days fooling with a 40 year old Lawn Boy for a recall. I just wipe off the thick goo left after the gas evaporates, leaves the deck nice and shiny too. Beautiful job on that machine you have!
#4

2smoked
2smoked
Very nice. Way better than the new stuff that is sold these days. Whoever buys it should get many years of good service.
#5

logert gogert
logert gogert
never heard of a lawn boy until i joined this forum. and ive still never seen one in real life.
whats all the fuss about?
whats all the fuss about?
#6

2smoked
1) They are simple and lightweight with their 2 cycle engines and easy to start.
2) They hold up and last as long as the are given reasonable care and maintenance.
3) They were and still are popular because many parts are still available.
4) Because of their simplicity, any problems are easy to diagnose.
5) Most models had magnesium or cast aluminum decks that do not rust out.
6) The 2 cycle engine will always have adequate lubrication even if the mower is operated at an angle.
Here is my 1965 Lawn Boy model 5233 with a magnesium deck. It is very smooth, very light, and very easy to start. Need I say more?

2smoked
What’s all the fuss about? Let me help you understand why vintage Lawn Boys are generally worth fussing over.never heard of a lawn boy until i joined this forum. and ive still never seen one in real life.
whats all the fuss about?
1) They are simple and lightweight with their 2 cycle engines and easy to start.
2) They hold up and last as long as the are given reasonable care and maintenance.
3) They were and still are popular because many parts are still available.
4) Because of their simplicity, any problems are easy to diagnose.
5) Most models had magnesium or cast aluminum decks that do not rust out.
6) The 2 cycle engine will always have adequate lubrication even if the mower is operated at an angle.
Here is my 1965 Lawn Boy model 5233 with a magnesium deck. It is very smooth, very light, and very easy to start. Need I say more?
Attachments
#8

FuzzyDriver
FuzzyDriver
Thanks, 2smoked. Nice Lawn-Boy you have there! I think you have number 3 cause-and-effect switched around, though. I'd say many 'parts are still available' because Lawn-Boys 'are still popular'...and still running great. And worth keeping that way, as anyone who's ever had one knows! : ) : )What’s all the fuss about? Let me help you understand why vintage Lawn Boys are generally worth fussing over.
1) They are simple and lightweight with their 2 cycle engines and easy to start.
2) They hold up and last as long as the are given reasonable care and maintenance.
3) They were and still are popular because many parts are still available.
4) Because of their simplicity, any problems are easy to diagnose.
5) Most models had magnesium or cast aluminum decks that do not rust out.
6) The 2 cycle engine will always have adequate lubrication even if the mower is operated at an angle.
Here is my 1965 Lawn Boy model 5233 with a magnesium deck. It is very smooth, very light, and very easy to start. Need I say more?
#9

upupandaway
upupandaway
It is a shame that with all markets when new, you have many brands with products that had their own way to get the job done - heck there were over 100 companies making cars in the US alone at one time! Over time many are either out of business or bought out and in the end you have only a hand full and they all seem the same. Too bad LawnBoy was on the short end.
#10
B
bertsmobile1
B
bertsmobile1
It is all about brainwashing , cheapness , greed & ignorance .
When any consumer item is new , people pay a premium price for it and are happy to do so cause they now have an automatic washing machine or air conditioning etc etc.
Because people pay a fair price there is enough profit margin to support a diverse range of factories and lots of innovations can happen.
Then some greedy company works out they can do it cheaper thus increase their market share & make more money.
This then stats the down ward spiral
The market is brainwashed into believing this is great because they are getting all this stuff for less money .
Profit margins go down & manufacturers merge, sell out divest or go bankrupt and as each one exits the market the products get worse , cheaper, shorter working life and all start to become clones of each other.
But the price continues to go down so Joe Stupid consumer is still over the moon in cloud cookoo land .
Then all of a sudden grand dad dies & he sees grandads 20 year old mower which cuts better & uses less fuel than his 5 year old mower which is now falling to pieces and they wonder why all of the good old mower companies went out of business.
#11

FuzzyDriver
FuzzyDriver
You sure know how to paint a sad picture, Bert. How much do you think a Lawn-Boy would go for today if it was a REAL Lawn-Boy, like the ones we use?
#12

tom3
tom3
If made in China, FOB west coast for about 30 dollars. Sell in Walmart/Amazon for 249.95. Good luck with warranty or service - or any concern whatsoever for your problem. That's today's marketplace.
#13
B
bertsmobile1
The biggest selling push mower dow here was the Victa 18" fited with the power torq 2 stroke engine with over 40% of all sales.
Tier II pollution laws were coming in so Victa had NSWIT doing prototypeing of an tier II compliant engine.
B& S bought Victa when they defaulted on their loan & breeched he loan agreement .
Briggs obviously wanted to fit Chinese B &S engines to make the highest profit & recoup the losses so they added a "research bounty" to the price of he 2 stroke engine.
Thus it went from being the cheapest , around $ 300 in the range to the dearest $ 700 and the sales dropped to next to zero so they got approval to close down the engine plant .
It all comes down to ignorance , price & greed.
And Lawn Boy in the USA would suffer the same fate even if they could have made a TIER IV compliant two stroke engine .
Capatialism requires a few basic things to work
1) the market must be informed, so the customers need to have the capacity to determine the quality , durability & operating costs of the mowers
2) a competative market with no single dominant player in either retail wholesale or manufacturing .
3) retailers & factories that are in competition with each other & not part of cartels ( basis of your anti-trust laws ) .
None of these exist anywhere except in the stock market
B
bertsmobile1
I would be about the same price as the Hondas and no one would buy them.You sure know how to paint a sad picture, Bert. How much do you think a Lawn-Boy would go for today if it was a REAL Lawn-Boy, like the ones we use?
The biggest selling push mower dow here was the Victa 18" fited with the power torq 2 stroke engine with over 40% of all sales.
Tier II pollution laws were coming in so Victa had NSWIT doing prototypeing of an tier II compliant engine.
B& S bought Victa when they defaulted on their loan & breeched he loan agreement .
Briggs obviously wanted to fit Chinese B &S engines to make the highest profit & recoup the losses so they added a "research bounty" to the price of he 2 stroke engine.
Thus it went from being the cheapest , around $ 300 in the range to the dearest $ 700 and the sales dropped to next to zero so they got approval to close down the engine plant .
It all comes down to ignorance , price & greed.
And Lawn Boy in the USA would suffer the same fate even if they could have made a TIER IV compliant two stroke engine .
Capatialism requires a few basic things to work
1) the market must be informed, so the customers need to have the capacity to determine the quality , durability & operating costs of the mowers
2) a competative market with no single dominant player in either retail wholesale or manufacturing .
3) retailers & factories that are in competition with each other & not part of cartels ( basis of your anti-trust laws ) .
None of these exist anywhere except in the stock market
#15
B
bertsmobile1
B
bertsmobile1
Workshop is on a friends farm on the rural outskirts of Sydney which is rapidly becoming large rural / residential
House is in the mountains .
When they changed the format we lost the location which is a problem because every one thinks all participants are in the USA
So they advise people in Ireland to go to HF & get a leak down tester which ain't going to happen.
House is in the mountains .
When they changed the format we lost the location which is a problem because every one thinks all participants are in the USA
So they advise people in Ireland to go to HF & get a leak down tester which ain't going to happen.
#17
B
bertsmobile1
B
bertsmobile1
Spring was over a month ago when we got rain.
The 4 seasons mean nothing down there.
The local Black fellars had 9 for this region, but not for every year .
Then what would they know, they have only been here for 80,000 years watching what happens.
Obviously an overweight European with a toe in the Medeterranian must know better because he could write.
Already eating new season early tomatoes & still have last seasons tomatoes.
The reason we have devistating bushfires is because we will not listen to the black fellars and I imagine that is a big part of your chronic bushfire as well
Again what would the natives know about not being burned alive ?
Not been to the West coast yet
There is a West -East cannonball ride planned for vintage motorcycles in a couple of years and that will be the first time.
Been no further than Wyhalla & Port Perrie in SA
#18

FuzzyDriver
FuzzyDriver
Interesting that your growing seasons don't match up well with the equinoxes.
I haven't been to Perth (or Fremantle, that's where we were tied up) in a looong time. I liked Australia. One of the few places an American could move to and not experience culture shock (except driving on the wrong side of the road, heh! I was the designated driver!) What are the start and finish points of your Cannonball ride?
I haven't been to Perth (or Fremantle, that's where we were tied up) in a looong time. I liked Australia. One of the few places an American could move to and not experience culture shock (except driving on the wrong side of the road, heh! I was the designated driver!) What are the start and finish points of your Cannonball ride?
#19
B
bertsmobile1
B
bertsmobile1
Basically Perth to Eden .
Naturally the exact places are secret til there is money in the bank but the proposed route was published last year for pre 1945 motorcycles.
Spring Summer Autum & Winter are only accurate in a very small lattitude band in Europe and a smaller one in the America's .
We hang on to them because our feedbele white brains can not accept that the coloured people who actually lived outside Europe might actually be right and the Greek/Roman philosophers might have been wrong .
Remember both your & my country base our entire legal , political & moral system on the Greeko-Romans , so they have to be right .
The Chinese do not tradtionally recognise the 4 seasons & neither do the Indians (Hindu & Muselum ones ) .
Not up on South American culture but fairly sure none of the Inuits, Aztecs , Inkas or Mayans used a 4 season year either .
The best we white folk ever got was Old Moores Almanac who used the 4 seasons, transposed with moon phases to predict plantings & harvests so as not to scare the horses & put himself above the Holy Word .
For example the coldest winter night we had this year was + 2 deg C so there will be little to no cherries , pears or appricots this season in the orchard but there should be a bumper olive season .
Even you must have noticed that some years you barely stop mowing while others it was hardly worth changing the oil you mowed so little .
#20

FuzzyDriver
FuzzyDriver
The defined Spring, Summer, Autumn, & Winter seasons aren't based on when anyone experiences annual changes. These seasons are based on where the Earth is around the Sun. So everywhere on Earth has this particular set of seasons, with the Southern hemisphere obviously seeing the opposite of the Northern hemisphere. But I understand what you are saying. "Season" has lots of meanings. Rugby season. Planting season. Baseball season. Harvest. None of them are necessarily fixed with respect to the equinoxes/solstices. For that reason there's no reason there has to be a particular count of annual seasons, or fixed length of each one. There's dozens of sets of seasons, I expect.
That ride is way over 2,000 miles. And there's lots of wilderness. Vintage bikes. There HAS to be a bunch of safety vehicles follow you all, right?
That ride is way over 2,000 miles. And there's lots of wilderness. Vintage bikes. There HAS to be a bunch of safety vehicles follow you all, right?
#21
B
bertsmobile1
Even if you count the hours of sunlight, the sun rise & sun set that are not symetrical nor constant year in year out.
They are an invention of man to put order into nature that is not there apart from the equinoxes which from memory also shift around a bit .
The point was they are for all practical purposes meaningless yet we infer meaning on them that is not there , Apart from being x days from salstus .
The "western seasons" do not take into account the earths wobble and tilt variations .
As for the ride, very much the same as the USA Cannonball & I rather think the organizers are Aussies who have competed in it .
So no back up apart from what you take yourself .
Way back in 1948 BSA did an ACU observed round Australia reliability ride on rigid 125cc BSA Bantams
In 2018 there was a re-enactement ride which I signed up for but could not make for financial reasons
Australia was always popular for torture testing motor vehicles.
All major factories have research facilities down here.
B
bertsmobile1
The defined Spring, Summer, Autumn, & Winter seasons aren't based on when anyone experiences annual changes. These seasons are based on where the Earth is around the Sun. So everywhere on Earth has this particular set of seasons, with the Southern hemisphere obviously seeing the opposite of the Northern hemisphere. But I understand what you are saying. "Season" has lots of meanings. Rugby season. Planting season. Baseball season. Harvest. None of them are necessarily fixed with respect to the equinoxes/solstices. For that reason there's no reason there has to be a particular count of annual seasons, or fixed length of each one. There's dozens of sets of seasons, I expect.
That ride is way over 2,000 miles. And there's lots of wilderness. Vintage bikes. There HAS to be a bunch of safety vehicles follow you all, right?
Even if you count the hours of sunlight, the sun rise & sun set that are not symetrical nor constant year in year out.
They are an invention of man to put order into nature that is not there apart from the equinoxes which from memory also shift around a bit .
The point was they are for all practical purposes meaningless yet we infer meaning on them that is not there , Apart from being x days from salstus .
The "western seasons" do not take into account the earths wobble and tilt variations .
As for the ride, very much the same as the USA Cannonball & I rather think the organizers are Aussies who have competed in it .
So no back up apart from what you take yourself .
Way back in 1948 BSA did an ACU observed round Australia reliability ride on rigid 125cc BSA Bantams
In 2018 there was a re-enactement ride which I signed up for but could not make for financial reasons
Australia was always popular for torture testing motor vehicles.
All major factories have research facilities down here.
#22

2smoked
2smoked
Fuzzy, your thread title was correct from the start. I’m on my second bowl of popcorn....
