You are using an out of date browser. It may not display this or other websites correctly.
You should upgrade or use an alternative browser.
You should upgrade or use an alternative browser.
Export thread
Intake valve stem install on 3.5 hp 450 series
#1

Herbielee
Herbielee
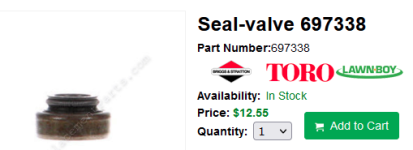
I was doing a full service and decided to clean the valves and head of carbon build up. I have damaged the intake valve stem oil seal. I have sourced a new seal but don’t know how to get old one out of install new one. Any help appreciated!
#4

StarTech
StarTech
10T502-0141-B1
Exhaust valve stem seal. Remove valve spring and gently pry off the seal. New seal is just put in place and the valve spring once install seats the seal.
Exhaust valve stem seal. Remove valve spring and gently pry off the seal. New seal is just put in place and the valve spring once install seats the seal.
#5

Herbielee

Herbielee
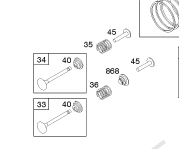
It is the intake valve oil seal. I ve had the springs out. You can only access the seal from the end you put the valves in. Also you have a different model listed. I have attached a photo of the the motor diagram and In red you will see an arrow, that is where the intake valve oil seal is
Attachments
#8

Herbielee
Herbielee
It’s 9T502-2091B1
I have two identical mowers, looking up this one gave me the engine same as mine. It’s definitely the intake valve. It’s the oil seal between the two chambers ie valve stem and spring
I have two identical mowers, looking up this one gave me the engine same as mine. It’s definitely the intake valve. It’s the oil seal between the two chambers ie valve stem and spring
#9

Herbielee
Herbielee
868 is the part but it doesn’t really show it in any of the diagrams I’ve looked up. The part is there but doesn’t show where it actually goes. It might be an unserviceable part. I put it all together with the damaged seal. The little spring on the oil seal has gone off and it’s slightly damaged. Started no problem and used it for around 2 hrs. No problem at this stage, I’ll just have to wait and see how it goes. Thanks for the help!
#11

Herbielee
Herbielee
Yes I know that’s why I came on here. The exhaust valve doesn’t even have an oil seal. It’s only the intake valve stem that has it!
#12

Herbielee
Herbielee
I’m not stupid I know what I am seeing when it is disassembled. But frustrating when the diagrams don’t match with what is actually inside. I’ve had both mowers pulled apart and they both identical inside. Only oil sea on the intake valve stem.
#13

StarTech
StarTech
Not saying you are stupid. I can only go by the IPLs. As you said you are the one looking at it in person, Then you should install the new seal there.
I don't get enough of these walk behind mower engines to know 100%, Customers just don't want to pay the repair bills. They rather buy new mowers.
I don't get enough of these walk behind mower engines to know 100%, Customers just don't want to pay the repair bills. They rather buy new mowers.
#16

StarTech
StarTech
Of course you have to remove the spring. But normally most seals of this type are just gently pried off the valve guide. They are just held on by fiction fit. But getting a sharp edge item in there can be a little hard. Also you could remove the valve and use a long pin punch that can be angled to catch the outside edge of the seal to drive it off.Something like a 1/8 pin punch since the guide is a 1/4 inch normally.
As for reinstalling it as you must use a bushing that fit over the seal edge and then clamp it back down on the guide. Something like a short socket might work along with a C clamp.

As for reinstalling it as you must use a bushing that fit over the seal edge and then clamp it back down on the guide. Something like a short socket might work along with a C clamp.

#17
T
TobyU
Cleaning off the carbon is not a real reason.
More likely to do more harm than good just like this.
If you want to remove carbon from an engine do a steam cleaning bye dribbling some water or get a spray bottle of water and spray it into the carburetor as much as you can while still keeping the engine running and revving it up mainly with your finger on the governor a few times or do the same thing with seafoam or just a can of spray card cleaner as all will clean and blow off the carbon from the valves and the head and combustion chamber area. BUT in reality there's little reason to do this because any carbon in the combustion chamber actually helps you and if anything make sure engine more powerful because these things have about 7.5 to 1 compression ratio which is a low performance little turd to begin with.
Increase the compression a little bit could actually help! Lol
It's also pretty much a waste of time to even take the muffler and the valve access cover/breather off of these to check and adjust the valves because they hardly ever need it and if they do you'll know it anyways.
To answer the actual question though you should be able to use a screwdriver or something to get under the valve seal and tap on the handle of that perpendicularly to it to get the valves seal moving to remove it and then oil and slide the new one on.
I personally don't like these engines with the valves and the block even though they okay great service for many people for many decades.
It's just not worth the time to bother with most of the repairs on them today.
I have so many other good used engines sitting around for donors that it's faster to take the blade and the three bolts off and swap an engine than it is to adjust the valves or remove and replace the head on the other one.
Also, you should never take one of these heads off to replace a head gasket as preventative or whatever and anytime you take the head off there is at 85% chance you will have to use a new head gasket because it will rip.
Sometimes it comes off cleanly and then I use the spray permatex copper gasket to put it back on but I don't do many of them.
This is just what I have a good engine that was running fine but a valve seat pops out so I can usually take the head off and drive the valve seat back in and stake it into place and have it back on and running in under 35 minutes.
The most important thing on these engines though is to snug up the head bolts each year.
It's pretty much a given that every single one of these will end up having loose head bolts and massively loose head bolts on the lower right corner as you're facing the head.
Those bottom three corner once are typically ridiculously loose if no one has tightened them up before.
You could be specific about it and use a torque wrench and the proper Briggs & Stratton tightening sequence and to the proper spec but in reality a 3/8 Drive ratchet with a half inch socket or deep well socket on it and just tighten them nice and snug and maybe a little bit more it's just fine.
As long as you don't go crazy on it because if you over tighten them you will strip out the threads or snap off a bolt - so that's just a bit too tight.
They do need Titan though because if not the head gasket will blow or at least start leaking on that side and then it will continue to burn through so it will have to be replaced.
If you catch them after only a few years and before they start leaking and tighten them up they can go indefinitely
T
TobyU
This is one possible reason why these so-called full services shouldn't be done or people should never pull the head off an engine unless there is a real reason to do so.I was doing a full service and decided to clean the valves and head of carbon build up. I have damaged the intake valve stem oil seal. I have sourced a new seal but don’t know how to get old one out of install new one. Any help appreciated!
Cleaning off the carbon is not a real reason.
More likely to do more harm than good just like this.
If you want to remove carbon from an engine do a steam cleaning bye dribbling some water or get a spray bottle of water and spray it into the carburetor as much as you can while still keeping the engine running and revving it up mainly with your finger on the governor a few times or do the same thing with seafoam or just a can of spray card cleaner as all will clean and blow off the carbon from the valves and the head and combustion chamber area. BUT in reality there's little reason to do this because any carbon in the combustion chamber actually helps you and if anything make sure engine more powerful because these things have about 7.5 to 1 compression ratio which is a low performance little turd to begin with.
Increase the compression a little bit could actually help! Lol
It's also pretty much a waste of time to even take the muffler and the valve access cover/breather off of these to check and adjust the valves because they hardly ever need it and if they do you'll know it anyways.
To answer the actual question though you should be able to use a screwdriver or something to get under the valve seal and tap on the handle of that perpendicularly to it to get the valves seal moving to remove it and then oil and slide the new one on.
I personally don't like these engines with the valves and the block even though they okay great service for many people for many decades.
It's just not worth the time to bother with most of the repairs on them today.
I have so many other good used engines sitting around for donors that it's faster to take the blade and the three bolts off and swap an engine than it is to adjust the valves or remove and replace the head on the other one.
Also, you should never take one of these heads off to replace a head gasket as preventative or whatever and anytime you take the head off there is at 85% chance you will have to use a new head gasket because it will rip.
Sometimes it comes off cleanly and then I use the spray permatex copper gasket to put it back on but I don't do many of them.
This is just what I have a good engine that was running fine but a valve seat pops out so I can usually take the head off and drive the valve seat back in and stake it into place and have it back on and running in under 35 minutes.
The most important thing on these engines though is to snug up the head bolts each year.
It's pretty much a given that every single one of these will end up having loose head bolts and massively loose head bolts on the lower right corner as you're facing the head.
Those bottom three corner once are typically ridiculously loose if no one has tightened them up before.
You could be specific about it and use a torque wrench and the proper Briggs & Stratton tightening sequence and to the proper spec but in reality a 3/8 Drive ratchet with a half inch socket or deep well socket on it and just tighten them nice and snug and maybe a little bit more it's just fine.
As long as you don't go crazy on it because if you over tighten them you will strip out the threads or snap off a bolt - so that's just a bit too tight.
They do need Titan though because if not the head gasket will blow or at least start leaking on that side and then it will continue to burn through so it will have to be replaced.
If you catch them after only a few years and before they start leaking and tighten them up they can go indefinitely
#18

Herbielee
Herbielee
It had lost compression. Thus the reason for pulling the head off. Value was stuck. Got a new gasket set. Thanks for the information, I will keep it in mind next time I get an old mower.This is one possible reason why these so-called full services shouldn't be done or people should never pull the head off an engine unless there is a real reason to do so.
Cleaning off the carbon is not a real reason.
More likely to do more harm than good just like this.
If you want to remove carbon from an engine do a steam cleaning bye dribbling some water or get a spray bottle of water and spray it into the carburetor as much as you can while still keeping the engine running and revving it up mainly with your finger on the governor a few times or do the same thing with seafoam or just a can of spray card cleaner as all will clean and blow off the carbon from the valves and the head and combustion chamber area. BUT in reality there's little reason to do this because any carbon in the combustion chamber actually helps you and if anything make sure engine more powerful because these things have about 7.5 to 1 compression ratio which is a low performance little turd to begin with.
Increase the compression a little bit could actually help! Lol
It's also pretty much a waste of time to even take the muffler and the valve access cover/breather off of these to check and adjust the valves because they hardly ever need it and if they do you'll know it anyways.
To answer the actual question though you should be able to use a screwdriver or something to get under the valve seal and tap on the handle of that perpendicularly to it to get the valves seal moving to remove it and then oil and slide the new one on.
I personally don't like these engines with the valves and the block even though they okay great service for many people for many decades.
It's just not worth the time to bother with most of the repairs on them today.
I have so many other good used engines sitting around for donors that it's faster to take the blade and the three bolts off and swap an engine than it is to adjust the valves or remove and replace the head on the other one.
Also, you should never take one of these heads off to replace a head gasket as preventative or whatever and anytime you take the head off there is at 85% chance you will have to use a new head gasket because it will rip.
Sometimes it comes off cleanly and then I use the spray permatex copper gasket to put it back on but I don't do many of them.
This is just what I have a good engine that was running fine but a valve seat pops out so I can usually take the head off and drive the valve seat back in and stake it into place and have it back on and running in under 35 minutes.
The most important thing on these engines though is to snug up the head bolts each year.
It's pretty much a given that every single one of these will end up having loose head bolts and massively loose head bolts on the lower right corner as you're facing the head.
Those bottom three corner once are typically ridiculously loose if no one has tightened them up before.
You could be specific about it and use a torque wrench and the proper Briggs & Stratton tightening sequence and to the proper spec but in reality a 3/8 Drive ratchet with a half inch socket or deep well socket on it and just tighten them nice and snug and maybe a little bit more it's just fine.
As long as you don't go crazy on it because if you over tighten them you will strip out the threads or snap off a bolt - so that's just a bit too tight.
They do need Titan though because if not the head gasket will blow or at least start leaking on that side and then it will continue to burn through so it will have to be replaced.
If you catch them after only a few years and before they start leaking and tighten them up they can go indefinitely
#19
B
bertsmobile1
Exhaust blows so leaks around the exhaust valve just increase the crankcase pressure that vents through the carb .
B
bertsmobile1
That is standard practice because the inlet sucks so it drags oil into the engine so the resulting exhaust would not meet EPA specificationsYes I know that’s why I came on here. The exhaust valve doesn’t even have an oil seal. It’s only the intake valve stem that has it!
Exhaust blows so leaks around the exhaust valve just increase the crankcase pressure that vents through the carb .


