Cub Cadet Z-Force 44” Deck Belt confusion

GomerPy739

Forum Newbie
Joined
Jul 26, 2025
Threads
1
Messages
3
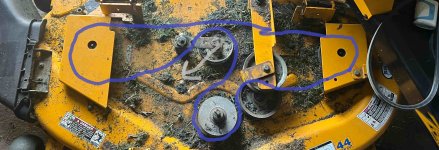
So, I inherited a much older Cub Cadet Z-Force. Mechanically, it’s in fantastic shape. It just needed some new wheels and a deck belt.
Model: 53AA5B6L712

I was able to find the correct deck belt and the diagram sticker is only partial on the mower and of no use. I know this is a much older Cadet and searching online has only made me more confused.

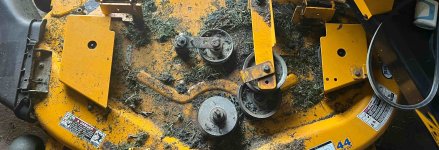
Can anyone help me figure out the routing for the deck belt?

Looking at the parts manual hasn’t been much help because there is a pulley that doesn’t look as if it matches up. Any help someone can provide would be a life saver.
632d1b3c-826c-4a30-85a2-eab69d7529b1-min 2.jpg
 

Auto Doc's

Well-Known Member
Top Poster Of Month
Joined
Sep 7, 2024
Threads
11
Messages
913
This has the belt on the deck and also one the comes from the engine PTO to drive the deck? I have a Z-Force 48 that is setup that exact way.

This picture may help.

The deck should also have a routing label on the left front to show exact belt placement. Note: It is easy to get the PTO belt on the wrong side of the pullies (I know this because I did that, and I've been a mower mechanic for many years)


These are even more fun if you have to replace the drive belt and tensioner pulley. It's not that bad if you have a way to lift the entire rear off the ground and remove the drive wheels to lower the cradle section.

These units were well built, but tricky to work on.

I'll see if I can get you a picture of my deck label belt routing.
 

GomerPy739

Forum Newbie
Joined
Jul 26, 2025
Threads
1
Messages
3
I genuinely can’t thank you both enough. I know I’m not a total idiot but for whatever reason this put me in a corner and finding so much close but different manuals and information online has a bit too much.

And now it looks like I may have the wrong size belt. I had purchased a 5/8x80” but after finding the right manual it may need a 1/2x82”. So, back to the store I go this morning.
 

Auto Doc's

Well-Known Member
Top Poster Of Month
Joined
Sep 7, 2024
Threads
11
Messages
913
While you are this far, grease every fitting you can find with a couple of pumps from a grease gun.

Let us know how your belt situation works out. That lever on the left side tensions both belts at the same time once they are installed. The PTO belt can be a bit of a challenge at the rear, but get it started and then rotate the PTO pulley, and it will jump into place.

Be mindful what side the PTO drive belt is on the deck idlers, because the belt can be put on the wrong side of the pullies easily. If it happens the belt will not spin the blade fast enough and the blades will stall when cutting.
 

GomerPy739

Forum Newbie
Joined
Jul 26, 2025
Threads
1
Messages
3
While you are this far, grease every fitting you can find with a couple of pumps from a grease gun.

Let us know how your belt situation works out. That lever on the left side tensions both belts at the same time once they are installed. The PTO belt can be a bit of a challenge at the rear, but get it started and then rotate the PTO pulley, and it will jump into place.

Be mindful what side the PTO drive belt is on the deck idlers, because the belt can be put on the wrong side of the pullies easily. If it happens the belt will not spin the blade fast enough and the blades will stall when cutting.
The belt situation worked out perfect. I exchanged what I had for a 1/2 x 82 and it provided just enough of a pain I knew it was the right one. When I disconnected the deck I remembered that someone else had mentioned greasing fittings too and had taken care of that in between the belt issue.

The PTO belt and I did come to an understanding and that understanding was unbolting the front links all together, marking where they were and sliding the deck back to make it easier to get the PTO on. When I slid everything forward and bolted the front links back on it fell where it needed to.

Everything ran fine after that. PTO engages as it should and the pulleys spin great. I did notice that someone has the bars at different angles and that was a bit annoying so i straightened those up.

And now on to the next find, the steering grips have different tensions to them. The right one has to pull back a bit harder where the left one feels a bit loose/more free. After a couple of rounds through the yard it sounded like the left steering grip was making a squealing/vibration sound when you pushed or pulled any direction.
 

Auto Doc's

Well-Known Member
Top Poster Of Month
Joined
Sep 7, 2024
Threads
11
Messages
913
On each side near the front of the engine, at the mounting plate area, there should be a plastic standpipe with a black dome vent cap. The standpipe portion can be unscrewed (usually by hand) to look down inside to see the oil level. If you do not see oil within 1/4 inch of the bottom of the hole, that means it is low.

If they do not unscrew, it will be tricky to get a wrench in at the base of them to break them loose. Hopefully they do not give you problems.

You can use a long metal flex funnel and some 20W-50 engine oil to top it off or use the Cub Cadet hydrostatic oil.

Make sure the O-ring at the bottom of the tube is good or replace it. Screw each tube back lightly hand tight.

After that run it back and forth a few times and see how it acts. It may still make a little noise, but it will quiet down eventually. Take it out a put it to work to see how it does.

I have realized that actual service manuals for this design are non-existent, or they are buried deep in the archives of Cub Cadet where I have not found them yet.

Much of what I have learned on mine is through trial and error, but it is a strong running machine that borders a commercial grade zero turn. I picked mine up from a customer who was just tired of the little thing adding up from his neglect of the machine.

Question: How many hours are on your newly acquired machine?
 
Top