You are using an out of date browser. It may not display this or other websites correctly.
You should upgrade or use an alternative browser.
You should upgrade or use an alternative browser.
Export thread
Crankcase Leakage Check Methodology
#1

FuzzyDriver
FuzzyDriver
Does anyone out there have a good way of checking crankcase leakage? I've got a good F engine with 92 cold PSI, so I'd like to use it without breaking the crankcase open or replacing the seals if they're OK. I'm thinking of rigging up a flange to put on the exhaust port and putting a slight pressure to leak check the seals with the piston near TDC. I'm thinking this is safer than messing around with the reed valves. Anybody done anything like this?
#2
H
hlw49
H
hlw49
That might work since it is a reed valve engine. You usually do a cc pressure check the other way around but like I said yours is a reed engine and if the reed doesn't leak you might get by with it.
#4

FuzzyDriver
WRT the test itself, you're saying draw a vacuum on the crankcase and check the vacuum gauge for drop in vacuum, right? I can see three issues that would need to be addressed:
- If the seal leaks under vacuum, you could suck stuff into the crankcase
- Carburetor flange needs to be securely blocked off
- Vacuum sucks piston back down, closing off exhaust port. Need to lock shaft from rotating?
FuzzyDriver
Seals leaking under vacuum is a common cause of the engine not running well since it's only supposed to draw from the carburetor, so I'm not against that check, but I was hoping a few inches of air pressure would identify that problem. This test is simpler to see the leak by spraying soapy water on the seals and looking for bubbles (might as well check the crankcase seal white you're at it, eh?) Do you think you could have a leak under vacuum, but not under pressure?You would also need to vac test the crankcase as seals tends to leak under vacuum.
WRT the test itself, you're saying draw a vacuum on the crankcase and check the vacuum gauge for drop in vacuum, right? I can see three issues that would need to be addressed:
- If the seal leaks under vacuum, you could suck stuff into the crankcase
- Carburetor flange needs to be securely blocked off
- Vacuum sucks piston back down, closing off exhaust port. Need to lock shaft from rotating?
#5

FuzzyDriver
FuzzyDriver
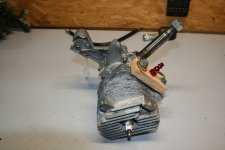
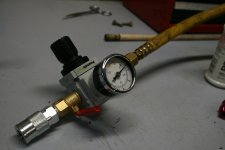
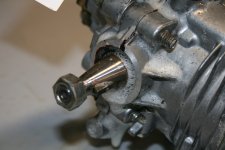
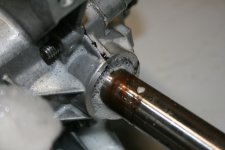
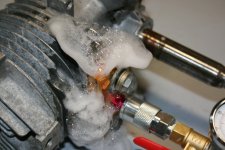
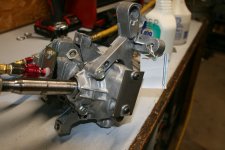
Well, I went ahead and fabricated a crankcase leakage test rig. I set the regulator to provide about 5 psi and hooked it up to the exhaust port (the photo was taken before setting the psi). I found no leakage from either seal. My cheap-o flange made of plywood sure leaked, though. I had this concern that since the piston skirt never opens a gap to the crankcase even at TDC that air wouldn't make it into the crankcase, but I shouldn't have worried about it since the rings sure clear the ports. Out of curiosity I sprayed soapy water on the carburetor flange block...so now I have another thing to wonder about. The carburetor flange DID leak, which means air was escaping around the reed valves. Since you can't get an air leak from here (you'd be getting fuel-air mixture), I don't know if this is a problem. How tight a seal are the reed valves supposed to give? Is the low pressure I was provided not adequate to close the reed valves, so I should ignore it? Oh...it did prove that air was making it to the crankcase, so it relieved any worry about air not making it to the seals.
In the photos you'll see bubbles at the seals, these are not being generated by a leak - they're coming from the spray bottle. Compare to the incredible bubble generator around my test flange. I didn't take a photo of the carburetor block off bubbles. They were very slight.
Please, I would love to hear from you gurus out there. Should I use a higher pressure for the test? Any other issues with my test method? Or my results? Thanks!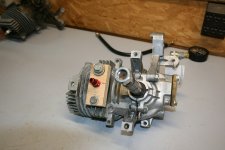


#6
J
Joed756
J
Joed756
Why are you checking for crankcase leaks? Do you have reason to suspect a leak? I see you have another of these engines, why not check the cc pressure on it and see how close they are?
#7

FuzzyDriver
FuzzyDriver
I only checked for crankcase leaks because it was so easy once I was hooked up anyway to check for crankshaft seal leaks. Those are crankcase leaks, too, so maybe I'm misinterpreting your question (??). I have no reason to suspect a leak, but since I am building up a mower I want to make sure the engine I use, which came from a scrapped mower, didn't get scrapped because of an engine issue (this particular engine is from a group of six mostly-scrapped mowers I bought as a group). I'm going to check what I can with the engine 100% accessible before I build up the mower. If I can tell that it, needs seals then I'm going to replace them now. Looks like they're fine, but I don't have a feel for how high a crankcase pressure I should use for the leak check. Crankcase pressure when running oscillates between some positive pressure and a vacuum. I suspect it never reaches a very high pressure on the power stroke, but how high?
"I see you have another of these engines, why not check the cc pressure on it and see how close they are?"
I don't understand where you're coming from on this question. Are you sure you understand what my test is doing? The pressure regulator is maintaining the crankcase pressure so it will be the same on every crankcase I check - unless the leak is so bad that the regulator can't keep up with the leakage!! 8^O
#8

StarTech
StarTech
Due to the way the seals are design the higher the pressure the tighter they seal as the lips are pressed against the shaft. It when vacuum is applied that they can leak easier the higher the vacuum as the lips are pulled away from the shaft. This is why it is wise to do both tests. The with your test jig is that wood is porous; therefore, you can not do the static pressure and vacuum tests which are percentage of loss tests over time. Usually express as PSI loss.
#9

FuzzyDriver
To do a static vacuum check, I do have a manual vacuum pump. My hand hurts just thinking about how many times I'd have to squeeze it to get a good vacuum on a crankcase. I'd also need to make steel flanges to replace my leaky, wooden ones.
Bonus Funny Story: A technician at work needed to check condenser vacuum. He checked out a U-tube manometer for the test. When he hooked it up, the condenser sucked the contents of the manometer right into the condenser. I think he still hasn't lived that down.
If I only had this one engine to do and if I had 100% confidence that replacing a seal will always result in a seal that doesn't leak, I'd just replace them and be done with it. I've already spent more on test equipment fabrication that two seals cost. And multi-hours of labor.
FuzzyDriver
Right, static pressure tests (i.e., drop tests) won't work with any flange leakage. That's why I'm using a pressure regulator. I didn't expect the wood (easy to make) flanges to leak so much, but c'est la vie, as long as the regulator can keep up. I don't have equipment to supply a steady vacuum, but if I did how would you detect the leak (soap bubble test obviously wouldn't work, heh heh)? Hmmm....maybe wrap the wife's Saran wrap around it and see if it's getting sucked in?Due to the way the seals are design the higher the pressure the tighter they seal as the lips are pressed against the shaft. It when vacuum is applied that they can leak easier the higher the vacuum as the lips are pulled away from the shaft. This is why it is wise to do both tests. The with your test jig is that wood is porous; therefore, you can not do the static pressure and vacuum tests which are percentage of loss tests over time. Usually express as PSI loss.
To do a static vacuum check, I do have a manual vacuum pump. My hand hurts just thinking about how many times I'd have to squeeze it to get a good vacuum on a crankcase. I'd also need to make steel flanges to replace my leaky, wooden ones.
Bonus Funny Story: A technician at work needed to check condenser vacuum. He checked out a U-tube manometer for the test. When he hooked it up, the condenser sucked the contents of the manometer right into the condenser. I think he still hasn't lived that down.
If I only had this one engine to do and if I had 100% confidence that replacing a seal will always result in a seal that doesn't leak, I'd just replace them and be done with it. I've already spent more on test equipment fabrication that two seals cost. And multi-hours of labor.
#10

FuzzyDriver
FuzzyDriver
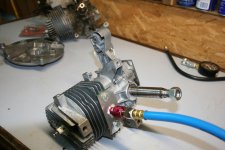
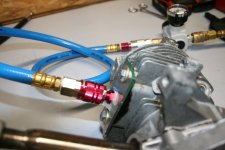
I spent the last couple days on-and-off making test flanges out of steel. They work great and don't leak like the wooden ones I whipped up. This test equipment buildup should make leak checking go super-fast in the future. I duplicated my previous check to verify it all works well with no leaks. Anybody out there want to buy some slightly-used wooden flanges, heh heh?


#11

StarTech
StarTech
Now you got something to use that works. Good Job.
Just a suggestion though. On the adapter plug use some sealant as I see a slight possible leak there. Considering the metal thickness probably some blue Loctite to help seal the threading. Of course what I see may just be normal suds too.
Just a suggestion though. On the adapter plug use some sealant as I see a slight possible leak there. Considering the metal thickness probably some blue Loctite to help seal the threading. Of course what I see may just be normal suds too.
#12

FuzzyDriver
For anyone interested, I cut the flanges from a knife-blade blank, annealed 1075 steel 1/8" thick.
I use blue and red Loctite sometimes, but never as a sealant. Have you had success with that usage?
FuzzyDriver
Yeah, those are just suds from the soapy-water spray, there's no leak on this iteration. I tapped the plate for 1/4-NPT, but the plate is way too thin to get a good seal by itself. I tried an O-ring/washer combination and that leaked to the tune of a 2 inch bubble every 10 seconds or so. Not much, but my OCD kicked in. Then I went with pipe sealant, but the thinness left that leaking too. Finally I went after it with Teflon tape. Ten layers later the leak disappeared. What a pain that was.Now you got something to use that works. Good Job.
Just a suggestion though. On the adapter plug use some sealant as I see a slight possible leak there. Considering the metal thickness probably some blue Loctite to help seal the threading. Of course what I see may just be normal suds too.
For anyone interested, I cut the flanges from a knife-blade blank, annealed 1075 steel 1/8" thick.
I use blue and red Loctite sometimes, but never as a sealant. Have you had success with that usage?
#13

StarTech
When tapping thin stuff just don't all the way with the taps as they are tapered. By going at shallower depth it makes a tighter fit. On that thinner piece of you might could have gone with the 1/4 BSP threads which little smaller diameter and is one TPI off. Now I don't a 1/4 BSP tap at hand but I do know the 1/8 BSP is a tighter fit here.
StarTech
Yes I have on my air line couplers and plugs but I never use the red stuff. I learned my lesson on that one. Cat had me apply red Loctite on a pressure pump valve caps. The stuff lock so quickly I couldn't even get the caps on fully install before it setup. I tried about everything including heat which I was afraid would melt the plastic check valves which it did to get the caps back off. I round off the hex and I had remake the hex just to get the caps off. Now I just use the blue Loctite.Yeah, those are just suds from the soapy-water spray, there's no leak on this iteration. I tapped the plate for 1/4-NPT, but the plate is way too thin to get a good seal by itself. I tried an O-ring/washer combination and that leaked to the tune of a 2 inch bubble every 10 seconds or so. Not much, but my OCD kicked in. Then I went with pipe sealant, but the thinness left that leaking too. Finally I went after it with Teflon tape. Ten layers later the leak disappeared. What a pain that was.
For anyone interested, I cut the flanges from a knife-blade blank, annealed 1075 steel 1/8" thick.
I use blue and red Loctite sometimes, but never as a sealant. Have you had success with that usage?
When tapping thin stuff just don't all the way with the taps as they are tapered. By going at shallower depth it makes a tighter fit. On that thinner piece of you might could have gone with the 1/4 BSP threads which little smaller diameter and is one TPI off. Now I don't a 1/4 BSP tap at hand but I do know the 1/8 BSP is a tighter fit here.
#14

FuzzyDriver
FuzzyDriver
Since it's tapered, at first I only drove down about half way. At that, I could barely get it started. I went after it some more - too enthusiastically - and when I tried it again it went all the way and didn't tighten until it hit the hex part. Which leaked, as I related. I wasn't about to make another flange so that's when the stop-the-leak saga began.
#15

StarTech
StarTech
If you do this enough you will learn to sneak up on things like this in the future. When I resizing or making a bushing it might me quite a few trial fits to get where I need it to be. I just made a bushing for a Nikki two barrel carburetor used on a JD Z950R engine. I still thinking about how a choke shaft would wear completely in two which did a lot damage to the carburetor thru hole. So wear that I had resize a 1/8" Sch 80 brass pipe that I used for making the bushing.Since it's tapered, at first I only drove down about half way. At that, I could barely get it started. I went after it some more - too enthusiastically - and when I tried it again it went all the way and didn't tighten until it hit the hex part. Which leaked, as I related. I wasn't about to make another flange so that's when the stop-the-leak saga began.
#16

FuzzyDriver
FuzzyDriver
Wow, that seems like a strange failure. I'm not familiar with that kind of carburetor. By "choke shaft" are you talking about the shaft that the choke plate is attached to? Is the housing plastic?
