You are using an out of date browser. It may not display this or other websites correctly.
You should upgrade or use an alternative browser.
You should upgrade or use an alternative browser.
Export thread
B&S Valve Adjustment Hiccup (Murphy's law & not a pro)
#1

oldlawnguy


oldlawnguy
2009 Craftsman model 917.289250 with 24HP B&S 445677-1188-B1 OHV Twin engine.
180 hrs on it and the past few seasons was beginning to hard start (8-10 secs) before turnover.
When measuring 1/4" backoff from TDC on compression stroke-- a 1/4" wooden dowel sliver (~1/2") split diagonally and broke off.
Will the wooden piece incinerate and exit via exhaust? (pictures attached)
After doing this I pulled the blower housing and noticed that both ignition coils have ~1/8 gap and the magnet has rust build up (needs a good wire brushing).
Can you please confirm both coils should have traditional credit card gap height?
I think this may be the bigger contributor to the hard cold start as the 1st valve set was between .006/007 and spec is .004/.006. I suspect the other valve set may be a little more out of spec, but very surprised both coils had such a large gap and it would turn over eventually.
Next time I will use a screwdriver to measure (lesson learned). Was going to use wood dowel that I would mark with 1/4' markings after I tested it.
Thanks
Attachments
#2

StarTech
StarTech
Ignition gapping I use a standard business card or a repair tag stock.
What you just had to happen is why I don't use that method of adjusting the valves I just use the old method of adjusting each individual valve when they are closed and the opposite valve is fully open. THe first it happen I had to pull the head and get the broken dowel out of the cylinder.
What you just had to happen is why I don't use that method of adjusting the valves I just use the old method of adjusting each individual valve when they are closed and the opposite valve is fully open. THe first it happen I had to pull the head and get the broken dowel out of the cylinder.
#3
B
bertsmobile1
B
bertsmobile1
NO
So it is off with the head
One of those bore-O-scopes with a grabber on the end might be able to retrieve it but a head gasket would be cheaper .
So it is off with the head
One of those bore-O-scopes with a grabber on the end might be able to retrieve it but a head gasket would be cheaper .
#4
oldlawnguy
")
oldlawnguy
Thanks Star, wish I had pulled the blower housing 1st instead of being a bonehead!Ignition gapping I use a standard business card or a repair tag stock.
What you just had to happen is why I don't use that method of adjusting the valves I just use the old method of adjusting each individual valve when they are closed and the opposite valve is fully open. THe first it happen I had to pull the head and get the broken dowel out of the cylinder.
#5
oldlawnguy
If I go the head gasket route, will I need any special tools to compress the piston rings of can I shimmy back on? (Never mind I answered my own question by looking at the exploded engine diagram)
After 2nd look I guess my question stands - do I need any special tools to shimmy head back onto cylinder? Gasket is about $24.
What are the torque specs for head bolts?
Thanks
oldlawnguy
Thanks Bertsmobile1, you have helped me out in the past! You think flooding the cylinder with gas might get it to float to grab? Trying to think of some clever way to grab it, while I have the engine head horizontal.NO
So it is off with the head
One of those bore-O-scopes with a grabber on the end might be able to retrieve it but a head gasket would be cheaper .
If I go the head gasket route, will I need any special tools to compress the piston rings of can I shimmy back on? (Never mind I answered my own question by looking at the exploded engine diagram)
After 2nd look I guess my question stands - do I need any special tools to shimmy head back onto cylinder? Gasket is about $24.
What are the torque specs for head bolts?
Thanks
#6
T
Tinkerer200
T
Tinkerer200
"When measuring 1/4" backoff from TDC on compression stroke-- a 1/4" wooden dowel sliver (~1/2") split diagonally and broke off."
Well either you are using a drastically wrong method or not explaining correctly. From reading your post, I suggest you take it to someone with some experience. I can not understand two of you breaking a 1/4" wooden dowel trying to find TDC then the piston 1/4" down PAST TDC of compression stroke.
I can send you a Service Manual for the engine IF you like, address below, put in proper format and remind me what you want.
Walt Conner
wconner5 at frontier dot com
#7
oldlawnguy
oldlawnguy
Thanks Bertsmobile1, you have helped me out in the past! You think flooding the cylinder with gas might get it to float to grab? Trying to think of some clever way to grab it, while I have the engine head horizontal.
If I go the head gasket route, will I need any special tools to compress the piston rings of can I shimmy back on? (Never mind I answered my own question by looking at the exploded engine diagram)
"When measuring 1/4" backoff from TDC on compression stroke-- a 1/4" wooden dowel sliver (~1/2") split diagonally and broke off."
Well either you are using a drastically wrong method or not explaining correctly. From reading your post, I suggest you take it to someone with some experience. I can not understand two of you breaking a 1/4" wooden dowel trying to find TDC then the piston 1/4" down PAST TDC of compression stroke.
I can send you a Service Manual for the engine IF you like, address below, put in proper format and remind me what you want.
Walt Conner
wconner5 at frontier dot com
#8
oldlawnguy

oldlawnguy
@Tinkerer200
Attached is what if found on the B&S Website, maybe I did not explain well. I'll send you email as well. Thanks
Attached is what if found on the B&S Website, maybe I did not explain well. I'll send you email as well. Thanks
Attachments
#9
oldlawnguy
BTW your email address bounced, checked it twice. Thanks
oldlawnguy
@Tinker200@Tinkerer200
Attached is what if found on the B&S Website, maybe I did not explain well. I'll send you email as well. Thanks
BTW your email address bounced, checked it twice. Thanks
#10
oldlawnguy
Are you suggesting that the most foolproof way for a DIYer to adjust valves is to just do TDC of each valve independently regardless of the stroke: compression, power, exhaust, intake? I've done a lot of online reading, heck even the B&S website states 1/4" past TDC
oldlawnguy
Thanks Bertsmobile1, you have helped me out in the past! You think flooding the cylinder with gas might get it to float to grab? Trying to think of some clever way to grab it, while I have the engine head horizontal.
If I go the head gasket route, will I need any special tools to compress the piston rings of can I shimmy back on? (Never mind I answered my own question by looking at the exploded engine diagram)
After 2nd look I guess my question stands - do I need any special tools to shimmy head back onto cylinder? Gasket is about $24.
What are the torque specs for head bolts?
Tha
Thanks Star gave both coils a good wire brushing including blower magnet (very rusty & gap way off) set gap to business card.Ignition gapping I use a standard business card or a repair tag stock.
What you just had to happen is why I don't use that method of adjusting the valves I just use the old method of adjusting each individual valve when they are closed and the opposite valve is fully open. THe first it happen I had to pull the head and get the broken dowel out of the cylinder.
Are you suggesting that the most foolproof way for a DIYer to adjust valves is to just do TDC of each valve independently regardless of the stroke: compression, power, exhaust, intake? I've done a lot of online reading, heck even the B&S website states 1/4" past TDC
#11
StarTech
StarTech
I know what Briggs say to do but I am old school. So I just rotate the engine in normal direction until say the cylinder I am adjusting exhaust valve is fully open and the intake is fully closed then adjust the intake and vica versa. When two cylinder I each cylinder the same way. Of course I am not pushed for time as some are. This is I learn to do V-8's before hydraulic lifters; except, on them you could several valves at one time. Just had to pay attention the rocker was exhaust or intake.
#12
oldlawnguy
I ordered b&s head gasket, valve cover gaskets, intake and exhaust gaskets for $22, got a $20 online discount
If I cannot get wood dowel removed-- Looks like 5 head bolts, intake & outtake screws & loosening bracket control (choke-a-matic) is all holding her in place.
1. Is there an ideal stroke position for valves to be in when removing head?
2. What are the head bolt torque specs (cannot find for my engine) Have seen 220lbs on b&s 110000 series
3. What are the valve cover torque specs? Have seen 55lbs on b&s 110000 series
Would love to get the fastener torque specs for 440000 series, but don't have pro access as a DIYer.
I know rods (steel, aluminum cannot be mixed) up but any other proven methods to use? You successfully guided me through a complete 46cc chainsaw rebuild so I ready to do the work.
Thanks
oldlawnguy
OK bertsmobile I got a decent bore-o-scope $100 US and did a 350 view of piston and no wood dowel seen. Suspect she may be up by cylinder head (above spark plug hole). The gizmo has a little mirror that I'll try next to see if I can pick up in scope.NO
So it is off with the head
One of those bore-O-scopes with a grabber on the end might be able to retrieve it but a head gasket would be cheaper .
I ordered b&s head gasket, valve cover gaskets, intake and exhaust gaskets for $22, got a $20 online discount
If I cannot get wood dowel removed-- Looks like 5 head bolts, intake & outtake screws & loosening bracket control (choke-a-matic) is all holding her in place.
1. Is there an ideal stroke position for valves to be in when removing head?
2. What are the head bolt torque specs (cannot find for my engine) Have seen 220lbs on b&s 110000 series
3. What are the valve cover torque specs? Have seen 55lbs on b&s 110000 series
Would love to get the fastener torque specs for 440000 series, but don't have pro access as a DIYer.
I know rods (steel, aluminum cannot be mixed) up but any other proven methods to use? You successfully guided me through a complete 46cc chainsaw rebuild so I ready to do the work.
Thanks
#13
oldlawnguy
Thanks again
oldlawnguy
OK Star old school is fine by me especially if you have done many, many, many times. If the spec is .004/.006 for both intake and exhaust (44000 series spec) would you set the adjustment to .005?I know what Briggs say to do but I am old school. So I just rotate the engine in normal direction until say the cylinder I am adjusting exhaust valve is fully open and the intake is fully closed then adjust the intake and vica versa. When two cylinder I each cylinder the same way. Of course I am not pushed for time as some are. This is I learn to do V-8's before hydraulic lifters; except, on them you could several valves at one time. Just had to pay attention the rocker was exhaust or intake.
Thanks again
#14
StarTech
StarTech
.005 is considered middle of the road adjustment. But on OHV engines I tend to with the lowest clearance by using a go/no go method; otherwords, if .004 is the lowest then if .004 slips in and a .005 don't I consider it set. Just remember to torque set screw or nut a little and recheck the adjustment as the threading will throw off the adjustment as you torque things down. Once satisfied torque the lock to spec.
If doing L-head (side valve) it is the other way around as you set more to the max gap spec.
This is done to condensate for wear.
If doing L-head (side valve) it is the other way around as you set more to the max gap spec.
This is done to condensate for wear.
#15
B
bertsmobile1
those numbers look about right just remember they are INCH pounds not Foot pounds so divide them by 12 to set your wrench unless you have a big $$$$ aircraft wrench marked in inch pounds
I like to do them at TDC compression stroke because there is no force on the rockers
OTOH if the head does not come off you can put the bolts back in loose remove the exhaust push rod then crank the engine and allow the piston pressure to pop the head
Remove the carb manifold at the head and leave the exhaust in place as the bolts have a habit of breaking
On some mowers that means removing some muffler to frame bolts first
B
bertsmobile1
I don't have the manual with me hereOK bertsmobile I got a decent bore-o-scope $100 US and did a 350 view of piston and no wood dowel seen. Suspect she may be up by cylinder head (above spark plug hole). The gizmo has a little mirror that I'll try next to see if I can pick up in scope.
I ordered b&s head gasket, valve cover gaskets, intake and exhaust gaskets for $22, got a $20 online discount
If I cannot get wood dowel removed-- Looks like 5 head bolts, intake & outtake screws & loosening bracket control (choke-a-matic) is all holding her in place.
1. Is there an ideal stroke position for valves to be in when removing head?
2. What are the head bolt torque specs (cannot find for my engine) Have seen 220lbs on b&s 110000 series
3. What are the valve cover torque specs? Have seen 55lbs on b&s 110000 series
Would love to get the fastener torque specs for 440000 series, but don't have pro access as a DIYer.
I know rods (steel, aluminum cannot be mixed) up but any other proven methods to use? You successfully guided me through a complete 46cc chainsaw rebuild so I ready to do the work.
Thanks
those numbers look about right just remember they are INCH pounds not Foot pounds so divide them by 12 to set your wrench unless you have a big $$$$ aircraft wrench marked in inch pounds
I like to do them at TDC compression stroke because there is no force on the rockers
OTOH if the head does not come off you can put the bolts back in loose remove the exhaust push rod then crank the engine and allow the piston pressure to pop the head
Remove the carb manifold at the head and leave the exhaust in place as the bolts have a habit of breaking
On some mowers that means removing some muffler to frame bolts first
#16
StarTech
Intake manifold. Torque screws to 80 in. lbs. .
Cylinder shield > a. Torque 1/4-20 screw to 80 in. lbs. b. Torque #10-24 screw to 45 in. lbs.
Rocker adjustment > Torque jam nut and adjusting screw to 60 in. lbs.
Rocker cover > Torque screws to 100 in. lbs.
Exhaust manifold. > Torque screws or nuts to 140 in. lbs.
StarTech
| Head Torque | 300 lb/in (34.0 Nm) |
Cylinder shield > a. Torque 1/4-20 screw to 80 in. lbs. b. Torque #10-24 screw to 45 in. lbs.
Rocker adjustment > Torque jam nut and adjusting screw to 60 in. lbs.
Rocker cover > Torque screws to 100 in. lbs.
Exhaust manifold. > Torque screws or nuts to 140 in. lbs.
#17
oldlawnguy
I have a 1/4 torque wrench in inch lbs. and a 3/8 in ft lbs.
As a retired engineer (who tinkers and does bonehead 1st time moves) I see your point with compression TDC with both valves closed.
Do you also do the 1/4" piston move down from TDC to compensate for lobe?
Thanks again bertsmobile
oldlawnguy
Yeah I already tested the intake & exhaust manifold bolts and they moved easily. Will use anti seize for ones I loosen and yes exhaust should just lift right out of muffler while attached to head.I don't have the manual with me here
those numbers look about right just remember they are INCH pounds not Foot pounds so divide them by 12 to set your wrench unless you have a big $$$$ aircraft wrench marked in inch pounds
I like to do them at TDC compression stroke because there is no force on the rockers
OTOH if the head does not come off you can put the bolts back in loose remove the exhaust push rod then crank the engine and allow the piston pressure to pop the head
Remove the carb manifold at the head and leave the exhaust in place as the bolts have a habit of breaking
On some mowers that means removing some muffler to frame bolts first
I have a 1/4 torque wrench in inch lbs. and a 3/8 in ft lbs.
As a retired engineer (who tinkers and does bonehead 1st time moves) I see your point with compression TDC with both valves closed.
Do you also do the 1/4" piston move down from TDC to compensate for lobe?
Thanks again bertsmobile
#18
oldlawnguy
I have a 1/4 inch torque wrench that goes up to 200 in lbs. which will cover all of the above except head bolts.
Will use the 3/8 torque wrench in ft lbs and set it to 25 ft lbs (300 in lbs / 12) = 25 ft lbs.
oldlawnguy
Thanks StarTech for all the fastener torque specsIntake manifold. Torque screws to 80 in. lbs. .
Head Torque 300 lb/in (34.0 Nm)
Cylinder shield > a. Torque 1/4-20 screw to 80 in. lbs. b. Torque #10-24 screw to 45 in. lbs.
Rocker adjustment > Torque jam nut and adjusting screw to 60 in. lbs.
Rocker cover > Torque screws to 100 in. lbs.
Exhaust manifold. > Torque screws or nuts to 140 in. lbs.
I have a 1/4 inch torque wrench that goes up to 200 in lbs. which will cover all of the above except head bolts.
Will use the 3/8 torque wrench in ft lbs and set it to 25 ft lbs (300 in lbs / 12) = 25 ft lbs.
#19
S
slomo
S
slomo
If you have one of those that you have to crank the handle to set the torque value, remember to set it back to 0 when you are done. If you leave it on say 50 ft lbs for example, it will throw your wrench out of calibration.
Best to get one of those old school beam style.

Best to get one of those old school beam style.
#20
StarTech
StarTech
Do the head torque in three steps per torquing pattern. 1/3, 2/3, and final torque to prevent head warpage.Thanks StarTech for all the fastener torque specs
I have a 1/4 inch torque wrench that goes up to 200 in lbs. which will cover all of the above except head bolts.
Will use the 3/8 torque wrench in ft lbs and set it to 25 ft lbs (300 in lbs / 12) = 25 ft lbs.
#21
oldlawnguy
oldlawnguy
Thanks slomo, I have the the crank ones (must always return to 0) before next setting. Wished I had the old tools, made right just like old lawn equipment.If you have one of those that you have to crank the handle to set the torque value, remember to set it back to 0 when you are done. If you leave it on say 50 ft lbs for example, it will throw your wrench out of calibration.
Best to get one of those old school beam style.
View attachment 61312
#22
oldlawnguy
Should I do the 5th bolt after doing the 1st 4 in a criss cross pattern?
oldlawnguy
Star this engine head has 5 bolts (4 outside and 1 bolt inside rocker cover) I assume by pattern you mean top left, bottom right, top right, bottom left)Do the head torque in three steps per torquing pattern. 1/3, 2/3, and final torque to prevent head warpage.
Should I do the 5th bolt after doing the 1st 4 in a criss cross pattern?
#24
StarTech

StarTech
#26
oldlawnguy

oldlawnguy
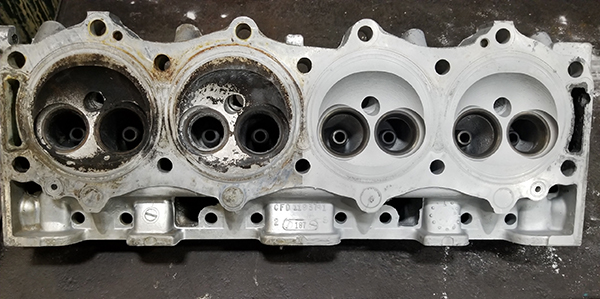
Update:
Looks like the wooden dowel bonehead move was a disguised debug tool.
Gasket looks wet on the right and it explains why plug was a little wet. Engine burns very little oil, but the visual explains what I could not see. At TDC compression valves were at .005 so they are within spec (.004-.006)
What are your proven methods for removing carbon build up from head and piston without damaging valves & piston? On reassembly should should I lubricate rods ends and head springs & rockers?
I have some work to do to clean up the top of head and valve cover as engine shipped from factory with gasket sealant (rather than gaskets on all but the head gasket). Also you can see metal on flywheel magnet after good wire brushing and resetting air gap.
Thanks
Attachments
#27
S
slomo
S
slomo
Plastic scraper or scotchbrite pad and some acetone, Diesel or naptha.
For the carbon, try C-4 or T-N-T LOL. That stuff is tenacious. Seafoam, naptha and acetone.....
For the carbon, try C-4 or T-N-T LOL. That stuff is tenacious. Seafoam, naptha and acetone.....
#28
oldlawnguy
Also The B&S 690971 gasket had note stating that if engine was not originally equipped with gaskets, to use silicone gasket sealant. Is this religion? as why would pros take all the labor time of cleaning up both the valve cover & head .vs using gaskets? Also if you are checking valves every few years, gaskets make more sense.
Same with the intake gasket, original was a red orange type, but I got the B&S gasket with the tradition 2 hole. Big deal or not?
oldlawnguy
Thanks slomo on it!Plastic scraper or scotchbrite pad and some acetone, Diesel or naptha.
For the carbon, try C-4 or T-N-T LOL. That stuff is tenacious. Seafoam, naptha and acetone.....
Also The B&S 690971 gasket had note stating that if engine was not originally equipped with gaskets, to use silicone gasket sealant. Is this religion? as why would pros take all the labor time of cleaning up both the valve cover & head .vs using gaskets? Also if you are checking valves every few years, gaskets make more sense.
Same with the intake gasket, original was a red orange type, but I got the B&S gasket with the tradition 2 hole. Big deal or not?
#29
S
slomo
S
slomo
I prefer paper gaskets and some spray tack sealant. Good beam style torque wrench is your friend.
I tend to shy away from amateur hour RTV. Seen a ton of it inside engines where guys have used an excessive amount. Gets into oil pump pick screens and such.
I tend to shy away from amateur hour RTV. Seen a ton of it inside engines where guys have used an excessive amount. Gets into oil pump pick screens and such.
#30
StarTech
StarTech
I know some think a 1/16 bead is too small but they realized much that stuff spreads. But using it on head gasket is one I wish I didn't see, what a mess to clean up..But it take all kinds like the fellow that duct tape on his mower blade.
#31
B
bertsmobile1
It is a cost cutting proceedure for original manufacture
Also can be used to check if a dealer has actually checked the valve lash
Petrol soaked scotchbrite will remove silicon sealant fairly quickly but you must block off the pushrod tube to prevent globs of it ending up in the sump
B
bertsmobile1
Yes use a gasketThanks slomo on it!
Also The B&S 690971 gasket had note stating that if engine was not originally equipped with gaskets, to use silicone gasket sealant. Is this religion? as why would pros take all the labor time of cleaning up both the valve cover & head .vs using gaskets? Also if you are checking valves every few years, gaskets make more sense.
Same with the intake gasket, original was a red orange type, but I got the B&S gasket with the tradition 2 hole. Big deal or not?
It is a cost cutting proceedure for original manufacture
Also can be used to check if a dealer has actually checked the valve lash
Petrol soaked scotchbrite will remove silicon sealant fairly quickly but you must block off the pushrod tube to prevent globs of it ending up in the sump
#32
oldlawnguy
oldlawnguy
I know some think a 1/16 bead is too small but they realized much that stuff spreads. But using it on head gasket is one I wish I didn't see, what a mess to clean up..But it take all kinds like the fellow that duct tape on his mower blade.
Yeah the factory bead spread pretty good and took a while to clean up with plastic tool and fingernailsI know some think a 1/16 bead is too small but they realized much that stuff spreads. But using it on head gasket is one I wish I didn't see, what a mess to clean up..But it take all kinds like the fellow that duct tape on his mower blade.
#33
oldlawnguy
Probably has a slow leak as well given plug looks a little oily as well. I now have a scope to look in side.
oldlawnguy
Thanks berstmobile1 for another tip. I think I may as well do the other head gasket as well.Yes use a gasket
It is a cost cutting proceedure for original manufacture
Also can be used to check if a dealer has actually checked the valve lash
Petrol soaked scotchbrite will remove silicon sealant fairly quickly but you must block off the pushrod tube to prevent globs of it ending up in the sump
Probably has a slow leak as well given plug looks a little oily as well. I now have a scope to look in side.
#34
oldlawnguy


oldlawnguy
You weren't kidding slomo... cylinder head took ~8 hrs, the piston took about 1.5 hrs and was much easier to clean using plastic scrapper and scothbrite pads. Started with Seafoam and then switched to acetone which seemed to do better on carbon. Is naphtha any better? Waiting on a seal-o-ring for intake that goes along with the intake gasket.Plastic scraper or scotchbrite pad and some acetone, Diesel or naptha.
For the carbon, try C-4 or T-N-T LOL. That stuff is tenacious. Seafoam, naptha and acetone.....
Attachments
#35
S
slomo
S
slomo
For carbon removal, that GM cylinder treatment is supposed to be the bom'. Window cleaner works good.
The key is to get some heat into the part. Like cleaning the oven at your house. Cook something. Remove the item. Immediately start cleaning the oven. All you need is a rag and dishsoap, maybe a green pad if it's really bad. No harsh chemicals. Works waaay better than cleaning a cold steel oven box deal.
Back in my Army days, we had a barrel of liquid freon in the motor pool. Don't know the exact R-22 like version. I do know, take a rag and dunk it in the barrel. Wipe anything you wanted. It came off like magic with no rubbing. Course the atmosphere probably got jacked up by using it. An amazing cleaner for sure. Never seen anything like it even today.
#36
S
slomo
Seafoam was originally made for 2 stroke engines. Acetone is a good one too. Naptha is Zippo Lighter fluid. An oil based quick evaporating fluid. It works good.
Normally you clean like with like. Meaning an oil stain you use an oil solvent type product.
S
slomo
Think solvents that evaporate fast clean better. That freon would disappear very fast. Course you have to reapply.....You weren't kidding slomo... cylinder head took ~8 hrs, the piston took about 1.5 hrs and was much easier to clean using plastic scrapper and scothbrite pads. Started with Seafoam and then switched to acetone which seemed to do better on carbon. Is naphtha any better? Waiting on a seal-o-ring for intake that goes along with the intake gasket.
Seafoam was originally made for 2 stroke engines. Acetone is a good one too. Naptha is Zippo Lighter fluid. An oil based quick evaporating fluid. It works good.
Normally you clean like with like. Meaning an oil stain you use an oil solvent type product.
#37
oldlawnguy
I'll give heat a try on the other head gasket project. Will let her sit on the black driveway while I have my morning coffee. It's in the 90s here in the U.S. Northeast, then rinse & repeat.
oldlawnguy
OK slomo, yeah know what you mean. I've used oven cleaner with those nasty fumes.For carbon removal, that GM cylinder treatment is supposed to be the bom'. Window cleaner works good.
The key is to get some heat into the part. Like cleaning the oven at your house. Cook something. Remove the item. Immediately start cleaning the oven. All you need is a rag and dishsoap, maybe a green pad if it's really bad. No harsh chemicals. Works waaay better than cleaning a cold steel oven box deal.
Back in my Army days, we had a barrel of liquid freon in the motor pool. Don't know the exact R-22 like version. I do know, take a rag and dunk it in the barrel. Wipe anything you wanted. It came off like magic with no rubbing. Course the atmosphere probably got jacked up by using it. An amazing cleaner for sure. Never seen anything like it even today.
I'll give heat a try on the other head gasket project. Will let her sit on the black driveway while I have my morning coffee. It's in the 90s here in the U.S. Northeast, then rinse & repeat.
#38
oldlawnguy
Window cleaner (ammonia) is interesting too. Thanks for the tips. I said to myself no way a shop guy is going to clean a head and piston for 8+ hours
oldlawnguy
Yeah I was also thinking paint thinner, but did not want to try something not recommended by the shop guys.Think solvents that evaporate fast clean better. That freon would disappear very fast. Course you have to reapply.....
Seafoam was originally made for 2 stroke engines. Acetone is a good one too. Naptha is Zippo Lighter fluid. An oil based quick evaporating fluid. It works good.
Normally you clean like with like. Meaning an oil stain you use an oil solvent type product.
Window cleaner (ammonia) is interesting too. Thanks for the tips. I said to myself no way a shop guy is going to clean a head and piston for 8+ hours
#39
S
slomo
Now you need to lap the head and block surfaces LOL. Some 220 grit, 400 and 800 wet/dry paper should do it. Piece of plate glass and get to rubbing. Wax on, wax off.
S
slomo
I'm not a shop guy. No way would I spend 8 hours as you did. Your parts came out great BTW.Yeah I was also thinking paint thinner, but did not want to try something not recommended by the shop guys.
Window cleaner (ammonia) is interesting too. Thanks for the tips. I said to myself no way a shop guy is going to clean a head and piston for 8+ hours
Now you need to lap the head and block surfaces LOL.
Some 220 grit, 400 and 800 wet/dry paper should do it. Piece of plate glass and get to rubbing. Wax on, wax off.
#40
B
bertsmobile1
As for which solvent , it is all about what radical is on each end .
B
bertsmobile1
Solvents that evaporate fast have small molecules which can penetrate crud easilyYeah I was also thinking paint thinner, but did not want to try something not recommended by the shop guys.
Window cleaner (ammonia) is interesting too. Thanks for the tips. I said to myself no way a shop guy is going to clean a head and piston for 8+ hours
As for which solvent , it is all about what radical is on each end .
#41
oldlawnguy
thanks, yeah got a bit **** on the clean-up, but want to do it correctly. To me your a "shop guy" while I'm just a grasshopper.
oldlawnguy
I'm not a shop guy. No way would I spend 8 hours as you did. Your parts came out great BTW.
Now you need to lap the head and block surfaces LOL.
thanks, yeah got a bit **** on the clean-up, but want to do it correctly. To me your a "shop guy" while I'm just a grasshopper.
#42
S
slomo
S
slomo
You learned the proper life thing to do it correctly and to finish the task at hand. What did you sit in front of the TV polishing your head? Oh that came out wrong LOL. Cleaning your mower parts at least? LOL
#43
oldlawnguy
I'm plugging away in my garage and the Mrs. will not be happy if a chemistry experiment goes sideways and I win a Darwin Award . Big difference between "Pros" and DIY stiffs. Oiy!
oldlawnguy
bertsmobile1 your exactly who I was thinking...Solvents that evaporate fast have small molecules which can penetrate crud easily
As for which solvent , it is all about what radical is on each end .
I'm plugging away in my garage and the Mrs. will not be happy if a chemistry experiment goes sideways and I win a Darwin Award . Big difference between "Pros" and DIY stiffs.
Oiy!
#44
oldlawnguy
Yeah do it right, with you 100% I did it over 3 days... at times I was sitting on the garage bench trying to distract myself as I sang Time in a Bottle. My 1st 2 fingers went numb.
oldlawnguy
You learned the proper life thing to do it correctly and to finish the task at hand. What did you sit in front of the TV polishing your head? Oh that came out wrong LOL. Cleaning your mower parts at least? LOL
Yeah do it right, with you 100% I did it over 3 days... at times I was sitting on the garage bench trying to distract myself as I sang Time in a Bottle. My 1st 2 fingers went numb.
#45
B
bertsmobile1
This of course requires a lot of work arounds using chemistry that either does not do the job properly or has bad side effects
I have gone almost exclusively to soda blasting as I can not see any authority banning baking soda and as it is bufffering agent, doe not have any major environmental problems
B
bertsmobile1
Unfortunately because of the "darwin factor" mot of the products that actually work properly have either been removed from the market or go on a restricted list for specalized places like avaition or military use .bertsmobile1 your exactly who I was thinking...
I'm plugging away in my garage and the Mrs. will not be happy if a chemistry experiment goes sideways and I win a Darwin Award . Big difference between "Pros" and DIY stiffs.
This of course requires a lot of work arounds using chemistry that either does not do the job properly or has bad side effects
I have gone almost exclusively to soda blasting as I can not see any authority banning baking soda and as it is bufffering agent, doe not have any major environmental problems
#46
oldlawnguy
 www.enginebuildermag.com
oldlawnguy
Pros .vs Joes... Don't expect to see one of these under the tree this XMASUnfortunately because of the "darwin factor" mot of the products that actually work properly have either been removed from the market or go on a restricted list for specalized places like avaition or military use .
This of course requires a lot of work arounds using chemistry that either does not do the job properly or has bad side effects
I have gone almost exclusively to soda blasting as I can not see any authority banning baking soda and as it is bufffering agent, doe not have any major environmental problems
Cleaning Components with Baking Soda - Engine Builder Magazine
There are many different processes for cleaning parts and components before engines can be rebuilt, and engine builders use a variety of cleaning solutions for different reasons. However, the argument can be made that sodium bicarbonate blasting or soda blasting has numerous advantages.
www.enginebuildermag.com
#47
B
bertsmobile1
Bought a 20kg bag of agricultural soda , same chemistry but different grit shape & size
When I finish it I will buy another one of blasting soda which is a bit more expensive
As you don't reuse the soda I do it outdoors .
Soda is not a pollutant nor harmful to your health.
It takes about 2 years for the soda to wear through the air duster tube
B
bertsmobile1
You can make one with nothing more than a plastic bottle & a air duster which is what I didPros .vs Joes... Don't expect to see one of these under the tree this XMAS
Cleaning Components with Baking Soda - Engine Builder Magazine
There are many different processes for cleaning parts and components before engines can be rebuilt, and engine builders use a variety of cleaning solutions for different reasons. However, the argument can be made that sodium bicarbonate blasting or soda blasting has numerous advantages.
Bought a 20kg bag of agricultural soda , same chemistry but different grit shape & size
When I finish it I will buy another one of blasting soda which is a bit more expensive
As you don't reuse the soda I do it outdoors .
Soda is not a pollutant nor harmful to your health.
It takes about 2 years for the soda to wear through the air duster tube
#48
oldlawnguy
Big thank you to StarTech, berstmobile1 and slomo for all the tips, spec settings and help.
Now going to do the other head.
oldlawnguy
OK fellas, put her all back together today & checked the torque settings (twice). I did end up adjusting the valve lash both intake/out could not take .006, .005 pretty tight and .004 with resistance. Started right up.
Big thank you to StarTech, berstmobile1 and slomo for all the tips, spec settings and help.
Now going to do the other head.
#49
S
slomo
S
slomo
Woo hoo, glad to hear she's alive. Nice job sir.OK fellas, put her all back together today & checked the torque settings (twice). I did end up adjusting the valve lash both intake/out could not take .006, .005 pretty tight and .004 with resistance. Started right up.
Big thank you to StarTech, berstmobile1 and slomo for all the tips, spec settings and help.
Now going to do the other head.
#50
oldlawnguy


oldlawnguy
Finished the other head today and fired it up. Was able to clean head in 2/3rds of the time. Plastic blade scrapers help pick off the big stufff, but scothbright pads, acetone and time is all you need.OK fellas, put her all back together today & checked the torque settings (twice). I did end up adjusting the valve lash both intake/out could not take .006, .005 pretty tight and .004 with resistance. Started right up.
Big thank you to StarTech, berstmobile1 and slomo for all the tips, spec settings and help.
Now going to do the other head.
Attachments
#51
oldlawnguy
I ran her the rest of the summer for another 30 hrs before winter.
Scoped both cylinders-- #1 had oil deposits on piston and #2 was clean (pictures attached). Once on startup she gave some blue smoke, but it cleared quickly during 10 uses before end of season.
I'm thinking maybe valve stem seals on #1 head? Head kit part number 597562 ($177.49 US) includes all the giblets for a new head.
Was reading the B&S service manual and I think it says something about replacing heads after so many hours, .vs just rebuilding the head which warps over time?
What you guys think?
Thanks


oldlawnguy
Update fellas:Finished the other head today and fired it up. Was able to clean head in 2/3rds of the time. Plastic blade scrapers help pick off the big stufff, but scothbright pads, acetone and time is all you need.
I ran her the rest of the summer for another 30 hrs before winter.
Scoped both cylinders-- #1 had oil deposits on piston and #2 was clean (pictures attached). Once on startup she gave some blue smoke, but it cleared quickly during 10 uses before end of season.
I'm thinking maybe valve stem seals on #1 head? Head kit part number 597562 ($177.49 US) includes all the giblets for a new head.
Was reading the B&S service manual and I think it says something about replacing heads after so many hours, .vs just rebuilding the head which warps over time?
What you guys think?
Thanks
Attachments
#52
S
slomo
S
slomo
More like rings and or general bore condition. If you see oil, it's getting past the rings.
#53
oldlawnguy
Given the pictures I posted before/after when doing the head gasket replacements? I was reading that blue smoke on cold startup that clears could also be from leaking valve seals. The mower gets through the season without having to add oil.
Wondering what's worth doing or just monitor it.
Thanks!
oldlawnguy
I've thought of that too, but then wouldn't the other cylinder have oil too?More like rings and or general bore condition. If you see oil, it's getting past the rings.
Given the pictures I posted before/after when doing the head gasket replacements? I was reading that blue smoke on cold startup that clears could also be from leaking valve seals. The mower gets through the season without having to add oil.
Wondering what's worth doing or just monitor it.
Thanks!
#54
O
OldDiyer
O
OldDiyer
Just my 2 cents worth, I am not a lawn equipment master tech for sure but had an auto repair shop for 35 years plus. If this were me, I believe by what you are seeing if it was mine, I would just keep checking oil if it isn't smoking all the time and just a bit at start up let it be unless it starts acting up all the time. Why spend a crap load of money and time if it isn't needed at this time.
#55
oldlawnguy
I don't want to fix it if it ain't broke. I don't mind tinkering with it, but as you said watching it until it starts acting up may be best for an old DIY guy like myself. I learn a ton on this website from folks like yourself.
Thanks!
oldlawnguy
Thanks for the tip! Can't hold a candle with a combustion engine pro.Just my 2 cents worth, I am not a lawn equipment master tech for sure but had an auto repair shop for 35 years plus. If this were me, I believe by what you are seeing if it was mine, I would just keep checking oil if it isn't smoking all the time and just a bit at start up let it be unless it starts acting up all the time. Why spend a crap load of money and time if it isn't needed at this time.
I don't want to fix it if it ain't broke. I don't mind tinkering with it, but as you said watching it until it starts acting up may be best for an old DIY guy like myself. I learn a ton on this website from folks like yourself.
Thanks!
#57
oldlawnguy
Thanks!
oldlawnguy
Yeah been changing the oil/filter every season with 2 qts of synthetic and yet have had to add any. Maybe I'm being **** and/or looking for something to tinker with. Probably should find something else...Well if it doesn't use ANY oil, leave it alone. I agree with the others above.
Thanks!
#58
B
bertsmobile1
Very common to have one cylinder very oily & the other dry
On a lot of vintage V-Twin motorcycled you have to put a drip feed into the crank case between the cylinders to get oil splashed up the bore in the trailing cylinder
B
bertsmobile1
The bulk of the oil that is in a cylinder comes from splash not the oil pumpI've thought of that too, but then wouldn't the other cylinder have oil too?
Given the pictures I posted before/after when doing the head gasket replacements? I was reading that blue smoke on cold startup that clears could also be from leaking valve seals. The mower gets through the season without having to add oil.
Wondering what's worth doing or just monitor it.
Thanks!
Very common to have one cylinder very oily & the other dry
On a lot of vintage V-Twin motorcycled you have to put a drip feed into the crank case between the cylinders to get oil splashed up the bore in the trailing cylinder
#59
oldlawnguy
After doing both head gaskets, was surprised how dry one was .vs the other.
oldlawnguy
Ahhhh thanks for the insight did not know that it's common.The bulk of the oil that is in a cylinder comes from splash not the oil pump
Very common to have one cylinder very oily & the other dry
On a lot of vintage V-Twin motorcycled you have to put a drip feed into the crank case between the cylinders to get oil splashed up the bore in the trailing cylinder
After doing both head gaskets, was surprised how dry one was .vs the other.