Snapper Pro Zero Turn Mower

hogan36

Member
Joined
Aug 20, 2017
Threads
4
Messages
12
Hello everyone,


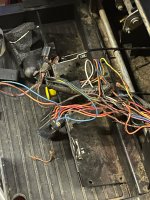
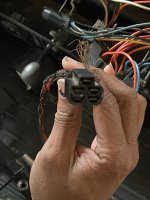
I have a Snapper Mid Mount Z-Rider Zero Turning Hydro Drive Series 3 Zero Turn Riding Mower with a 48 inch cutting deck and 19.0 HP Kawasaki Engine. I've been searching for the Wire Harness (Part Number 7074795YP) for this and hasn't had any luck on finding it. Does anyone have a used/new Wire Harness (must be the EXACT part number I'm looking for) that you would like to get rid of?
 

bertsmobile1

Lawn Royalty
Joined
Nov 29, 2014
Threads
64
Messages
24,705
Why do you need it ?
Do you have the original ?
There is no loom that can not be made by a reasonable auto electrician or a better mower tech
Lots of techs here make up looms & sub looms because OEM parts can take forever to be delivered or are way too expensive .
 

hogan36

Member
Joined
Aug 20, 2017
Threads
4
Messages
12
Why do you need it ?
Do you have the original ?
There is no loom that can not be made by a reasonable auto electrician or a better mower tech
Lots of techs here make up looms & sub looms because OEM parts can take forever to be delivered or are way too expensive .
I need it because the wrong ignition switch was hooked up to it and caused the wires to shorten out and catch on fire.
 

slomo

Lawn Addict
Joined
Jul 14, 2019
Threads
76
Messages
4,713
Can you repair the wires with the same or larger gauge wire? Soldering and shrink wrapping as you go?

slomo
 

hogan36

Member
Joined
Aug 20, 2017
Threads
4
Messages
12
Can you repair the wires with the same or larger gauge wire? Soldering and shrink wrapping as you go?

slomo
I have no idea. I would like to send pictures to show you how bad they are messed up. I haven't took them off. Some of the wires are stuck together. This is not all of the wires in the photos.
 

Attachments

  • IMG_1875.jpg
    IMG_1875.jpg
    798.2 KB · Views: 16
  • IMG_1883.jpg
    IMG_1883.jpg
    621 KB · Views: 15

bertsmobile1

Lawn Royalty
Joined
Nov 29, 2014
Threads
64
Messages
24,705
Easy peasy.
All of those terminals look like std 1/ 4" Packard spades which will pull out of the housings with a thin screwdriver or ground down feeler gauge ( .050" works well )
Then it is just a case of replacing the burned wires one at a time .
A regular repair task for this little black duck .
I like to rewrap with spiral cable wrap then cover that with loom tape.
All of what you need should be available from most bigger auto stores
 

hogan36

Member
Joined
Aug 20, 2017
Threads
4
Messages
12
Easy peasy.
All of those terminals look like std 1/ 4" Packard spades which will pull out of the housings with a thin screwdriver or ground down feeler gauge ( .050" works well )
Then it is just a case of replacing the burned wires one at a time .
A regular repair task for this little black duck .
I like to rewrap with spiral cable wrap then cover that with loom tape.
All of what you need should be available from most bigger auto stores
Thank you! I guess I’ll give that a try.
 

bertsmobile1

Lawn Royalty
Joined
Nov 29, 2014
Threads
64
Messages
24,705
If you don't already have one you will need an uninsulated terminal crimper, not one of those presses out ones for insulated terminals
Buy an extra pack & practice a few times on a piece of scrap wire.
I have a really old one so have to do a bit of fiddleing to get a good crimp on both the bare wire & through the insulation into the wire.
It is also a good idea to slip a piece of heat shrink ( or two ) up the wire before you crimp, then slide it down over the crimp & shrink to give a little extra support to the wire.
Not uncommon to find a wire fatigued through right at the crimp that occasionally will break connection, drives techs mad trying to find these faults .
A while back Star did a reply that identified the various connections by name & number & I had hoped he would have chimmed in but the last time he posted he was taking a battering from the Texas snow storm.
 
Top