You are using an out of date browser. It may not display this or other websites correctly.
You should upgrade or use an alternative browser.
You should upgrade or use an alternative browser.
Export thread
CMM1200 - Upgraded to lithium ion - lots of power to spare!
#1
F
Filek

F
Filek
After 5 years of using the CMM 100 with its lead acid 24 volt 18Ah battery, I decided that it was time for an upgrade. After months of searching I decided on the Lithium ion (LiMn2O4/LiNiO2) used to power the electric car the Nissan Leaf. I considered both the NiCd and NiMh battery types, but could not find high enough capacity cells for a reasonable cost. It is not possible to charge either of those battery chemistries properly and safely in parallel, so building a pack out of multiple parallel cells wasn't an option either. One could build a parallel battery pack, and disassemble it to charge it one at a time, but that is not an option. The way the CMM1200 is designed.
So lithium ion it is. I am very familiar with the lithium batteries and their safety issues. Lithium ion batteries are very dangerous and you must be careful as fire and explosion are very real possibilities. I write this as both a warning to any who wish to do the same as I did and also to let people know that I understand the danger (if I don't write this I inevitably get angry replies about the danger I am putting myself in working with these batteries).
From the pictures you can see that the cells are about the size of a piece of paper, although a little thicker. You can see three posts that look like screw holes. These are the positive, negative, and monitor terminals of the battery and are not labeled in any way, so you must use a multimeter to figure it out. Then carefully pry the cells apart and then use a Dremel to cut the copper leads that are still connected, but not needed. You must be VERY careful not to touch both terminals at the same time with a piece of metal or pair of pliers etc., or sparks will fly! Once you have figured out the positive and negative poles, and have pried apart the cells that are in parallel, then solder them all back together in series, positive to negative, negative to positive etc., until you have the 6 cells together for a total of 25.2 volts fully charged.
Continued in the next post...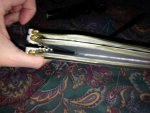

Attachments
#2
F
Filek
F
Filek
So now you have a 6 cell 30 Ah 24 volt lithium ion battery. Lithium ion batteries are very sensitive to overcharge and under charge to the point where you should monitor each individual cell while charging to ensure that any one cell doesn't get overcharged during the charging process. For example, the battery is fully charged at 25.2 volts, which is 4.2 volts per cell Maximum, but during discharge, one cell might get unbalanced and result in a slightly lower voltage. Then, when charged, that cell might be only 4.1 volts and the cell beside it would be 4.3 volts, the battery in total would still be 25.2 volts. This is a big problem and could ruin the battery or worse, start a fire. As a result, it is unwise to just plug in the old charger and wait for the voltage to rise to 25.2 and hope that all cells are at 4.2 volts.
So we have to built a balance wire that will be able to measure every cells voltage and make small adjustments during charging as necessary. Most lithium chargers available use a plug called the JST-XH plug. I purchased the female end of a 6-cell plug off of ebay and then using 7 - 18 guage wires built the cable. It is simple really: on one end is the female JST-XH, the other end of the cable is soldered to the battery. The order is important: with the female ends arrows pointing up and away from you, the far right end is negative and the far left is positive. Simply start at one end (say positive) and solder the other end of the wire to the positive terminal of the battery, then take the wire immediately next to the positive and it will be soldered to the positive of the NEXT CELL in the battery pack (or more accurately, it will be at the junction of the negative of the first cell and positive of the second cell, but just positive of second cell works exactly the same). Take the next wire and solder it to the next cell's positive etc., - sounds difficult but it isn't too bad.
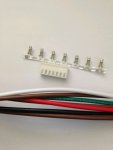
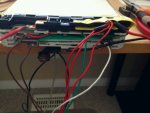
The second picture above shows the battery with the balance cables soldered on, you can also see that the top right is the positive for the battery, so it has the balance cable, the charging cable, and the third cable coming off the positive is to connect to the positive of the mower. The yellow tape is covering the positive electrode so I don't accidently place something on it and touch another electrode causing many sparks etc., (oops)
Now you have a balance cable soldered to the battery. Not only does this ensure that the battery will be charged correctly, but it also allows you to connect a capacity indicator to the cable while using the lawn mower if you desire.
Next you need to build and attach a charge cable that will do the bulk charging. I used an Jean's connector which many chargers use. This simply entails soldering a wire to the positive of the battery and another wire to the negative of the battery. Note the charge wire goes to the positive and negative of the battery, not each individual cell.
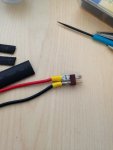
Note on the picture that the charge wire still needs shrink wrap to make it complete.
To be cont....
So we have to built a balance wire that will be able to measure every cells voltage and make small adjustments during charging as necessary. Most lithium chargers available use a plug called the JST-XH plug. I purchased the female end of a 6-cell plug off of ebay and then using 7 - 18 guage wires built the cable. It is simple really: on one end is the female JST-XH, the other end of the cable is soldered to the battery. The order is important: with the female ends arrows pointing up and away from you, the far right end is negative and the far left is positive. Simply start at one end (say positive) and solder the other end of the wire to the positive terminal of the battery, then take the wire immediately next to the positive and it will be soldered to the positive of the NEXT CELL in the battery pack (or more accurately, it will be at the junction of the negative of the first cell and positive of the second cell, but just positive of second cell works exactly the same). Take the next wire and solder it to the next cell's positive etc., - sounds difficult but it isn't too bad.


The second picture above shows the battery with the balance cables soldered on, you can also see that the top right is the positive for the battery, so it has the balance cable, the charging cable, and the third cable coming off the positive is to connect to the positive of the mower. The yellow tape is covering the positive electrode so I don't accidently place something on it and touch another electrode causing many sparks etc., (oops)
Now you have a balance cable soldered to the battery. Not only does this ensure that the battery will be charged correctly, but it also allows you to connect a capacity indicator to the cable while using the lawn mower if you desire.
Next you need to build and attach a charge cable that will do the bulk charging. I used an Jean's connector which many chargers use. This simply entails soldering a wire to the positive of the battery and another wire to the negative of the battery. Note the charge wire goes to the positive and negative of the battery, not each individual cell.

Note on the picture that the charge wire still needs shrink wrap to make it complete.
To be cont....
#3
F
Filek
F
Filek
Now that the battery is built: 24 volt 30Ah from several 8.4v 60Ah, it is time to install it.
First remove the original battery, and underneath it is very uneven so I cut a piece of plywood to size and installed it:
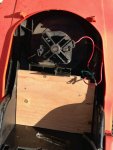
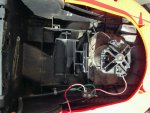
Then place the battery. There was room to spare, so I put two inch thick foam on top of the plywood, under the battery. Then I placed the battery and fixed it into place with the original black strap that helps the first battery, and added some zip ties for added strength.
The battery now needs to be connected to the motor. I wanted to keep the handle switch and breaker so I decided to just connect it to the positive and negative where the old battery was connected. I decided to use the same jeans connector to do this so that the battery could be easily disconnected. This turned out to be a good idea as I added the amp meter and coloumb counter, I just unplugged the battery for safety. So where the old battery was connected, I soldered a female jeans connecter and a male jeans onto the battery. See pictures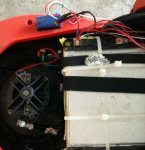
You can see in this picture, the battery is unplugged near the top of the pic, the other end, lower down, connects to the motor just before the reset able breaker. The breaker is hard to see, but it is just below the top left edge of the battery.
To be cont....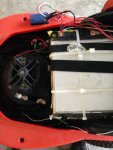
First remove the original battery, and underneath it is very uneven so I cut a piece of plywood to size and installed it:


Then place the battery. There was room to spare, so I put two inch thick foam on top of the plywood, under the battery. Then I placed the battery and fixed it into place with the original black strap that helps the first battery, and added some zip ties for added strength.
The battery now needs to be connected to the motor. I wanted to keep the handle switch and breaker so I decided to just connect it to the positive and negative where the old battery was connected. I decided to use the same jeans connector to do this so that the battery could be easily disconnected. This turned out to be a good idea as I added the amp meter and coloumb counter, I just unplugged the battery for safety. So where the old battery was connected, I soldered a female jeans connecter and a male jeans onto the battery. See pictures

You can see in this picture, the battery is unplugged near the top of the pic, the other end, lower down, connects to the motor just before the reset able breaker. The breaker is hard to see, but it is just below the top left edge of the battery.
To be cont....

#4
F
Filek
F
Filek
The battery is in, plugged into the motor, and ready to go. Just put the top back on and you are ready to mow.
However, it would be wise to at least add a volt meter to get ideas of where your charge status is so you don't over discharge while you are mowing. You could just plug in something similar to the balance cable you attached earlier, butI found it harder to look at while mowing.
The volt meter was easy, it was self powered, so just attached red to positive and black to negative and then place the volt meter in an easy to see place.
The amp meter was much harder as you need a shunt resistor and it's own power supply. So I built a small 12 volt battery out of old laptop battery cells for the power supply. The shunt resistor is a unit that goes in series with the current, after the motor, before the battery on the negative line. All of the current goes through the shunt resistor, and then you attach two lines, one at the beginning, one at the end of the shunt resistor. The amp meter measures the change in voltage across the shunt resistor and then converts it into an equivalent current.
The coulomb counter has the same thing. So I have two of these devices squished in after the motor. I don't have a picture of the coloumb counter, but you can see the amp meter's shunt resistor in this picture: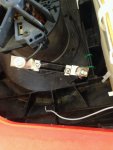
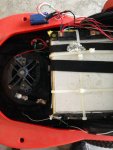
You can see on those pictures the shunt resistor just after the motor.
To be cont....
However, it would be wise to at least add a volt meter to get ideas of where your charge status is so you don't over discharge while you are mowing. You could just plug in something similar to the balance cable you attached earlier, butI found it harder to look at while mowing.
The volt meter was easy, it was self powered, so just attached red to positive and black to negative and then place the volt meter in an easy to see place.
The amp meter was much harder as you need a shunt resistor and it's own power supply. So I built a small 12 volt battery out of old laptop battery cells for the power supply. The shunt resistor is a unit that goes in series with the current, after the motor, before the battery on the negative line. All of the current goes through the shunt resistor, and then you attach two lines, one at the beginning, one at the end of the shunt resistor. The amp meter measures the change in voltage across the shunt resistor and then converts it into an equivalent current.
The coulomb counter has the same thing. So I have two of these devices squished in after the motor. I don't have a picture of the coloumb counter, but you can see the amp meter's shunt resistor in this picture:


You can see on those pictures the shunt resistor just after the motor.
To be cont....
#5
F
Filek


F
Filek
This project just never seems to be finished. I plan to add two temperature guages, one for the motor and the other for the battery and maybe a tachometer.
With th old battery, it just could not supply the current required to really push the motor or mow thick high grass. With this new battery, it can supply 120 amps continuously and 200 amps for a few seconds. I usually mow in the 14-16 amp range jumping to 25 amps often. I did hit 66 amps for a few seconds, and the other day in very thick as somewhat wet grass I hit a dip and so the blades essentially hit the ground, the motor stuttered and the amps shot up to 133. I quickly backed up as I am sure that the motor won't handle that for very long!
Some pics..
Also, I should point out that with the original battery I could just barely mow my lawn once with a full charge if it was not too long. Now I can mow it 5 times on a full charge!
Attachments
#7
F
Filek
Good question.
I am considering retiring it as it was doing double duty this summer mowing two lawns and the person who borrowed the mower tried to cut grass that was way too long and thick and wet. They succeeded in cutting the grass, melting the connectors that connected that battery to the fuse and the motor’s shaft is slightly bent causing the mower to vibrate.
I might take the battery out and re use it for a small trolling motor battery.
Clearly the original fuse in the mower is faulty because it should have stopped the mower long before the connectors melted. I have replaced with much beefier connectors and added two 100amp fuses (original should have been 40-50 amp)
So - yes, it still works, but probably not for long!
F
Filek
Is this still working?
Good question.
I am considering retiring it as it was doing double duty this summer mowing two lawns and the person who borrowed the mower tried to cut grass that was way too long and thick and wet. They succeeded in cutting the grass, melting the connectors that connected that battery to the fuse and the motor’s shaft is slightly bent causing the mower to vibrate.
I might take the battery out and re use it for a small trolling motor battery.
Clearly the original fuse in the mower is faulty because it should have stopped the mower long before the connectors melted. I have replaced with much beefier connectors and added two 100amp fuses (original should have been 40-50 amp)
So - yes, it still works, but probably not for long!
#8
V
videobruce
V
videobruce
You went thru a lot of time to devise this, BUT;
There is no way I would want all of those wires exposed, dangling all over the place. It's not safe, it's an accident waiting to happen.
This looks like some high school project done solely as an class project, not a finished, practical alternative to gel-cells to be used over & over.
There is no way I would want all of those wires exposed, dangling all over the place. It's not safe, it's an accident waiting to happen.
This looks like some high school project done solely as an class project, not a finished, practical alternative to gel-cells to be used over & over.
#9
F
Filek
Well then you don’t have to use it.
I consulted experts on how to do this safely. The wires are exposed because those pictures are from the unfinished mower, but people wanted to see it.
The wires are all put away neatly, it’s been used by my wife and most of my neighbours safely for over 5 years.
A gas lawnmower has the energy of a stick of dynamite - not scared to push that around?
A gas mower puts out the pollution of an average car driving 93 miles - a few wires don’t bother me.
Now that Home Depot sells all sorts of lithium powered lawn mowers, this whole thread and my mower are is a little absolute!
F
Filek
You went thru a lot of time to devise this, BUT;
There is no way I would want all of those wires exposed, dangling all over the place. It's not safe, it's an accident waiting to happen.
This looks like some high school project done solely as an class project, not a finished, practical alternative to gel-cells to be used over & over.
Well then you don’t have to use it.
I consulted experts on how to do this safely. The wires are exposed because those pictures are from the unfinished mower, but people wanted to see it.
The wires are all put away neatly, it’s been used by my wife and most of my neighbours safely for over 5 years.
A gas lawnmower has the energy of a stick of dynamite - not scared to push that around?
A gas mower puts out the pollution of an average car driving 93 miles - a few wires don’t bother me.
Now that Home Depot sells all sorts of lithium powered lawn mowers, this whole thread and my mower are is a little absolute!
#10
V
videobruce
V
videobruce
I have used a battery operated mower for 23 years, I'm on my 2nd. The power source was NOT the issue. I commented on what I saw. There was no mention of what you just posted that I saw AFA concealing all those wires so I wouldn't of known that.
#11

tom3
tom3
Thanks to the smut peddler for bringing this back up. Mods will probably axe that post pretty quick.
But I wonder how you charge those Li-ion battery packs without over charging? Pretty easy to destroy those.
But I wonder how you charge those Li-ion battery packs without over charging? Pretty easy to destroy those.
