Ariens Zoon 34 Model 915157 Engine Swap

YodaMan

Forum Newbie
Joined
Nov 12, 2020
Threads
1
Messages
2
Shout out to @mbunch907 who gave me the confidence to attack this Engine Swap. I’ve had this zoom 34 (615157) since 2012 that I purchased for $1,800, love the compact size, added a dual bagger for another $400 or so, but the HP was lacking, especially noticeable in the spring when the grass grows quickly and I can only get cuts in on weekends due to work. The Briggs and Stratton (Model 31A507 0133 G5) engine died after I ran it out of oil, get your chuckles in, miss calculated when I last changed oil and was ready to change that day but did not check oil levels. So, in frantic mode I started searching on-line for a replacement engine. My skill level in a garage setting I would rate as novice. I only found one posting by @mbunch907 that gave me the confidence to attack this project. I looked at the Kohler V-twin Courage motor 20HP same as his swap, but also had a message out to Briggs and Stratton for a drop-in replacement after they collected Model numbers of Platform and Engine. B&S connected me to OPD-Outdoor Power Direct who recommended the B&S 33S877-0019-G1 19HP Vertical Shaft Engine for $637 including delivery. I ordered the Engine Thursday night 7pm and the thing was at my house Saturday 3pm. Additional cost (not exact but close) for me, was a 3/8 16 tap with oil Walmart $7, Loctite-Blue, Home Depot $4, both Drive belts from O’Reilys $50, and a Quick drain hose (Drainzit) from Home Depot $19. Now to the Engine Swap steps.
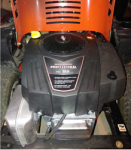
  • Removed Bagger and engine cover (Gave me additional room but not needed, I popped off the cup holder to get access to bolt)
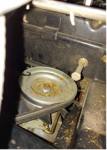
  • Loosen Deck Drive Belt and PTO Drive belt. I removed tensioning springs first which loosened both belts. Rear PTO tensioning spring below removed, see hook left side connects to bolt just above spindle
1606684766134.png
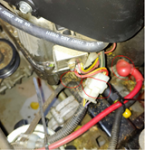
  • Disconnect Battery, Harness, Starter wire to starter, Grounding wire from battery and another black wire from harness on rear mounting bolt, circled in RED (Pic) below. Don’t loss the nut that holds it all together. Unplug PTO cable from the bottom.
1606684782297.png

  • Remove fuel Lines, keep raised and plug to prevent fuel spillage, I used some bolts press fit to plug lines. I also removed the Danger plate this gave me access to the PTO Tension spring. Also keep the fuel line highlighted in yellow, you will need to attach to new engine, be careful as I snapped the plastic barb it was inserted too.
1606684873013.png
  • Engine – The two bolts in rear will be the easiest by far. The front two was a knuckle buster and took the most time to get completely out. I bought a ratcheting wrench set after this project, would have save me some time and choice words to the design engineers ?. Keep engine bolts as new engine does not have any new ones.
  • Take the Bolt holding the Clutch assembly to engine spindle out. No need to take Clutch out it will rest between both rear drive motors.
1606684890681.png
  • Disconnect the Throttle cable, now you should be ready to pull engine out. Check for any mechanical connections before pulling engine
  • You can pull engine straight up out of Clutch assembly. Be careful not to lose the key on the shaft that connects to the Clutch assembly, will be needed for new engine
1606684903271.png
  • Clean-up time, you can get to places you normally don’t get to. I took this time to remove deck, remove spindle covers that had a bunch of packed grass from cutting. Greased what I believed needed greasing, sharpened blades, I had a couple extra days because I was waiting for Belts I ordered from Amazon, before finding equivalent belts (Gates 6944BR Deck belt, 6498BR PTO Belt) from O’Reilly’s.
1606684920233.png
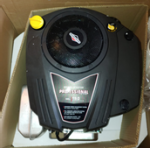
  • New Engine
1606685078557.png
  • While waiting for belts I took the time to Tap (3/8 16 Tap) the 4 mounting holes on new engine. My first time tapping but very easy, made sure I had tapping oil in hole while tapping. Also, you can see the key on the shaft I pulled from old engine. The mounting screws are self-tapping but it would be a nightmare to let them self-tap when you can barely get any leverage when screwing in.
1606685334061.png
  • New Engine Install - Get a helper if you can, I tried multiple times to get the keyed shaft to line up with the key slot on the clutch, after 10 minutes fumbling with the heavy motors I called my 10 yr. old daughter who lined my up in 15 secs. The engine slid right into the Clutch.
  • Assemble – Reverse everything you have done. 4 bolts, Belts in place I used Loctite on the bolts, Clutch Bolt, connect electrical, fuel lines, etc.
  • Throttle Cable – This gave a me some trouble. There is a screw in the throttle plate marks with the letter “R”, remove this and the adjustment is really easy from there.
  • Install the quick oil change hose before adding oil.
  • Add Oil, new engine does not have any oil.
  • No additional parts needed, a true plug and play. Engine cover fits with no issues. One thing noticed while running, Old vent sits in one place and does not spin, but the new vent on top actually spins while running, something new for me as I would always clear the top of the motors from leaves, but now that it spins, I don’t believe leaves will stay stuck on top anymore.
  • Old next to New - This baby sounds so much better with the 19hp engine in it. Ran it once to pick up leaves about an hour. Next Spring I should notice the difference cutting high grass, but then again now that I work from home I can get more cuts in.
  • I hope this can help the next person on the fence about doing an Engine Swap.
1606685365209.png1606685369384.png
 

Shannondalebreaux

Forum Newbie
Joined
Jun 3, 2021
Threads
0
Messages
1
Shout out to @mbunch907 who gave me the confidence to attack this Engine Swap. I’ve had this zoom 34 (615157) since 2012 that I purchased for $1,800, love the compact size, added a dual bagger for another $400 or so, but the HP was lacking, especially noticeable in the spring when the grass grows quickly and I can only get cuts in on weekends due to work. The Briggs and Stratton (Model 31A507 0133 G5) engine died after I ran it out of oil, get your chuckles in, miss calculated when I last changed oil and was ready to change that day but did not check oil levels. So, in frantic mode I started searching on-line for a replacement engine. My skill level in a garage setting I would rate as novice. I only found one posting by @mbunch907 that gave me the confidence to attack this project. I looked at the Kohler V-twin Courage motor 20HP same as his swap, but also had a message out to Briggs and Stratton for a drop-in replacement after they collected Model numbers of Platform and Engine. B&S connected me to OPD-Outdoor Power Direct who recommended the B&S 33S877-0019-G1 19HP Vertical Shaft Engine for $637 including delivery. I ordered the Engine Thursday night 7pm and the thing was at my house Saturday 3pm. Additional cost (not exact but close) for me, was a 3/8 16 tap with oil Walmart $7, Loctite-Blue, Home Depot $4, both Drive belts from O’Reilys $50, and a Quick drain hose (Drainzit) from Home Depot $19. Now to the Engine Swap steps.
  • Removed Bagger and engine cover (Gave me additional room but not needed, I popped off the cup holder to get access to bolt)
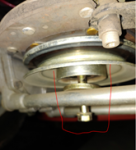
  • Loosen Deck Drive Belt and PTO Drive belt. I removed tensioning springs first which loosened both belts. Rear PTO tensioning spring below removed, see hook left side connects to bolt just above spindle
View attachment 54985
  • Disconnect Battery, Harness, Starter wire to starter, Grounding wire from battery and another black wire from harness on rear mounting bolt, circled in RED (Pic) below. Don’t loss the nut that holds it all together. Unplug PTO cable from the bottom.
View attachment 54986

  • Remove fuel Lines, keep raised and plug to prevent fuel spillage, I used some bolts press fit to plug lines. I also removed the Danger plate this gave me access to the PTO Tension spring. Also keep the fuel line highlighted in yellow, you will need to attach to new engine, be careful as I snapped the plastic barb it was inserted too.
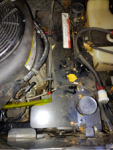
View attachment 54988
  • Engine – The two bolts in rear will be the easiest by far. The front two was a knuckle buster and took the most time to get completely out. I bought a ratcheting wrench set after this project, would have save me some time and choice words to the design engineers ?. Keep engine bolts as new engine does not have any new ones.
  • Take the Bolt holding the Clutch assembly to engine spindle out. No need to take Clutch out it will rest between both rear drive motors.
View attachment 54989
  • Disconnect the Throttle cable, now you should be ready to pull engine out. Check for any mechanical connections before pulling engine
  • You can pull engine straight up out of Clutch assembly. Be careful not to lose the key on the shaft that connects to the Clutch assembly, will be needed for new engine
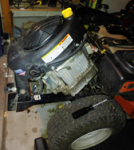
View attachment 54990
  • Clean-up time, you can get to places you normally don’t get to. I took this time to remove deck, remove spindle covers that had a bunch of packed grass from cutting. Greased what I believed needed greasing, sharpened blades, I had a couple extra days because I was waiting for Belts I ordered from Amazon, before finding equivalent belts (Gates 6944BR Deck belt, 6498BR PTO Belt) from O’Reilly’s.
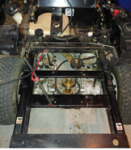
View attachment 54992
  • New Engine
View attachment 54995
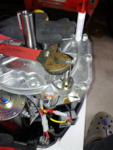
  • While waiting for belts I took the time to Tap (3/8 16 Tap) the 4 mounting holes on new engine. My first time tapping but very easy, made sure I had tapping oil in hole while tapping. Also, you can see the key on the shaft I pulled from old engine. The mounting screws are self-tapping but it would be a nightmare to let them self-tap when you can barely get any leverage when screwing in.
View attachment 54996
  • New Engine Install - Get a helper if you can, I tried multiple times to get the keyed shaft to line up with the key slot on the clutch, after 10 minutes fumbling with the heavy motors I called my 10 yr. old daughter who lined my up in 15 secs. The engine slid right into the Clutch.
  • Assemble – Reverse everything you have done. 4 bolts, Belts in place I used Loctite on the bolts, Clutch Bolt, connect electrical, fuel lines, etc.
  • Throttle Cable – This gave a me some trouble. There is a screw in the throttle plate marks with the letter “R”, remove this and the adjustment is really easy from there.
  • Install the quick oil change hose before adding oil.
  • Add Oil, new engine does not have any oil.
  • No additional parts needed, a true plug and play. Engine cover fits with no issues. One thing noticed while running, Old vent sits in one place and does not spin, but the new vent on top actually spins while running, something new for me as I would always clear the top of the motors from leaves, but now that it spins, I don’t believe leaves will stay stuck on top anymore.
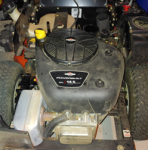
  • Old next to New - This baby sounds so much better with the 19hp engine in it. Ran it once to pick up leaves about an hour. Next Spring I should notice the difference cutting high grass, but then again now that I work from home I can get more cuts in.
  • I hope this can help the next person on the fence about doing an Engine Swap.
View attachment 54997View attachment 54998
Hello looks like I may be doing this swap as well I have same mower. Two days ago I was on a incline going into my shed to store my mower not sure if the oil levels were low already and it bring on a incline maybe shift the oil even lower but it made a very loud clank sound and the engine shut off and smoke came from the engine and oil was leaking so I am assuming it's done. It won't turn over. I may need some pointers.
 

Rivets

Lawn Royalty
Joined
Mar 11, 2012
Threads
55
Messages
14,681
Sounds like a job well done, but I suggest you do one more thing. Check and level the deck.
 

mbunch907

Forum Newbie
Joined
Sep 10, 2020
Threads
1
Messages
4
Glad my experience was able to lend a hand. Sorry I dont get onto the forum that much and didnt realize you had given me a shout out :) Thanks for that. Ironically, I am back to looking into another issue I have found after doing the engine swap. The new, more HP, motor really likes to turn over the stock narrow tires of the ariens 34. Especially in the wet summer we have had here in AK. I was looking at making some changes. The stock sized tires are 6.5 inches wide. Looking at the parts manual I believe I can upgrade them to the 8.5 inch tires with out much of a problem. I would have to change out the HUB too, but I believe this would work. The Part numbers I am looking at are 07100123 for the tires and 03958000 for the Hubs. Any chance, @YodaMan had the same issues with your tires leaving way more skid marks after the change out?
 
Top