Headlights for the Hustler Raptor?

C4Tom

Member
I work nights and sometimes don't get started cutting until nearly dark on my days off, is there a headlight option or reasonably priced alternative? I've been looking at a set of LED fog light style but not sure where's the best place to mount them or where and how to connect them to the mowers electrical system.

Any help/ideas would be appreciated.
 
After some exploring, I found a few threads covering this topic. Mods please delete this thread as it adds no value.

Thanks
 
Okay, I'll start my little write-up...

I own the 2016 Hustler Raptor 52" w/Kohler engine and got it delivered for just under $3k brand new including taxes.

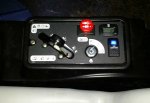
I removed the bolt holding the panel down, then measured the precut openings, 1st is the top hole (horizontal) at 24mm x 39mm and the 2nd (vertical) is 21mm x 39mm.

I ordered the hour meter for $23 shipped:
http://www.amazon.com/576179401-Genuine-OEM-Husqvarna-Hourmeter/dp/B00PKDR2WG

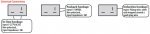
I was really curious about the pinout and found this on the interwebs:Hour Meter.jpg

I ordered 2 of these LEDs (4 total lights) for $6.85 shipped:
http://www.amazon.com/Super-Bright-Lights-Driving-Waterproof/dp/B00K12LM68

And this lighted switch for $8.19 shipped:
http://www.amazon.com/Support-Blue-Light-Toggle-Switch/dp/B00T7DR7FW

I know others have done the very same thing so I've just added a bit more information/detail to the process. Once the parts arrive I will grab some pics and get them posted. :smile:
 
Well, everything came in the mail today.

The hour meter install was a 5 minute easy peasy job.
-Popped the panel
-cut the vinyl opening with a box knife
-push in the hour meter til it clicked
-plug it in with the existing wires/push on connectors. Done.

I got the lights stuck to the front bar and had to go to the store for some stuff. I needed more electrical parts to do this job. I also had to do a whole lot of other jobs... since I'm on vacation and all. :confused2:

Oh well, I'll post again when I get the wiring done.
 
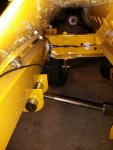
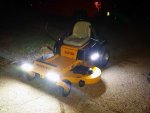
I finished the wiring tonight and gave it a drive, I am so happy. The lights are awesome!
20160525_044356.jpg

The switch is lighted and fits perfectly in the other factory precut hole.
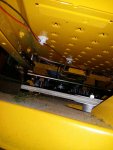
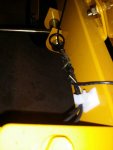
20160525_044408.jpg

Well, that's it. In case you are wondering, I tapped off the solenoid, the same side that has the fuse in wire coming off of it.
 
I like it!! Thinking the same thing on my unit. Any chance you can post photos of how you did the wiring? Just close up's of where you hid the wiring and how you hooked it.

Thanks,:thumbsup:
 
Cool project! I think I'll do sometime similar on my SD60.

One comment though... That second picture makes me nervous. I've have problems with those sticky-tape wire clamps before. I'm afraid with all the vibration, bouncing, and some heat that they'll let go and the wiring will fall into the deck belt. I'd recommend running them up along the frame rails and securing to the existing holes (you can see one in the pic on the left) with zip ties.
 
Back
Top