Toro Mower with Tecumseh carburetor leaking gas

jimzerg

Forum Newbie
Joined
Jun 8, 2020
Threads
1
Messages
5
Hello,

I have an old Toro lawnmower with a Tecumseh carburetor. Full disclosure - I am not very experienced with small engine repair. I had issues with it starting a few weeks ago and so I took it apart and cleaned it with carb cleaner and put it back together (video link below). I also fixed the pull cord which had broken. It ran well after that and fired right up. However, two weeks later, I put some gas into an empty tank and gas just starts running out the back of the carb where the filter is located. I have taken a video of my problem here:

I would like to save this mower but I'm wondering what I should do. I read something about a bad float needle but I'm not sure what to repair. Or maybe I should get a whole new carb? Is this the correct part if so? https://www.amazon.com/Tecumseh-640350-Carburetor/dp/B0074BMSGM

Anyway, thanks, would like to keep the mower going longer rather than give up on it. My exact Toro mower and the cleaning steps I followed on the same exact carb are in this video on Youtube by donyboy73:
. It appears I only bought some time but didn't fix my carb completely.

Side notes:
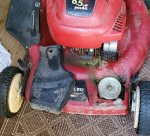
Another issue is that black plastic thing next to the wheel fell off as I banged the mower trying to unstick the carb needle (that didn't help). It appears to have been glued on. How to reattach or replace this part? Also does anyone know where to get filters for this carb?

Thanks again!
 

Rivets

Lawn Royalty
Joined
Mar 11, 2012
Threads
55
Messages
14,742
You will need to do two things to get it running again. First, you will to clean and rebuild the carb again, this time replacing the float needle and seat. Tecumseh part number 631021B. belo is the procedure I recommend. Second, check the oil level. I’m betting the the gas ran out the carb into the crankcase. If over filled, drain and refill. Any more questions post back with all model and serial numbers, engine and mower. Don’t know what black part you are talking about, include a picture.
Needle and seat replacement.
Remove the carb, and then remove the float bowl. Check the float bowl jet (which is the bowl screw) and make sure the jets both horizontal and vertical are clean and open. Tip the carb upside down and remove the float pin and float with needle attached. Look in the float needle passage and you should see the red float seat at the bottom of the passage. This is where a #5 crotchet hook would come in handy as you need to remove this seat. If you have no hook, but compressed air, you can blow through the fuel inlet and try to pop the seat out. Put your thumb over the passage to prevent the seat from flying who knows where. No air or hook try bending a stiff paper clip to dig the seat out.
I would either give the carb a good 24 hour soaking or have it ultrasonically cleaned at this time.
With the seat out clean the passage way with carb cleaner. Now you must find a drill bit slightly smaller than the passage way, to be used to press in the new seat. Apply a very, very small amount of a very light lube to the new seat. 3-1 oil or lighter, to help seat it better. Carefully insert the new seat in the passage way with the rings on the seat down toward the carb body. Slowly and carefully force the seat down with the back end of the drill bit. Once it is seated, check to see that it did not flip and the rings are up. Next check to make sure that the float does not have any liquid in it. If it does, replace. If everything looks correct, attach the new needle to the float and install with the float pin centered. It everything is correct, the float should seat level to the carb body, when looking at it upside down. If everything looks good reattach the float bowl, making sure that both the bowl gasket and the nut gasket seal properly. Reinstall on the engine and test unit. Remember to have patience and take your time. Good luck, but I don't think you'll need it.
PS: On the side of some Tecumseh carbs you will find a plastic cover. Under this cover will be an idle jet. Remove it and check to see that the jet is open both horizontally and vertically. You should be able to push the old float needle wire through the vertical opening.
 

jimzerg

Forum Newbie
Joined
Jun 8, 2020
Threads
1
Messages
5
Hi Rivets!

I'm not sure about the model number but it's exact same Toro mower as the one in the Youtube video here:
. If you can tell me where the model number might be, I can check. I got this second hand from a repair guy that basically was trying to offload it years ago since my old one had died.

I did check the oil. It is not overfilled, but right at the Add line. Smells a little bit like gas, but looks fresh still and I could top it or change it completely after I fix this leak.

I did change to synthetic oil and changed the spark plug a week ago when I cleaned the carburetor. Based on that part number you gave me, you think the seal is bad and that is why gas is leaking? When I looked at the float needle and that pin that holds it, that all looked okay to me when I cleaned it. I cleaned the fix jet and soaked that as well. I did notice a little corrosion on the bowl lip (that rests against that O-ring) but I just put cleaner and scrubbed it real good and did not replace the O-ring or anything else. Should I also replace that plastic float bit because I've read this can cause a leak also somehow?

I'm still trying to figure out why the gas is leaking out the back of this thing. In the video (around the 4 minute mark), the guy says that the O-ring needs to seal against "air leaks" but doesn't mention gas leaks. Just want to order and replace all the right parts and get it right the second time since my lawn is looking really crappy!

Thanks for your reply!
 

Rivets

Lawn Royalty
Joined
Mar 11, 2012
Threads
55
Messages
14,742
If you take off the red engine cover you’ll find a tag with the model and spec numbers. You might be able to tip it on its side and see the numbers, but don’t leave it sit long if the carb is down, will have gas all over the place. Looking at someone else’s video won’t help me, I go by what you say yours is doing.
 

bertsmobile1

Lawn Royalty
Joined
Nov 29, 2014
Threads
64
Messages
24,700
So let me get this right.You want to replace the float without checking if it had a leak in it because you read somewhere on the web that they CAN cause flooding ( yet to see one in 8 years of repairs )
But you did not replace the needle or seat because they "looked OK " to you again without testing them .
As a person who does this for a living, the needle & seats get replaced without a second thought whenever a carb is cleaned.
They are SERVICE REPLACEMENT PART as are all of the rubber and copper / alloy seals & washers that is why they are in the carb kit.

Following this you made no attempt to test the carb before refitting it and then are mystified by the fact it is still leaking .
If you took some time off from watching idiots on U-tube and Face Book and used your own brain to do some thinking it should have come to you that parts which ae supplied both in rebuild kit and as a stand alone part are the parts that require regular replacement.
Funny enough you buy needle & seat or needles , depending upon which one has the rubber on it as stand alone items.
In fact they are also sold in 10 & 20 packs.
That should have made you realize that needles & seats require regular replacement.

Most carb rebuild kits do not contain a float, but they all come with needles & seats.

Oh and you check the needle & seat by inverting the carb and checking the way the float sits
If it is parallel to the base then you blow through the fuel inlet.
If you can blow the needle off the seat or can blow through it at all it is stuffed .
On mowers with fuel pumps it is required to hold back 10 psi of air pressure.
 

jimzerg

Forum Newbie
Joined
Jun 8, 2020
Threads
1
Messages
5
I said in my original post that I am new to this. I didn't come here to get insulted about my lack of experience. That's why I'm asking the small engine experts on this forum. I am looking for a quick fix to get my mower working again and I did not buy a rebuild kit since I was unsure what to do so I followed that guy's video and he doesn't seem like an idiot. After I followed the video, the mower fired right up and worked that weekend and I cut my lawn. The leak happened two weeks LATER.

The model of the Toro mower is 20071. Rather than screwing around with float needles and O-rings, I am thinking of just buying this part to replace the whole carburetor. It's an aftermarket part that is only $13 and should require me to simply bolt it on. The other part kits with the seals and needles aren't much less in terms of cost. Any comments on this part?

https://www.ebay.com/itm/CARBURETOR...398090&hash=item3f3e6abc9a:g:84oAAOSwQJhUkvsc

Thanks,
Jim
 

bertsmobile1

Lawn Royalty
Joined
Nov 29, 2014
Threads
64
Messages
24,700
Not trying to be insulting
People rush around like headless chooks looking for magic silver bullets without thinking about what they are doing.
Many people come here having spent a small fortune in replacing perfectly good parts because they did not stop for a minute and have a think.
You are heading strait down that road.
If your mechanical appitude is not up to the job then yes replace the entire carburettor.
However in one breath you say you looked at the needle & seat then decided they were good in the next you say you don't know anything about carbs .
So if you don't know how did you decide the needle was good ?

If you looked at the carburettor it should be obvious there is only one place fuel can come in
There is also only one place where that flow can be stopped.
Thus if the carburettor is leaking the obvious deduction would be that the bit that stops the fuel coming in is not stopping the fuel coming in and the excess is dripping out.

I am not a plumber but if the toilet sistern is overflowing then the bit that stops the water coming in is not doing its job
 

jimzerg

Forum Newbie
Joined
Jun 8, 2020
Threads
1
Messages
5
Fair enough, thanks for the helpful hints. I am just a layman so by "it looked okay" I just meant I did not see damage or corrosion. After reading the posts and looking more into it, I never really inspected the seat where the needle rests and I am pretty sure I sprayed carb cleaner all over that. It may be damaged but I have not taken anything apart since two weeks ago. Given the unknown history and age of this mower, it may be better to get a whole carb for $13 and keep this one for backup parts. I remember the bowl had some corrosion where it touches that oring. I ran ethanol gas and let it sit without stabilizer which I have learned is not a good practice and probably caused my starting issues in the first place. I have started buying ethanol free and use stabilizer now. Thanks again.
 

jimzerg

Forum Newbie
Joined
Jun 8, 2020
Threads
1
Messages
5
The black housing I mentioned earlier that broke off was this part. Appears to have been glued on. Does this piece need to be reattached? It appears it was glued on with liquid nail.
20200608_210857_resize_52.jpg
 

Attachments

  • 20200608_210857_resize_52.jpg
    20200608_210857_resize_52.jpg
    147.1 KB · Views: 0

bertsmobile1

Lawn Royalty
Joined
Nov 29, 2014
Threads
64
Messages
24,700
I don't even bother to look any more they just get replaced.
Yes that cover need to be there or debris will end up tangeled in the belt.
Rivet a pair of L brackets or a butt hinge on the mower
If you use a hinge then glue a magnetic kitchen door latch on the other end
 
Top